In this article I will explain briefly about using HCIBench for storage benchmarking vSphere deployments. I recently had a chance to try HCIBench on a ScaleIO cluster running on a 3 node ESXi 6.0 cluster. Latest version of the tool can be downloaded from here.
I conducted the tests with HCIBench version 1.6.5.1. Installation steps are very straight forward. You can install it on one of the ESXi nodes using "Deploy OVF Template" option.
*Browse and select the template.
*Provide a name and select location.
*Select a resource to host HCIBench.
*Review details and click Next.
*Accept license agreements.
*Select a datastore to store HCIBench files.
*Select networks (as shown below).
Note:
Public network is the network through which you can access management web GUI of HCIBench.
Private network is the network where HCIBench test VMs will be deployed.
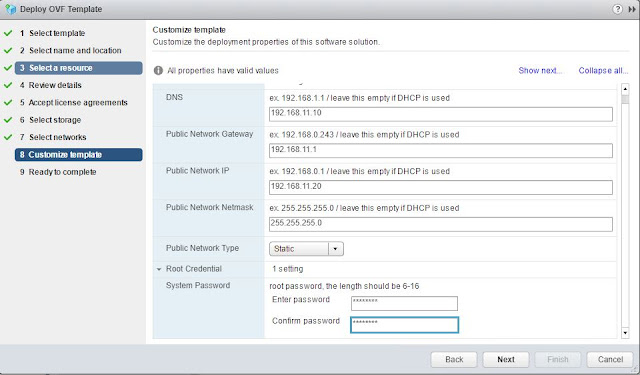
*Provide management IP details (I am using static IP) and root password for HCIBench as shown below.
*Click Next and Finish.
*Once the deployment is complete, you can power on the HCIBench VM.
*Web GUI can be accessed by: <IP address>:8080
*Provide root credentials to access the configuration page.
In the configuration page fill the necessary details as given below.
*vCenter IP.
*vCenter username and password.
*Datacenter name.
*Cluster name.
*Network name (the network on which HCIBench test VMs will be deployed).
Note:
The network on to which HCIBench test VMs will be deployed should have a DHCP server to provide IPs to the test VMs. If you do not have a DHCP server available in that network, select "Set Static IP for Vdbench VMs" as shown below. In this case HCIBench will provide IPs to the test VMs through the private network that you have chosen in the earlier installation step. Here, I don't have a DHCP server in VMNet-SIO network. So I connected eth1 of HCIBench to VMNet-SIO (private network) and checked the option "Set Static IP for Vdbench VMs".
*Provide datastore names.
*Provide ESXi host username and password.
*Total number of VMs.
*Number of data disks per VM.
*Size of each data disk.
Note:
Make sure to keep a ratio between the total number of datastores, number of ESXi nodes and the number of test VMs. Here I have 3 ESXi nodes and 3 datastores in the cluster. So if I deploy 9 VMs for the test, each ESXi node will host 3 test VMs, one on each datastore.
*Give a name for the test.
*Select the test parameters.
*You can use the Generate button to customize the parameters (shown in next screenshot).
*Input parameters as per your requirement and submit.
*If you are doing this the very first time, you will find the below option at the end of the page to upload Vdbench ZIP file. You can upload the file if you have one, or you can download it from the Oracle website using the Download button.
*After providing necessary inputs, you can save the configuration and validate. If the validation passes, you can click on test to begin the benchmarking test.
*Once the test is complete, click on the Result button and it will take you to the directory where result files are stored.
Hope the article was useful to you. Happy benchmarking. Cheers!


