Wednesday, July 8, 2015

Multi-Master Model and FSMO Roles

Consider an enterprise with multiple Domain Controllers (DC). A multi-master enabled database like Windows Active Directory (AD), allows to update changes to any DC in the enterprise. But, in this case there are chances/ possibilities of conflicts which may lead to problems. As AD role is not bound to a single DC, it is referred as a Flexible Single Master Operation (FSMO) role. Currently in Windows there are 5 FSMO roles. These roles prevent conflict operations and are vital for handling the smooth operation of AD as a multi-master system. Out of the 5 FSMO roles, there are 2 forest wide roles per forest and 3 domain wide roles in each domain.

Forest wide roles

-Schema master : controls all updates and modifications to the schema (eg : changes to attributes of an object).

-Domain naming master : responsible while adding or removing a domain  in a forest.


Domain wide roles

-RID master : allocates Relative IDs (RID) to DCs within a domain. When an object is created it will have an SID, which contains a domain SID (same for all SIDs created in the domain) and RID which is unique to the domain.

-PDC emulator : responsible for time sync, password changes etc.

-Infrastructure master : responsible for updating references from objects in its domain to objects in other domains. Infrastructure master role should not be on the same DC that is hosting the Global Catalogue (GC), unless there is only one DC in a domain. If they are on the same server, infrastructure master will not function, it will never find data that is out of date and so will never replicate changes to other DCs in a domain. If all DCs in the domain hosts a GC, then it doesn't matter which DC has the infrastructure master role as all DCs will be up to date due to the GC.


If you want to transfer FSMO roles from one DC to another, you can follow the below steps.

To check current FSMO status
Steps before role transfer
Use ntdsutil to transfer the roles. You have to connect to the server to which you want to transfer the role. Above screenshot explains this whole process.

Transfer roles
Click Yes to transfer the role and then transfer all roles one by one.

FSMO status after role transfer
Now all roles are moved from INVLABSDC02 to INVLABSDC01.


Sunday, May 17, 2015

Port forwarding in Windows

An example of port forwarding is shown below :


C:\Windows\system32>netsh interface portproxy add v4tov4 listenaddress=192.168.18.43 listenport=5555 connectport=80 connectaddress= 192.168.87.142 protocol=tcp

Here, 192.168.18.43 is the IP address of my local computer and 192.168.87.142 is the IP address of a virtual machine running inside my local machine. The above command will port forward all requests coming to 192.168.18.43:5555 to 192.168.87.142. 

Sunday, May 10, 2015

Spinning up an OpenStack cloud instance using TryStack

TryStack is a free way to try OpenStack. Its an OpenStack sandbox. That means TryStack is a testing environment only. You cannot use it for setting up your production servers. You can get a free account in TryStack by joining their Facebook group. As this is a testing facility there are several limitations in it. The server instances that you launch inside TryStack will be available for 24 hours only. You cannot upload your own server images to it, you can only select the available images in it.  


After joining their Facebook group, you can start using TryStack with your Facebook login.


Once you login successfully, you will be able to view the OpenStack dashboard as shown below.


You will be able to create maximum of 3 instances, 6 VCPUs, 12 GB of RAM, 4 Floating IPs etc.

Before creating your first cloud VM, you need to do some initial configurations like creating a network, adding a router, defining security group etc. This is explained below.

Creating a network :


Click on create network tab, and enter a name, click next. 


Enter network address with a subnet mask and gateway IP. Click next.


Enter the following details as shown below and click create.


A new network (192.168.10.0/24) named private is now created.


Now there should be a router to enable communication between your internal and external network. So click on create router tab. Enter a router name and click create router. 


A router will be now created as shown below. Mouse over the router and you will get options to add an interface.


Click on add interface, select the private network that you have created earlier from the drop down menu and enter the details as shown below and click add interface button.


Now the router is connected to your private network through the interface 192.168.10.1


Next step is to connect the router to external network. Select the routers tab from the left hand side menu.


Click set gateway button, select external network and click set gateway.


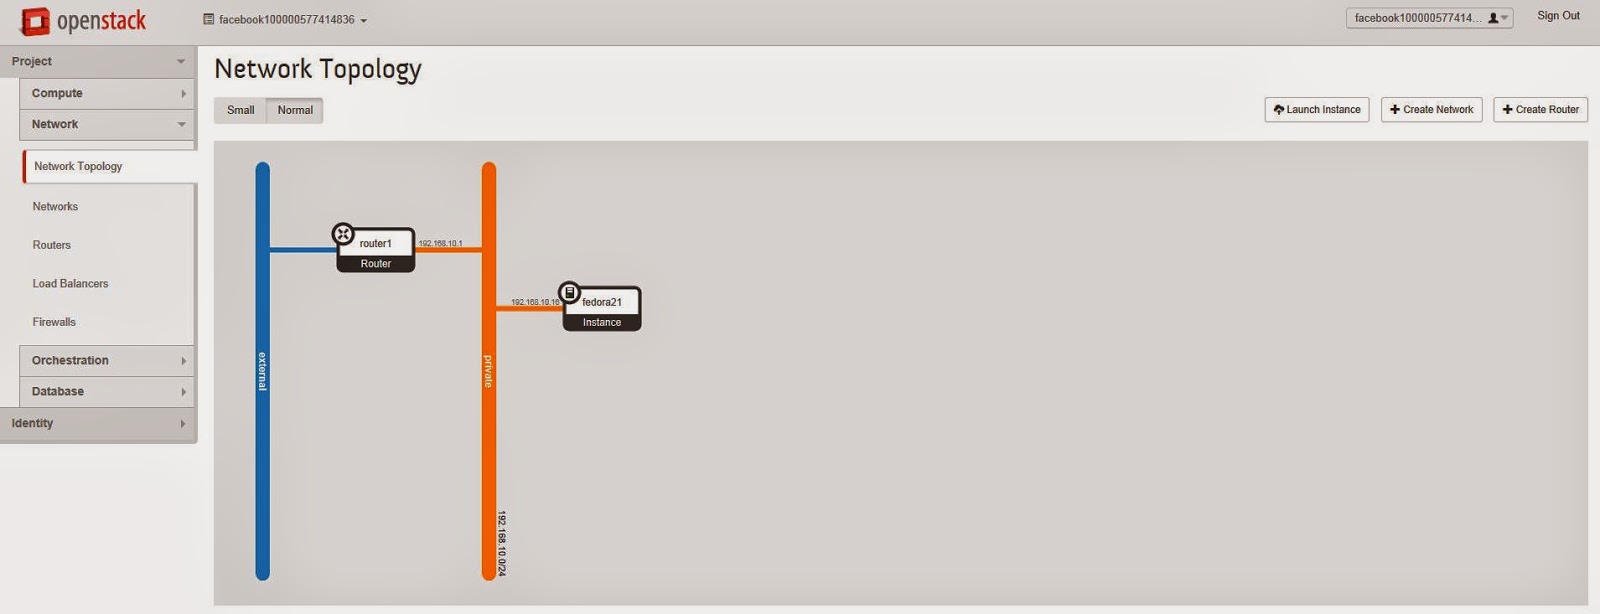
Now, check your network topology and you can see that the internal and external network is connected with the router.


Next step is creating a security group and defining rules. Select access & security from the left hand side menu and then click on create security group.


Enter a name and description and click create.


Now, click manage rules tab of security group that you have just created (securitygroup1). If there is any rule which is already present, select all and delete them. Click add rule. You will get a window as shown below to add your custom rules.


The above rule just allows ingress HTTP traffic. Similarly we have to allow ingress as well as egress traffic for HTTP, HTTPS, SSH and ICMP. Once all the rules are added, it will look like the below screenshot.


Next you have to create a key pair.


Click on import key pair. Here I am using Putty key generator to generate the keys. Click generate button and a key pair will be generated. Save the private key locally in your machine. It will be a .ppk file. As shown in the below screenshot, copy the public key from Putty key generator and paste it in public key text field. Give a key pair name too.  


Click import key pair and it will be generated as shown below.


Next step is allocating floating IPs. 


Click allocate IP to project.


Click allocate IP and now a floating IP will be allocated.


Now you are all set to create your first instance. Select instances tab and then click launch instance.


Do not click launch now. Click on the next tab (access & security).


Select the key pair and security group that we have created earlier. Click launch. You have just created your first instance.


From the above screenshot, you can see that the VM has an internal IP address. Inorder to access this VM from public, you have to associate it with a floating IP. Follow the below screenshot.


Click associate floating IP.


Select IP address from the drop down menu and click associate. Now you can see that the floating IP is mapped to the private IP of the VM.


Status of your instance and network topology is shown below.


You can PING to your cloud instance.


You can SSH into your VM using Putty. Enter IP address of the VM.


Under connections tab, select data and enter username as fedora. This is the default user name for fedora21 cloud image.


Browse and select the private key file that you have saved locally in your machine and click open.


You are now successfully connected to your OpenStack cloud instance through SSH.


Final overview from your OpenStack dashboard is also shown below.


Thank you and all the best in creating your first OpenStack cloud instance. Cheers!

Sunday, April 26, 2015

OpenStack

  • OpenStack is an open source cloud operating system
  • It can be used to control large pools of compute, storage and networking resources throughout a datacentre, all managed through a dashboard that gives administrators control while permitting their users to provision resources through a web interface
  • It provides IAAS - Infrastructure-As-A-Service
  • OpenStack is a software platform that can be used to convert your traditional private datacentre to a private cloud
  • There are several components of OpenStack : Compute, Storage, Networking, Dashboard and Shared services
  • A conceptual relationship diagram of these components is shown below :


Reference :
www.openstack.org
 

VM Resource Metering


'VM Resource Metering' is a feature in Windows Server 2012 R2, which will help us to keep track of the resources consumed by virtual machines. By default this feature is disabled.

You can enable metering for a particular VM using the PowerShell command : Get-VM <virtual machine name> |  Enable-VMResourceMetering

If you want to enable it for all VMs, you can use : Get-VM | Enable-VMResourceMetering

You can view the resource usage list of all virtual machines using : Get_VM | Measure-VM

You can sort the list using : Get_VM | Measure-VM |sort AvgRAM –descending

Thursday, April 2, 2015

Cloud

Cloud computing or simply cloud refers to the delivery of computing resources on demand, which includes mostly everything from applications to data centers over the internet on a pay-for-use basis. It can be private cloud, public cloud or hybrid cloud. A private cloud is owned and operated by a specific enterprise where as in a public cloud like Amazon AWS or Microsoft Azure, any one can create an account and build up their virtual infrastructure following the rules and regulations of the cloud service provider. A hybrid cloud is nothing but a combination of private and public cloud, where enterprises have most of their infrastructure running on a private cloud and a part of their infrastructure is running on the public cloud. Cloud offers SAAS (Software-As-A-Service), PAAS (Platform-As-A-Service) and IAAS (Infrastructure-As-A-Service).

Considering the public cloud, high performance tier 4 data centers are the basic building blocks or foundation of the cloud infrastructure. Several virtualized data center clusters which are geographically distributed across the globe and interconnected by multiple high speed and redundant communication links that are backed up by multiple power sources and disaster recovery (DR) plans forms the backbone of public cloud architecture. It mainly provides IAAS (Infrastructure-As-A-Service) platform that manages and orchestrates pools of storage, network and compute resources. You can setup an on-demand elastic cloud computing service. It allows end users to provision resources. They are massively scalable infrastructure. Everything is virtualized. Internally, a pool of virtual appliances support the operation and configuration of the cloud itself. It will be having a GUI, web interface for provisioning resources and managing the cloud infrastructure. It will also have high availability and metering of resource usage.

You can setup your own private cloud using open source cloud platforms like Open Stack, Apache Cloud Stack etc.

How to restore services if your Hyper-V host is not booting up : Incident management

How to restore services if your Hyper-V host goes down all of a sudden. It can be something like, the server is not booting up after a reboot, showing that operating system not found. This can be due to many reasons. But, you have to find a work around to fix this and to restore the services which were running before. There may be a few VMs running on that host and you have to find a solution to bring those VMs up and running.
 
If you don't have much time to troubleshoot and fix this, the best possible option is to copy those VM files to another Hyper-V host (if you have another Hyper-V hosts running with enough resources). In this case, you can try using a Linux live CD/ DVD (say CentOS or Ubuntu), to boot from the CD/ DVD. Once it boots up, you can see your drives and VM files, copy it to another Hyper-V host. Once copying is done, you can import the VMs using Hyper-V manager and power it on.