Saturday, November 28, 2015

Shared Nothing Live Migration

Shared Nothing Live Migration is a Hyper-V 3.0 feature that help us live migrate virtual machines from one Hyper-V server to another without a shared storage and cluster membership.
 
Note : Failover clustering provides HA, but shared nothing live migration is a mobility solution that gives flexibility in a planned movement of VMs between Hyper-V hosts without downtime.

Hyper-V settings for Live migrations 

As a prerequisite for this, we need to standardize network connectivity on Hyper-V host machines (eg : vSwitches should have same names for VM traffic, iSCSI traffic etc). And for this shared nothing Live Migration traffic we can use a separate VLAN (say, VLAN 90) so that it won’t affect local LAN.

Separate VLAN for live migration traffic


Also we need to configure constrained delegation on Hyper-V servers to use Kerberos authentication protocol when managing the servers remotely. This is shown below.

Use Kerberos

Delegation to specified services


Best practice recommendations for iSCSI network adapters

Best practice recommendations for iSCSI network adapters


Note : all those settings are enabled by default, we need to disable it as best practice on all iSCSI NICs

Also, if your network/ network devices supports jumbo frames, then that should be enabled too on the network adapters.


Recommended BIOS settings for DELL PowerEdge 12G servers

BIOS settings for optimal performance

Memory mode : Optimizer
Node interleave : Disabled
Logical processor : Enabled
QPI frequency : Maximum frequency
CPU power management : Maximum performance
Turbo boost : Enabled
C1E : Disabled
C-states : Disabled
Memory frequency : Maximum performance

Thursday, November 5, 2015

RAID configuration using PERC

PERC stands for PowerEdge Raid Controller. Here we have 3 physical disks present. We will be configuring 2 virtual disks (VD) of RAID 5 using these 3 physical disks.

VD00 - 100 GB
VD01 - 1.7 TB

Once the system starts press Ctrl+R to enter PERC configuration utility and follow the steps as shown below.

No configuration present and 3 disks available

Press F2 and create new VD

VD00 properties

Click OK

VD00 - 100 GB created

Press F2 and add new VD

VD01 properties

VD00 and VD01 created

 Now we have successfully created 2 VDs. Next step is to initialize both VDs.

Initialization of VD00

Start Init

Click OK

Initialization VD00 in progress

Similarly initialize the next VD too. Once its completed you can exit from the PERC utility and reboot the machine.

Saturday, October 24, 2015

Enabling jumbo frame on Hyper-V 2012 R2 Core NIC using powershell

Enabling jumbo frame on a NIC using powershell is shown below :

Enabling jumbo frames using powershell


To list advanced properties of NIC3 : Get-NetAdapterAdvancedProperty -Name "NIC3"

To change jumbo mtu to 9000 : Get-NetAdapterAdvancedProperty -Name "NIC3" -RegistryKeyword "*jumbopacket" | Set-NetAdapterAdvancedProperty -RegistryValue 9000


Jumbo frames

Jumbo frames are Ethernet frames with more than 1500 bytes of payload. Generally, jumbo frames can carry up to 9000 bytes, but variations do exist. Enabling jumbo frames in specific cases (say, in your Storage Area Network) can improve performance and network throughput. But, if you are enabling it, all devices connecting it including the source, destination and other devices in between like switches etc must support jumbo frames and should be enabled.

Enabling jumbo frames on a VMware virtual network adapter (vmxnet3) is shown below :

Jumbo Packet on vmxnet3 adapter
Steps to enable jumbo frames on a VMware vSphere 4.1 vSwitch is shown below :

List vSwitch
 By default it is 1500 MTU. Say, you want to change vSwitch1 to 9000 MTU. It can be done as follows :

Enabling jumbo frame with MTU 9000 on vSwitch1
You can verify connectivity after enabling jumbo frames by specifying packet size using ping command as given below :

Verifying jumbo frames


Creating VHD/ VHDX templates

Templates can save you lot of time, instead of building a server from scratch. Following are the steps to create a VHD/ VHDX template that can be used on Hyper-V servers.

1.Create a virtual machine (say Windows Server 2008 R2 with 80 GB hard drive)
2.Make sure you create fixed disk
3.Install OS
4.Install Windows updates
5.Install Hyper-V integration services
6.Install any applications as per your requirement

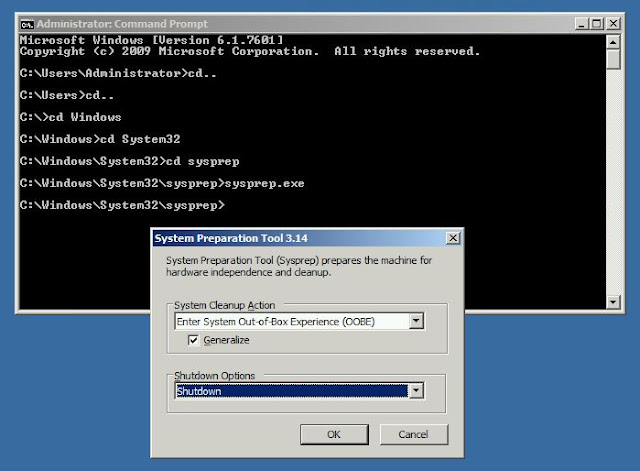
Once you are done with all the above steps, now its time to sysprep your machine. This is shown below :

sysprep

Make sure you check Generalize and shutdown options. Once the system completes sysprep operation, it will automatically shutdown. You can now take a copy of this VHD disk, rename it as you wish and save it to a location where you keep your templates. Also, make sure to make this file as read-only, so that you can avoid booting it up accidentally.

Note : You can create VHD templates for OS earlier than Windows Server 2012 and VHDX templates for Windows Server 2012 and later.