Showing posts with label performance. Show all posts

Friday, September 6, 2024

Revisiting Storage Performance Benchmarking

Few years ago, I had the opportunity to explore the intricacies of storage performance benchmarking using tools like FIO, DISKSPD, and Iometer. Those studies provided valuable insights into the performance characteristics of various storage solutions, shaping my understanding and approach to storage performance analysis. As I prepare for an upcoming project in this domain, I find it essential to revisit my previous work, reflect on the lessons learned, and share my experiences. This blog post aims to provide a comprehensive overview of my benchmarking journey and the evolving landscape of storage performance studies.


Recent advancements 

The field of storage technology has seen significant advancements in recent years. The rise of NVMe and storage-class memory technologies has also redefined high-end storage performance, offering unprecedented speed and efficiency. These advancements highlight the dynamic nature of storage performance benchmarking and underscore the importance of staying updated with the latest tools and methodologies.

Challenges

Benchmarking storage performance is not without its challenges. One of the primary difficulties is ensuring a consistent and controlled testing environment, as variations in hardware, software, and network conditions can significantly impact results. Another challenge is the selection of appropriate benchmarks that accurately reflect real-world workloads, which requires a deep understanding of the specific use cases and performance metrics. Additionally, interpreting the results can be complex, as it involves analyzing multiple metrics such as IOPS, throughput, and latency, and understanding their interplay. These challenges necessitate meticulous planning and a thorough understanding of both the benchmarking tools and the storage systems being tested.

Prior works

Following are some of the articles on storage benchmarking that I’ve published in the past:

Custom storage benchmarking framework

While there are numerous storage benchmarking tools available, such as VMFleet and HCIBench, I wanted to highlight a custom framework I developed a few years ago. Here are some reasons why we created this custom tool:

  • Great learning experience: It provided valuable insights into how things work.
  • Customization: Being a custom framework, it allows you to add or remove features as needed.
  • Flexibility: You can modify multiple parameters to suit your requirements.
  • Custom test profiles: You can create tailored storage test profiles.
  • No IP assignment needed: There’s no need for IP assignment or DHCP for the stress test VMs.
  • Centralized log collection: It offers centralized log collection for detailed analysis.


You can access the scripts and readme on my GitHub repository:

https://github.com/vineethac/vsan_cluster_storage_benchmarking_with_diskspd


Here is an overview.

  • Profile Manifest: All storage test profiles are listed in profile_manifest.psd1. You can define as many profiles as you want.
  • VM Template: A Windows VM template should be present in the vCenter server.
  • Benchmarking Manifest: Details of vCenter, cluster name, VM template, number of stress test VMs per host, etc., are provided in benchmarking_manifest.psd1.
  • Deploy Test VMs: deploy_test_vms.ps1 will deploy all the test VMs with pre-configured parameters.
  • Start Stress Test: start_stress_test.ps1 will initiate the storage stress test process for all the profiles mentioned in profile_manifest.psd1 one by one.
  • Log Collection: All log files will be automatically copied to a central location on the host from where these scripts are running.
  • Cleanup: Use delete_test_vms.ps1 to clean up the stress test VMs from the cluster.


Note:
 These scripts were created about five years ago, and I haven’t had the opportunity to refactor them according to current best practices and new PowerShell scripting standards. I plan to enhance them in the coming months!

This overview should provide you with a clear understanding of the overall process and workflow involved in the storage benchmarking process. I hope it was useful. Cheers!

Sunday, January 30, 2022

vSphere with Tanzu using NSX-T - Part14 - Testing TKC storage using kubestr

In the previous posts we discussed the following:

This article is about using kubestr to test storage options of Tanzu Kubernetes Cluster (TKC). Following are the steps to install kubestr on MAC:

  • wget https://github.com/kastenhq/kubestr/releases/download/v0.4.31/kubestr_0.4.31_MacOS_amd64.tar.gz
  • tar -xvf kubestr_0.4.31_MacOS_amd64.tar.gz 
  • chmod +x kubestr
  • mv kubestr /usr/local/bin


Now, lets do kubestr help.

% kubestr help
kubestr is a tool that will scan your k8s cluster
        and validate that the storage systems in place as well as run
        performance tests.

Usage:
  kubestr [flags]
  kubestr [command]

Available Commands:
  browse      Browse the contents of a CSI PVC via file browser
  csicheck    Runs the CSI snapshot restore check
  fio         Runs an fio test
  help        Help about any command

Flags:
  -h, --help             help for kubestr
  -e, --outfile string   The file where test results will be written
  -o, --output string    Options(json)

Use "kubestr [command] --help" for more information about a command.


I am going to use the following TKC for testing.

% KUBECONFIG=gc.kubeconfig kubectl get nodes                                            
NAME                               STATUS   ROLES                  AGE    VERSION
gc-control-plane-pwngg             Ready    control-plane,master   103d   v1.20.9+vmware.1
gc-workers-wrknn-f675446b6-cz766   Ready    <none>                 103d   v1.20.9+vmware.1
gc-workers-wrknn-f675446b6-f6zqs   Ready    <none>                 103d   v1.20.9+vmware.1
gc-workers-wrknn-f675446b6-rsf6n   Ready    <none>                 103d   v1.20.9+vmware.1


Let's run kubestr against the cluster now.

% KUBECONFIG=gc.kubeconfig kubestr                                      

**************************************
  _  ___   _ ___ ___ ___ _____ ___
  | |/ / | | | _ ) __/ __|_   _| _ \
  | ' <| |_| | _ \ _|\__ \ | | |   /
  |_|\_\\___/|___/___|___/ |_| |_|_\

Explore your Kubernetes storage options
**************************************
Kubernetes Version Check:
  Valid kubernetes version (v1.20.9+vmware.1)  -  OK

RBAC Check:
  Kubernetes RBAC is enabled  -  OK

Aggregated Layer Check:
  The Kubernetes Aggregated Layer is enabled  -  OK

W0130 14:17:16.937556   87541 warnings.go:70] storage.k8s.io/v1beta1 CSIDriver is deprecated in v1.19+, unavailable in v1.22+; use storage.k8s.io/v1 CSIDriver
Available Storage Provisioners:

  csi.vsphere.xxxx.com:
    Can't find the CSI snapshot group api version.
    This is a CSI driver!
    (The following info may not be up to date. Please check with the provider for more information.)
    Provider:            vSphere
    Website:             https://github.com/kubernetes-sigs/vsphere-csi-driver
    Description:         A Container Storage Interface (CSI) Driver for VMware vSphere
    Additional Features: Raw Block,<br/><br/>Expansion (Block Volume),<br/><br/>Topology Aware (Block Volume)

    Storage Classes:
      * sc2-01-vc16c01-wcp-mgmt

    To perform a FIO test, run-
      ./kubestr fio -s <storage class>


You can run storage tests using kubestr and it uses FIO for generating IOs. For example this is how you can run a basic storage test.

% KUBECONFIG=gc.kubeconfig kubestr fio -s sc2-01-vc16c01-wcp-mgmt -z 10G
PVC created kubestr-fio-pvc-zvdhr
Pod created kubestr-fio-pod-kdbs5
Running FIO test (default-fio) on StorageClass (sc2-01-vc16c01-wcp-mgmt) with a PVC of Size (10G)
Elapsed time- 29.290421119s
FIO test results:
 
FIO version - fio-3.20
Global options - ioengine=libaio verify=0 direct=1 gtod_reduce=1

JobName: read_iops
  blocksize=4K filesize=2G iodepth=64 rw=randread
read:
  IOPS=3987.150391 BW(KiB/s)=15965
  iops: min=3680 max=4274 avg=3992.034424
  bw(KiB/s): min=14720 max=17096 avg=15968.827148

JobName: write_iops
  blocksize=4K filesize=2G iodepth=64 rw=randwrite
write:
  IOPS=3562.628906 BW(KiB/s)=14267
  iops: min=3237 max=3750 avg=3565.896484
  bw(KiB/s): min=12950 max=15000 avg=14264.862305

JobName: read_bw
  blocksize=128K filesize=2G iodepth=64 rw=randread
read:
  IOPS=2988.549316 BW(KiB/s)=383071
  iops: min=2756 max=3252 avg=2992.344727
  bw(KiB/s): min=352830 max=416256 avg=383056.187500

JobName: write_bw
  blocksize=128k filesize=2G iodepth=64 rw=randwrite
write:
  IOPS=2754.796143 BW(KiB/s)=353151
  iops: min=2480 max=2992 avg=2759.586182
  bw(KiB/s): min=317440 max=382976 avg=353242.781250

Disk stats (read/write):
  sdd: ios=117160/105647 merge=0/1210 ticks=2100090/2039676 in_queue=4139076, util=99.608589%
  -  OK

As you can see, a PVC of 10G, a FIO pod will be created, and this will be used for the FIO test. Once the test is complete, the PVC and FIO pod will be deleted automatically. 

I hope it was useful. Cheers!


Saturday, January 23, 2021

Benchmarking Kubernetes infrastructure using K-Bench

K-Bench is a framework to benchmark the control and data plane aspects of a Kubernetes cluster. More details are available at https://github.com/vmware-tanzu/k-bench. In my case, I am going to conduct this benchmarking study on a Tanzu Kubernetes cluster which is provisioned using Tanzu Kubernetes Grid service on a vSphere 7 U1 cluster.

Step 1: Clone the K-Bench repo

git clone https://github.com/vmware-tanzu/k-bench.git


Step 2: Install

./install.sh


Once the installation is done it will say, "Completed k-bench installation.".

Step 3: Run the benchmark

./run.sh


If you don't specify any test, then it is going to conduct the default set of tests. All sets of tests are defined under the config directory. If you browse to the config directory and list, there are separate folders specific to each test. You can see folders starting with cp and dp, and it refers to control plane and data plane related tests.


If no specific test is mentioned, then it is going to run all that is defined in the default directory. You can also see details of the test and results in the logs. The directories starting with "results" will have log files corresponding to each test run.


Following is a sample log that shows a summary of pod creation throughput, pod creation average latency, pod startup total latency, list/ update/ delete pod latency, etc.


Now, if you want to run a specific test case, you can do it as follows:
Usage: ./run.sh -r <run-tag> [-t <comma-separated-tests> -o <output-dir>]
DP network internode test

For example, you can run a data plane test to check the network performance between two nodes as shown below.

./run.sh -r "kbench-run-on-tkg-cluster-02"  -t "dp_network_internode" -o "./"


As soon as you run the above command, two pods will be created inside "kbench-pod-namespace" on two worker nodes as you see below.


It will then start "iperf3" process inside those two pods to create a network load following a client-server model as per the actions defined in the config.json file.


Sample logs are given below. It shows details like the amount of data transferred, transfer rate, network latency, etc.


Once the test run is complete, the pods and other resources created will be automatically deleted. Similarly, you can select the other set of tests that are pre-defined in the framework. I believe you have the flexibility to define custom test cases too as per your requirements. I hope it was useful. Cheers!

Related posts


Storage performance benchmarking of Tanzu Kubernetes clusters
Monitoring Tanzu Kubernetes cluster using Prometheus and Grafana


References


Saturday, November 28, 2020

Storage performance benchmarking of Tanzu Kubernetes Clusters

Benchmarking of IT infrastructure is standard practice and is usually done before putting it into a production environment. It gives you baseline values about different performance aspects of the system/ solution under test. These benchmarking principles are applicable for Kubernetes clusters too. But the test cases and evaluation criteria may slightly vary compared to benchmarking a traditional IT infrastructure. 

Following are some of the test considerations:

  • Performance of PVCs.
    • Time to provision PVCs.
    • Read/ Write IOPS and Latency of PVCs.
  • Pod startup latency.
  • The time consumed to complete the deployment of different K8s objects.
    • Statefulset
    • Deployment etc.
  • Performance behavior of sample application workloads.
  • Network performance and connectivity between different K8s nodes.

In this article, I will explain a quick and easy way to benchmark the storage system used by the Kubernetes cluster to provision PVCs for application workloads. I am using FIO to generate storage IOs. You can use the following YAML file to deploy FIO pods as a statefulset. Note that here I am using PowerFlex VVOL datastore as Cloud Native Storage (CNS) for Tanzu K8s clusters and so the storage class "powerflex-storage-policy". This may differ in your case, and you might need to modify it to match the storage class available in your setup.


This YAML file will deploy a statefulset with 15 FIO pods (as per the number of replicas mentioned) and will start the storage IO stress test (8k block size, 70% random reads, 30% random writes, 2 jobs, 16 iodepth) on the attached PVC as and when the pod is started. Total 15 PVCs will be created in this case, and one PVC will get attached to one FIO pod. 

Note: If you get an error "forbidden: unable to validate against any pod security policy" after applying the above statefulset, then the pods will not get created. You will need to first create and apply Pod Security Policy (PSP) to the Tanzu Kubernetes Cluster.


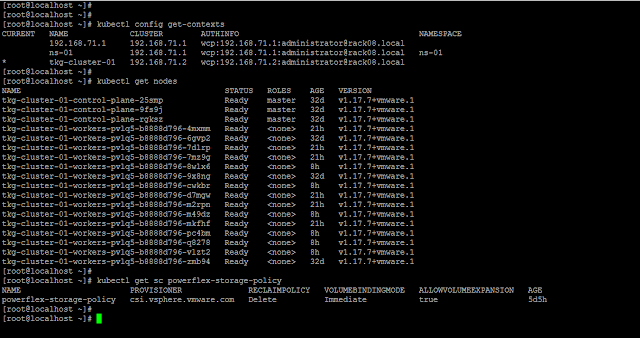
Following is an overview of my vSphere with Tanzu setup:

Tanzu K8s control plane nodes/ master VMs: 3
Tanzu K8s worker nodes/ VMs: 15


Contexts, Tanzu K8s cluster nodes, and storage class.


Create a statefulset using the above YAML file.
kubectl apply -f https://gist.githubusercontent.com/vineethac/7c9f6ce2b72868b8832a4404b79ebba2/raw/980f9d6c24c10b1b7b39b20d80c15a9f2ee6c4f1/fio_ss.yaml -n <namespace name>


You can see that it took roughly 6 minutes to deploy 15 FIO pods and corresponding PVCs. The time may vary depending on whether the FIO image is locally available on the nodes, available resources on the nodes, etc.  


As and when each pod is created, FIO will automatically start IO stress on it. IOs will be read/ written into the attached PVCs. As I mentioned earlier, I am using a storage class "powerflex-storage-policy" and this is associated with a VVOL datastore backed by a PowerFlex storage pool. In this case, all the PVCs are created in a PowerFlex VVOL datastore.


You can also see multiple volumes in the PowerFlex UI and all those volume names starting with "vasa" are externally managed by the PowerFlex VASA provider. The performance of each volume can be also be monitored using the PowerFlex UI.


If you would like to see the historical performance data, you can use vROps. Dell EMC has recently released a vROps management pack for PowerFlex systems. It is a monitoring and alerting solution that provides extensive visibility into the PowerFlex infrastructure. For monitoring K8s clusters and resources, you can use the vROps management pack for container monitoring


Note: When the duration mentioned in the FIO test is over, the pods will get restarted and the IO stress will also start. To modify the FIO parameters you can use kubectl edit statefulset fiopod-statefulset-multipod -n fiogit modify required parameters and save it. After saving it the new changes will get applied automatically. Once you are done with the testing, you can delete the statefulset and the corresponding PVCs using kubectl delete command. This method is useful when you want to test something quickly or if you have only less test profiles. If you have many test profiles with varying block sizes, iodepth, etc, then you will need to build a small script or something to automate the process. 

Hope it was useful. Cheers!


Related articles


References


Sunday, November 8, 2020

Dell EMC PowerFlex MP for vROps 8.x - Part4 - Resource kinds and relationships

In this post, we will take a look at the different resource kinds that are part of the Dell EMC PowerFlex Management Pack. Following is a very high-level logical representation of the PowerFlex Adapter resource kinds and their relationships:


Go to Environment - All objects - PowerFlex Adapter


You can also get a PowerFlex system level view in vROps using the PowerFlex rack/ appliance system resource kind. This system view is making use of the system name field that we provided while configuring each PowerFlex Adapter instance type. The system name is used to group all the logical components of one PowerFlex system. 


This view provides end-to-end visibility of the PowerFlex infrastructure components that will be useful to understand the relationship between different layers of the stack. This will be also helpful to identify and troubleshoot in case of issues.

Hope it was useful. Cheers!

Related posts


Part1 - Install
Part2 - Configure
Part3 - Dashboards


Wednesday, November 4, 2020

Dell EMC PowerFlex MP for vROps 8.x - Part3 - Dashboards

We have covered the installation and configuration of the PowerFlex Management Pack in the previous posts. In this post, we will have a look at the different dashboards that are part of the MP. Following are the 13 dashboards you will get after installing the MP:

Overview
  • PowerFlex System Overview
PowerFlex Manager
  • PowerFlex Manager Details
Management Controller 
  • PowerFlex Management Controller
Compute
  • PowerFlex ESXi Cluster Usage
  • PowerFlex ESXi Host Usage
  • PowerFlex SVM Utilization
Networking
  • PowerFlex Networking Environment
  • PowerFlex Networking Performance
Storage
  • PowerFlex Summary
  • PowerFlex Details
  • PowerFlex Replication Details
Server Hardware
  • PowerFlex Node Summary
  • PowerFlex Node Details

Now, let's have a quick look at some of these dashboards and their functionality.

PowerFlex Node Summary


This dashboard shows the health of all PowerFlex nodes being monitored by the MP. You can see the classification of nodes as Compute Only, Storage Only, Hyperconverged, and Management Controller along with a relationship between a node and its corresponding hardware components.


PowerFlex Summary


This dashboard shows the health status of all the logical components of the PowerFlex storage system. It also has a parent-child relationship between different objects of the storage system. You can also see widgets for capacity usage trend forecasting, alerts, top storage pools by capacity usage, top volumes by size, etc.


PowerFlex Details


This dashboard shows all PowerFlex storage performance KPIs like IOPS, Bandwidth, Latency, etc.


PowerFlex Networking Environment


You can see the health status of Cisco networking components and the relationship between network interfaces, nodes, switch ports, VLANs, port-channels, etc.


PowerFlex Networking Performance


This dashboard shows the switch and switch port KPIs like Throughout, Errors, Packet discards, etc.


PowerFlex Manager


You can see the service deployment details like service health, RCM compliance status, deployment status, etc. in this dashboard.


Hope it was useful. Cheers!

References


Monday, November 2, 2020

Dell EMC PowerFlex MP for vROps 8.x - Part2 - Configure

In this post, I will explain how to configure the PowerFlex Management Pack for vROps


Before getting into the configuration, I would like to provide a high-level view of my lab setup. I have two separate PowerFlex rack systems that I will be monitoring using the management pack. The two systems are named RAMS and VIKINGS and have the following components.


The PowerFlex Management Pack supports the following 4 instance types:
  • PowerFlex Networking - queries and collects networking details from Cisco switches
  • PowerFlex Gateway - queries and collects storage details from PowerFlex Gateway
  • PowerFlex Nodes - queries and collects server hardware health details from iDRACs
  • PowerFlex Manager - queries and collects service deployment details from PowerFlex Manager

Note: The default collection interval for all PowerFlex Adapter instance types is set to 5 minutes.

I have already configured the controller VCSA and customer VCSA of both (RAMS and VIKINGS) clusters as shown below. This makes use of the native vSphere Adapter and vSAN Adapter present in vROps.


Note: The PowerFlex MP is already installed in vROps. Please see the previous post on how to install it.

Now we can start adding required accounts for the PowerFlex Adapter to connect to the different REST endpoints.

PowerFlex Networking


Click add account.


Select the PowerFlex Adapter.


Let's configure the account for monitoring Cisco TOR switches of the RAMS cluster.

Provide the following details:

  • Name
  • Management IP address of Cisco TOR switches

Select the instance type as "PowerFlex Networking" and provide a system name. 
In this case, these TOR switches are part of RAMS. So I have given the system name as RAMS.


Add a new credential. Select the credential kind as "PowerFlex Networking Adapter Credentials". 
Provide a credential name, username and password. Click OK.


Click VALIDATE CONNECTION.


If everything is fine, you will get a test connection successful message. Click OK.


Click ADD to save the account. You will see the account we just created under the other accounts page.
Initially, the status will be warning but it will turn to OK in few seconds.


Note: In the product guide it is recommended to configure not more than 40 Cisco switches in one PowerFlex Networking instance. So, if you have 80 switches in your PowerFlex system, you will need to configure 2 PowerFlex Networking instances where each instance will connect/ query/ collect details from 40 switches.

PowerFlex Gateway


PowerFlex Nodes


Make sure to provide the PowerFlex Management Controller vCenter details in the advanced settings. If you have configured the native adapter with vCenter IP address, then you have to provide the IP address in the advanced settings. In this case, I have configured the native adapter with the vCenter hostname/ FQDN, so in the advanced settings, I have provided the same FQDN. This field will be used to identify and classify the PowerFlex Management Controller nodes.

Note: In the product guide it is recommended to configure 30 iDRACs or less in one PowerFlex Node instance. So, if you have 120 nodes in your PowerFlex system, you will need to configure 4 PowerFlex Node instances where each instance will connect/ query/ collect details from 30 iDRACs.

PowerFlex Manager


Note: While adding the credentials for the PowerFlex Manager, it is mandatory to provide the PowerFlex Manager Domain Name. VXFMLOCAL is the domain name for the default admin user.

Verify the status of all accounts.


Now we have finished creating all the required accounts to monitor the RAMS system. Similarly, you can add multiple PowerFlex systems and monitor them using the management pack. In my case, I have one more PowerFlex system named VIKINGS and I have added all the required accounts as given in the following screenshot. As you can see below, for the VIKINGS system I have configured seperate instances for CO, SO, and Controller nodes. This is because the iDRAC credentials for CO, SO, and Controller nodes are different. 


In the dashboards section, you can see all the 13 dashboards. Depending on the number of components/ size of the PowerFlex system, it may take 15-20 minutes for the data to get populated in the respective dashboards. 


In the next part, we will go through the different dashboards and other capabilities of the management pack. Hope it was useful. Cheers!

References

Friday, October 30, 2020

Dell EMC PowerFlex MP for vROps 8.x - Part1 - Install

Dell EMC has recently released a vROps management pack for PowerFlex. It is a monitoring and alerting solution that provides extensive visibility into PowerFlex systems using vROps. The management pack collects key metrics for PowerFlex storage, networking, compute, and server hardware and ingests into vROps. The solution is available to all PowerFlex rack and appliance customers free of cost. This brings additional value to the IT operations and life cycle management functionality delivered by PowerFlex Manager.

Now, let's start with installation of the management pack. The steps are same for vROps 8.0, 8.1, and 8.2.

Administration - Solutions - Repository - Add/ Upgrade

Browse and select the PAK file and click upload.


Click next.


Accept the EULA and click next.


Click finish.


The management pack is now installed and it will be listed in the repository.


Verify the contents of the management pack by selecting view content.


Verify the 13 dashboards.
Note: If any of the dashboards are missing, then try to reinstall the management pack.


In the next part, we will go through the adapter instance configurations. Hope it was useful. Cheers!

Related posts


Part2 - Configure
Part3 - Dashboards
Part4 - Resource kinds and relationships


References