VMware ESXi hosts use Non-Uniform Memory Access (NUMA) architecture to optimize CPU and memory locality. Each NUMA node consists of a subset of CPUs and memory. Accessing local memory within the same NUMA node is significantly faster than remote memory access. Misaligned NUMA configurations can lead to latency spikes, increased CPU Ready Time, and degraded VM performance.

Key symptoms
The common symptoms for Virtual Machines (VMs) on ESXi that have a misconfigured or misaligned Non-Uniform Memory Access (NUMA) configuration primarily manifest as performance degradation and latency. The main issue caused by NUMA misalignment is that the VM's vCPUs end up frequently having to access memory that belongs to a different physical NUMA node on the ESXi host (known as Remote Access), which is significantly slower than accessing local memory.
The resulting symptoms for the VM include:
- Overall Slowness and Unresponsiveness: Services and applications running inside the guest OS may respond slowly or intermittently. The entire VM can feel sluggish.
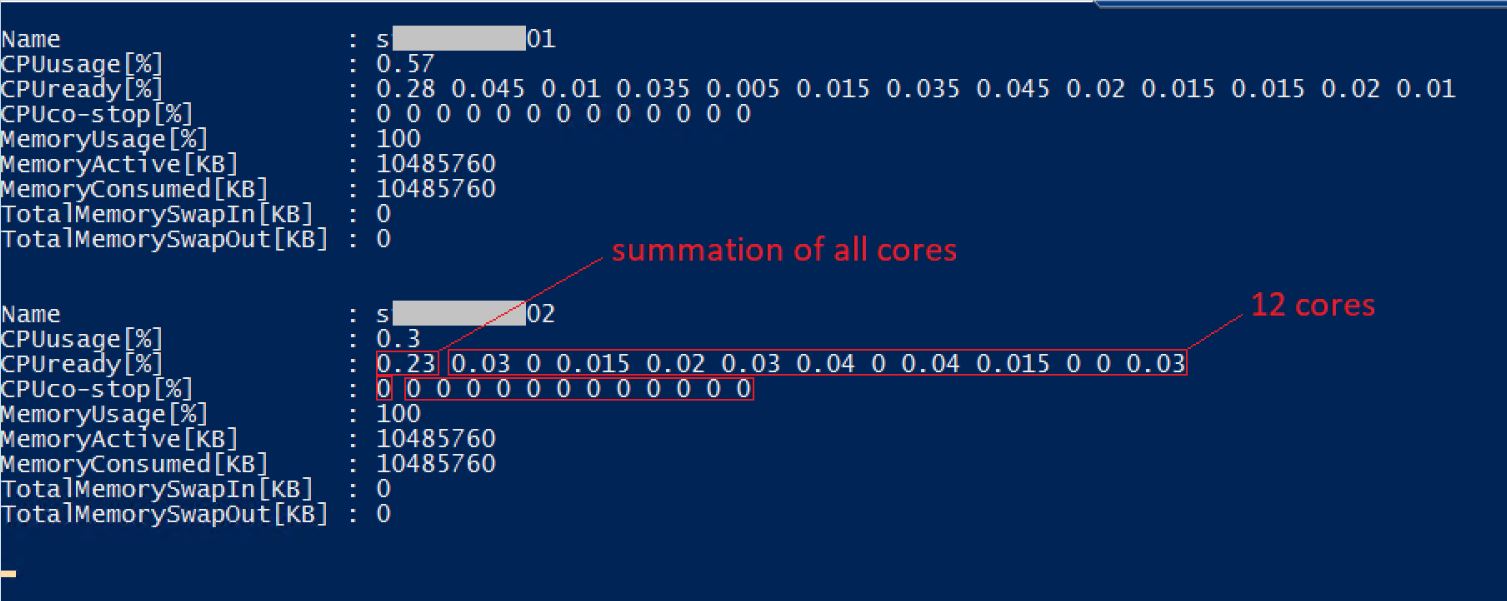
- High CPU Ready Time (%RDY): This is the most critical ESXi-level metric. CPU Ready Time represents the percentage of time a VM was ready to run but could not be scheduled on a physical CPU. High %RDY times (often above 5% or 10%) can indicate that the VM's vCPUs are struggling to get scheduled efficiently, which happens when they are spread across multiple NUMA nodes (NUMA spanning).
- Excessive Remote Memory Access: When a VM consumes more vCPUs or memory than is available on a single physical NUMA node, a portion of its memory traffic becomes "remote." You can check this using the esxtop utility on the ESXi host.
Common misconfigurations
- Over-Sized VM: Allocating more vCPUs than the physical cores available in a single physical NUMA node or allocating more memory than the physical memory on a single NUMA node.
- Hot-Add Features: Enabling CPU Hot-Add or Memory Hot-Add can disable vNUMA (Virtual NUMA) for the VM, preventing the VMkernel from presenting an optimized NUMA topology to the guest OS.
- Incorrect Cores per Socket Setting: While vSphere 6.5 and later are smarter about vNUMA, configuring the Cores per Socket value manually in a way that doesn't align with the host's physical NUMA topology can still lead to poor scheduling and memory placement, particularly when licensing dictates a low number of virtual sockets.
- Setting VM Limits: Setting a memory limit on a VM that is lower than its configured memory can force the VMkernel to allocate the remaining memory from a remote NUMA node.
Check NUMA assignments in ESXi
- SSH into the ESXi node.
- Issue the esxtop command and press m for memory view, then press f to enable the fields, G to enable NUMA information.

- You should be able to view the NUMA related information like NRMEM, NLMEM, and N%L.
- NRMEM (MB): NUMA Remote MEMory
- This is the current amount of a VM's memory (in MB) that is physically located on a remote NUMA node relative to where the VM's vCPUs are currently running.
- High NRMEM indicates NUMA locality issues, meaning the vCPUs must cross the high-speed interconnect (like Intel's QPI/UPI or AMD's Infinity Fabric) to access some of their data, which results in slower performance.
- NLMEM (MB): NUMA Local MEMory
- This is the current amount of a VM's memory (in MB) that is physically located on the local NUMA node, meaning it's on the same physical node as the vCPUs accessing it.
- The ESXi NUMA scheduler's goal is to maximize NLMEM to ensure fast memory access.
- N%L: NUMA % Locality
- This is the percentage of the VM's total memory that resides on the local NUMA node.
- A value close to 100% is ideal, indicating excellent memory locality. If this value drops below 80%, the VM may experience poor NUMA locality and potential performance issues due to slower remote memory access.
- Issue the esxtop command and press v to see the virtual machine screen.
- From the virtual machine screen note down the GID of the VM under consideration, and press q to exit the screen.
- Now issue the sched-stats -t numa-clients command. This will list down NUMA details of the VM. Check the groupID column to match the GID of the VM.
- For example, the GID of the VM I am looking at is 7886858. This is a 112 CPU VM which is running on an 8-socket physical host.

- You can see the VM is spread/ placed under NUMA nodes 0, 1, 2, and 3.
- The remoteMem is 0, for each of these NUMA nodes, which means they are accessing all the local memory of the NUMA node.
- To view physical NUMA details of the ESXI you can use
sched-stats -t numa-pnodecommand. You can see this server has 8 NUMA nodes.

- To view the NUMA latency, you can use the sched-stats -t numa-latency command.

Verify NUMA node details at guest OS
- Easiest way is to go to Task Manager - Performance - CPU
- Right click on the CPU utilization graph and select Change graph to - NUMA nodes
- If there only one NUMA node, you may notice the option as greyed out.
- To get detailed info you can consider using the sysinternals utility coreinfo64.

Linux
- To view NUMA related details from the Linux guest OS layer, you can use the following commands:
lscpu | grep -i NUMA
dmesg | grep -i NUMA
Remediation
- Right-Size VMs: Keep vCPU count within physical cores of a single NUMA node.
- Evenly Divide Resources: For monster/ wide VMs, ensure the total vCPUs are configured such that they are evenly divisible by the number of physical NUMA nodes they span.
- Example: If a VM needs 16 vCPUs on a host with 12-core NUMA nodes, configure the vCPUs to be a multiple of a NUMA node count (e.g., 2 sockets $\times$ 8 cores per socket to create 2 vNUMA nodes, aligning with 2 pNUMA nodes).
- Cores per Socket Setting (Important for older vSphere/Licensing): While vSphere 6.5 and later automatically present an optimal vNUMA topology, you should still configure the Cores per Socket setting on the VM to create a vNUMA structure that aligns with the physical NUMA boundaries of the host. This helps the guest OS make better scheduling decisions.
- Disable VM CPU/ Memory Hot-Add: Plan capacity upfront.
References
- 64 Cores per NUMA Node Limit in Microsoft SQL Server: Recommendation for Efficiently Allocating Logical CPUs to SQL Server VMs on VMware vSphere - VMware Cloud Foundation (VCF) Blog
- Architecting Microsoft SQL Server on VMware vSphere | VMware
- Virtual Machine vCPU and vNUMA Rightsizing - Guidelines - VROOM! Performance Blog
- Setting corespersocket can affect guest OS topologies
- Performance Best Practices for VMware vSphere 7.0, Update 3
- Home - Flings (broadcom.com) (Virtual Machine Compute Optimizer)
- vSphere 7 Cores per Socket and Virtual NUMA - frankdenneman.nl
- How many NUMA Nodes do I have? – SQLpassion
- Coreinfo - Sysinternals | Microsoft Learn