Showing posts with label vCenter. Show all posts

Friday, September 20, 2024

VMware PowerCLI 101 - part10 - Verify vSphere cluster state

To verify the most common selected status attributes of the cluster:

Get-Cluster | Get-VMHost | Select Name,@{N='HAState';E={$_.ExtensionData.Runtime.DasHostState.State}},ConnectionState,PowerState,@{N='OverallStatus';E={$_.ExtensionData.OverallStatus}},@{N='ConfigStatus';E={$_.ExtensionData.ConfigStatus}},@{N='InMaintenanceMode';E={$_.ExtensionData.Runtime.InMaintenanceMode}},@{N='RebootRequired';E={$_.ExtensionData.Summary.RebootRequired}},@{N='BootTime';E={$_.ExtensionData.Runtime.BootTime}} | ft

> Get-Cluster | Get-VMHost | Select Name,@{N='HAState';E={$_.ExtensionData.Runtime.DasHostState.State}},ConnectionState,PowerState,@{N='OverallStatus';E={$_.ExtensionData.OverallStatus}},@{N='ConfigStatus';E={$_.ExtensionData.ConfigStatus}},@{N='InMaintenanceMode';E={$_.ExtensionData.Runtime.InMaintenanceMode}},@{N='RebootRequired';E={$_.ExtensionData.Summary.RebootRequired}},@{N='BootTime';E={$_.ExtensionData.Runtime.BootTime}} | ft

Name      HAState           ConnectionState PowerState OverallStatus ConfigStatus InMaintenanceMode RebootRequired BootTime
----      -------           --------------- ---------- ------------- ------------ ----------------- -------------- --------
10.90.1.4 connectedToMaster       Connected  PoweredOn        yellow       yellow             False          False 8/27/2024 7:31:10 AM
10.90.1.5 master                  Connected  PoweredOn        yellow       yellow             False          False 9/6/2024 9:08:09 PM

Hope it was useful. Cheers!

Thursday, July 4, 2024

vSphere with Tanzu using NSX-T - Part35 - Monitoring supervisor cluster health with Python and vCenter APIs

vSphere with Tanzu Supervisor cluster is a Kubernetes platform that simplifies the deployment, management, and scaling of Kubernetes clusters. Monitoring the health of your WCP/ Supervisor clusters is crucial to ensure the smooth running of your Tanzu Kubernetes Clusters (TKCs) and applications. In this blog post, we'll explore how to use Python and vCenter APIs to verify the health of your Supervisor clusters.

You can access the Python script from my GitHub repository: https://github.com/vineethac/VMware/tree/main/vSphere_with_Tanzu/wcp_cluster_health


This script connects to the vCenter server, retrieves the cluster summary, and checks the Tanzu Supervisor cluster configuration info and prints the status of the cluster. By using this Python script, you can easily monitor the health of your Tanzu Supervisor clusters through vCenter APIs.

Hope it was useful. Cheers!

Saturday, June 22, 2024

vSphere with Tanzu using NSX-T - Part31 - Troubleshooting inaccessible TKC with expired control plane certs

In the course of managing multiple Tanzu Kubernetes Clusters (TKC), I encountered an unexpected issue: the control plane certificates had expired, preventing us from accessing the cluster using the kubeconfig file. To make matters worse, we were unable to SSH into the TKC control plane Virtual Machines (VMs) due to the vmware-system-user password expiring in accordance with STIG Hardening.

The recommended workaround for updating the vmware-system-user password expiry involves applying a specific daemonset on Guest Clusters. However, this approach requires access to the TKC using its admin kubeconfig file, which was unavailable due to the expired certificates.

Warning: In case of critical production issues that affect the accessibility of your Tanzu Kubernetes Cluster (TKC), it is strongly advised to submit a product support request to our team for assistance. This will ensure that you receive expert guidance and a timely resolution to help minimize the impact on your environment.

To resolve this issue, I followed an alternative workaround: I reset the root password of the TKC control plane VMs through the vCenter VM console, as outlined in this knowledge base article. Once the root password was reset, I was able to log directly into the TKC control plane VM using the VM console.


After gaining access to the TKC control plane VM, I proceeded to renew the control plane certificates using kubeadm, as detailed in this blog post. It's essential to apply this process to all control plane nodes in your cluster to ensure proper functionality.

root [ /etc/kubernetes ]# kubeadm certs check-expiration

root [ /etc/kubernetes ]# kubeadm certs renew all
[renew] Reading configuration from the cluster...
[renew] FYI: You can look at this config file with 'kubectl -n kube-system get cm kubeadm-config -o yaml'
[renew] Error reading configuration from the Cluster. Falling back to default configuration

certificate embedded in the kubeconfig file for the admin to use and for kubeadm itself renewed
certificate for serving the Kubernetes API renewed
certificate the apiserver uses to access etcd renewed
certificate for the API server to connect to kubelet renewed
certificate embedded in the kubeconfig file for the controller manager to use renewed
certificate for liveness probes to healthcheck etcd renewed
certificate for etcd nodes to communicate with each other renewed
certificate for serving etcd renewed
certificate for the front proxy client renewed
certificate embedded in the kubeconfig file for the scheduler manager to use renewed

Done renewing certificates. You must restart the kube-apiserver, kube-controller-manager, kube-scheduler and etcd, so that they can use the new certificates.

Although this workaround required some additional steps, it ultimately allowed us to regain access to our Tanzu Kubernetes Cluster and maintain its security and functionality.

Hope it was useful. Cheers!

Saturday, May 25, 2024

vSphere with Tanzu using NSX-T - Part30 - Troubleshooting inaccessible TKC with server pool members missing in the LB VS

Encountering issues with connectivity to your TKC apiserver/ control plane can be frustrating. One common problem we've seen is the kubeconfig failing to connect, often due to missing server pool members in the load balancer's virtual server (LB VS).

The Issue

The LB VS, which operates on port 6443, should have the control plane VMs listed as its member servers. When these members are missing, connectivity problems arise, disrupting your access to the TKC apiserver.

Troubleshooting steps

  1. Access the TKC: Use the kubeconfig to access the TKC.
    ❯ KUBECONFIG=tkc.kubeconfig kubectl get node
    Unable to connect to the server: dial tcp 10.191.88.4:6443: i/o timeout
    
    
  2. Check the Load Balancer: In NSX-T, verify the status of the corresponding load balancer (LB). It may display a green status indicating success.
  3. Inspect Virtual Servers: Check the virtual servers in the LB, particularly on port 6443. They might show as down.
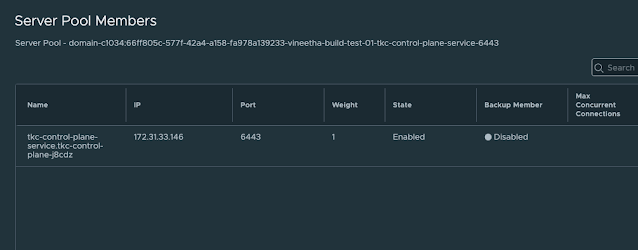
  4. Examine Server Pool Members: Look into the server pool members of the virtual server. You may find it empty.
  5. SSH to Control Plane Nodes: Attempt to SSH into the TKC control plane nodes.
  6. Run Diagnostic Commands: Execute diagnostic commands inside the control plane nodes to verify their status. The issue could be that the control plane VMs are in a hung state, and the container runtime is not running.
    vmware-system-user@tkc-infra-r68zc-jmq4j [ ~ ]$ sudo su
    root [ /home/vmware-system-user ]# crictl ps
    FATA[0002] failed to connect: failed to connect, make sure you are running as root and the runtime has been started: context deadline exceeded
    root [ /home/vmware-system-user ]#
    root [ /home/vmware-system-user ]# systemctl is-active containerd
    Failed to retrieve unit state: Failed to activate service 'org.freedesktop.systemd1': timed out (service_start_timeout=25000ms)
    root [ /home/vmware-system-user ]#
    root [ /home/vmware-system-user ]# systemctl status containerd
    WARNING: terminal is not fully functional
    -  (press RETURN)Failed to get properties: Failed to activate service 'org.freedesktop.systemd1'>
    lines 1-1/1 (END)lines 1-1/1 (END)
    
  7. Check VM Console: From vCenter, check the console of the control plane VMs. You might see specific errors indicating issues.
    EXT4-fs (sda3): Delayed block allocation failed for inode 266704 at logical offset 10515 with max blocks 2 with error 5
    EXT4-fs (sda3): This should not happen!! Data will be lost
    EXT4-fs error (device sda3) in ext4_writepages:2905: IO failure
    EXT4-fs error (device sda3) in ext4_reserve_inode_write:5947: Journal has aborted
    EXT4-fs error (device sda3) xxxxxx-xxx-xxxx: unable to read itable block
    EXT4-fs error (device sda3) in ext4_journal_check_start:61: Detected aborted journal
    systemd[1]: Caught <BUS>, dumped core as pid 24777.
    systemd[1]: Freezing execution.
    
  8. Restart Control Plane VMs: Restart the control plane VMs. Note that sometimes your admin credentials or administrator@vsphere.local credentials may not allow you to restart the TKC VMs. In such cases, decode the username and password from the relevant secret and use these credentials to connect to vCenter and restart the hung TKC VMs.
    ❯ kubectx wdc-01-vc17
    Switched to context "wdc-01-vc17".
    
    ❯ kg secret -A | grep wcp
    kube-system                                 wcp-authproxy-client-secret                                               kubernetes.io/tls                                  3      291d
    kube-system                                 wcp-authproxy-root-ca-secret                                              kubernetes.io/tls                                  3      291d
    kube-system                                 wcp-cluster-credentials                                                   Opaque                                             2      291d
    vmware-system-nsop                          wcp-nsop-sa-vc-auth                                                       Opaque                                             2      291d
    vmware-system-nsx                           wcp-cluster-credentials                                                   Opaque                                             2      291d
    vmware-system-vmop                          wcp-vmop-sa-vc-auth                                                       Opaque                                             2      291d
    
    ❯ kg secrets -n vmware-system-vmop wcp-vmop-sa-vc-auth
    NAME                  TYPE     DATA   AGE
    wcp-vmop-sa-vc-auth   Opaque   2      291d
    ❯ kg secrets -n vmware-system-vmop wcp-vmop-sa-vc-auth -oyaml
    apiVersion: v1
    data:
      password: aWAmbHUwPCpKe1Uxxxxxxxxxxxx=
      username: d2NwLXZtb3AtdXNlci1kb21haW4tYzEwMDYtMxxxxxxxxxxxxxxxxxxxxxxxxQHZzcGhlcmUubG9jYWw=
    kind: Secret
    metadata:
      creationTimestamp: "2022-10-24T08:32:26Z"
      name: wcp-vmop-sa-vc-auth
      namespace: vmware-system-vmop
      resourceVersion: "336557268"
      uid: dcbdac1b-18bb-438c-ba11-76ed4d6bef63
    type: Opaque
    
    
    ***Decrypt the username and password from the secret and use it to connect to the vCenter.
    ***Following is an example using PowerCLI:
    
    PS /Users/vineetha> get-vm gc-control-plane-f266h
    
    Name                 PowerState Num CPUs MemoryGB
    ----                 ---------- -------- --------
    gc-control-plane-f2… PoweredOn  2        4.000
    
    PS /Users/vineetha> get-vm gc-control-plane-f266h | Restart-VMGuest
    Restart-VMGuest: 08/04/2023 22:20:20	Restart-VMGuest		Operation "Restart VM guest" failed for VM "gc-control-plane-f266h" for the following reason: A general system error occurred: Invalid fault
    PS /Users/vineetha>
    PS /Users/vineetha> get-vm gc-control-plane-f266h | Restart-VM
    
    Confirm
    Are you sure you want to perform this action?
    Performing the operation "Restart-VM" on target "VM 'gc-control-plane-f266h'".
    [Y] Yes  [A] Yes to All  [N] No  [L] No to All  [S] Suspend  [?] Help (default is "Y"): Y
    
    Name                 PowerState Num CPUs MemoryGB
    ----                 ---------- -------- --------
    gc-control-plane-f2… PoweredOn  2        4.000
    
    PS /Users/vineetha>
    
  9. Verify System Pods and Connectivity: Once the control plane VMs are restarted, the system pods inside them will start, and the apiserver will become accessible using the kubeconfig. You should also see the previously missing server pool members reappear in the corresponding LB virtual server, and the virtual server on port 6443 will be up and show a success status.

Following these steps should help you resolve the connectivity issues with your TKC apiserver/control plane effectively.Ensuring that your load balancer's virtual server is correctly configured with the appropriate member servers is crucial for maintaining seamless access. This runbook aims to guide you through the process, helping you get your TKC apiserver back online swiftly.

Note: If required for critical production issues related to TKC accessibility I strongly recommend to raise a product support request.

Hope it was useful. Cheers!

Friday, September 22, 2023

Configure syslog forwarding in vCenter servers using Python

As a system administrator, it's essential to ensure that your vCenter servers are properly configured to collect and forward system logs to a central location for monitoring and analysis. In this blog, we'll explore how to configure syslog forwarding in vCenter servers using Python.

You can access the Python script from my GitHub repository: 
https://github.com/vineethac/VMware/tree/main/vCenter/syslog_forwarding


In this blog, we've demonstrated how to get, test, and set syslog forwarding configuration in vCenter servers using Python. By following these steps, you can ensure that your vCenter servers are properly configured to collect and forward system logs to a central location for monitoring and analysis. Remember to replace the placeholders in the config file with your actual vCenter server names, syslog server IP address or hostname, port, and protocol.

Hope it was useful. Cheers!

Saturday, December 10, 2022

vSphere with Tanzu using NSX-T - Part21 - Pointers while upgrading the stack

Here are some pointers.

The main workflow while upgrading the entire stack is:

  1. upgrade NSX-T
  2. upgrade vCenter server
  3. upgrade ESXi nodes
  4. upgrade vSAN and vDS (if required)
  5. upgrade WCP

Note: Make sure you follow the compatibility matrix while performing upgrades in a production environment.

NSX-T

While NSX-T is getting upgraded, the host transport nodes will also need to be updated. NSX components will be installed/ updated on the ESXi nodes and may need a reboot also. 

In NSX-T: System > Lifecycle Management > Upgrade > Upgrade NSX > Hosts

Plan

-Upgrade order across groups - Serial

-Pause upgrade condition - When an upgrade unit fails to upgrade

Host Groups

-Upgrade order within group - Serial

-Upgrade mode - Maintenance


Notes: 

  • There is an in-place upgrade mode for the host groups, and in this mode the NSX component on the ESXi nodes will get updated first and then the node will be placed in MM and then gets rebooted. But we have had some cases where the NSX component update on the ESXi node fails, and the workload/ TKC VMs running on that ESXi loses network connectivity. To fix this the ESXi node has to be rebooted, and while trying to put the node in MM, the TKC VMs running on it fails to get migrated, and the final option is to force reboot the ESXi and that affects the workload running on it. To avoid this case, the safest option is to choose the upgrade mode as Maintenance, so that the TKCs VMs will get migrated off the ESXi node first before updating the NSX component, and even if the component update fails, we are safe to reboot the node as it is in already in MM. 
  • We have also noticed in some cases the ESXi nodes in a WCP cluster fails to enter MM. Following are some common cases:
  • Orphaned or inaccessible VMs are one of the main causes. You can follow this article to find those and clean them up.
  • I have noticed cases like some VMs (vSphere pods) were present on the ESXi host in poweredoff state. In this case the ESXi was stuck 100% in maintenance mode. You will need to check on those VMs and then delete them if required to proceed further.
  • There are cases where some TKC VMs were present on the ESXi host and they fail to get migrated. Check whether these VMs are still present at the Kubernetes layer. If not, delete those VMs!
  • Check if there are any TKC nodes still present on the ESXi node. There can be cases where the TKC node or nodes are unable to migrate to other available nodes in the cluster due to resource constraints. Check whether the TKC nodes that are unable to migrate is using guaranteed vmclass. The solution is to find out unused resources/ TKCs in the cluster, check with the owner/ user and then delete it if not being used. Another way is to check with the user and change the guaranteed vmclass to besteffort if possible or temporarily reduce the number of worker nodes if the user agrees to do so.

  • Verify whether any pods are running on the respective ESXi worker node:
    kubectl get pods -A -o wide | grep ESXi-FQDN
    Safely drain the node.

Hope it was useful. Cheers!

Sunday, May 30, 2021

vSphere with Tanzu using NSX-T - Part8 - Create namespace and deploy Tanzu Kubernetes Cluster

In the previous posts we discussed the following:

vSphere with Tanzu using NSX-T - Part1 - Prerequisites

vSphere with Tanzu using NSX-T - Part2 - Configure NSX

vSphere with Tanzu using NSX-T - Part3 - Edge Cluster

vSphere with Tanzu using NSX-T - Part4 - Tier-0 Gateway and BGP peering

vSphere with Tanzu using NSX-T - Part5 - Tier-1 Gateway and Segments

vSphere with Tanzu using NSX-T - Part6 - Create tags, storage policy, and content library

vSphere with Tanzu using NSX-T - Part7 - Enable workload management


Now that we have enabled workload management, the next step is to create namespaces on the supervisor cluster, set resource quotas as per requirements, and then the vSphere administrator can provide access to developers to these namespaces, and they can either deploy Tanzu Kubernetes clusters or VMs or vSphere pods. 

  • Create namespace.

  • Select the cluster and provide a name for the namespace.

  • Now the namespace is created successfully. Before handing over this namespace to the developer, you can set permissions, assign storage policies, and set resource limits.

Let's have a look at the NSX-T components that are instantiated when we created a new namespace.
  • A new segment is now created for the newly created namespace. This segment is connected to the T1 Gateway of the supervisor cluster.

  • A SNAT rule is also now in place on the supervisor cluster T1 Gateway. This helps the Kubernetes objects residing in the namespace to reach the external network/ internet. It uses the egress range 192.168.72.0/24 that we provided during the workload management configuration for address translation.

We can now assign a storage policy to this newly created namespace.

  • Click on Add Storage and select the storage policy. In my case, I am using Tanzu Storage Policy which uses a vsanDatastore.

Let's apply some capacity and usage limits for this namespace. Click edit limits and provide the values.


Let's set user permissions to this newly created namespace. Click add permissions.


Now we are ready to hand over this new namespace to the dev user (John).


Under the first tile, you can see copy link, you can provide this link to the dev user. And he can open it in a web browser to access the CLI tools to connect to the newly created namespace.


Download and install the CLI tools. In my case, CLI tools are installed on a CentOS 7.x VM. You can also see the user John has connected to the newly created namespace using the CLI.


The user can now verify the resource limits of the namespace using kubectl.


You can see the following limits:
  • cpu-limit: 21.818
  • memory-limit: 131072Mi
  • storage: 500Gi
Storage is limited at 500 GB and memory at 128 GB which is very straightforward. We (vSphere admin) had set the CPU limits to 48 GHz. And here what you see is cpu-limit of this namespace is limited to 21.818 CPU cores. Just to give some more background on this calculation, the ESXi host that I am using for this study has 20 physical cores, and the total CPU capacity of a host is 44 GHz. I have 4 such ESXi hosts in the cluster. Now, the computing power of one physical core is (44/ 20) = 2.2 GHz. So, in order to limit the CPU to 48 GHz, the number of cpu core should be limited to (48/ 2.2) = 21.818.  

Apply the following cluster definition yaml file to create a Tanzu Kubernetes cluster under the ns-01-dev-john namespace.

apiVersion: run.tanzu.vmware.com/v1alpha1
kind: TanzuKubernetesCluster
metadata:
 name: tkg-cluster-01
 namespace: ns-01-dev-john
spec:
 topology:
   controlPlane:
     count: 3
     class: guaranteed-medium
     storageClass: tanzu-storage-policy
   workers:
     count: 3
     class: guaranteed-xlarge
     storageClass: tanzu-storage-policy
 distribution:
   version: v1.18.15
 settings:
  network:
   services:
    cidrBlocks: ["198.32.1.0/12"]
   pods:
    cidrBlocks: ["192.1.1.0/16"]
   cni:
    name: calico
  storage:
   defaultClass: tanzu-storage-policy


Login to the Tanzu Kubernetes cluster directly using CLI and verify.


You can see corresponding VMs in the Center UI.


Now, let's have a look at the NSX-T side.
  • A Tier-1 Gateway is now available with a segment linked to it.


  • You can see a server load balancer with one virtual server that provides access to KubeAPI (6443) of the Tanzu Kubernetes cluster that we just deployed.


  • You can also find a SNAT rule. This helps the Tanzu Kubernetes cluster objects to reach the external network/ internet. It uses the egress range 192.168.72.0/24 that we provided during the workload management configuration for address translation.

Note: This architecture is explained on the basis of vSphere 7 U1. In the newer versions there are changes. With vSphere 7 U1c the architecture changed from a per-TKG cluster Tier 1 Gateway model to a per-Supervisor namespace Tier 1 Gateway model. For more details, feel free to refer the blog series published by Harikrishnan T @hari5611.

In the next part we will discuss monitoring aspects of vSphere with Tanzu environment and Tanzu Kubernetes clusters. I hope this was useful. Cheers!

Sunday, April 18, 2021

vSphere with Tanzu using NSX-T - Part7 - Enable workload management

In the previous posts we discussed the following: 

Part1: Prerequisites

Part2: Configure NSX-T

Part3: Edge Cluster

Part4: Tier-0 Gateway and BGP peering

Part5: Tier-1 Gateway and Segments

Part6: Create tags, storage policy, and content library


We are all set to configure and enable workload management. Before stepping into the configurations I just want to give an overall picture of vSphere with Tanzu architecture and different components. 


Once you enable workload management, the vSphere cluster will transform to a supervisor cluster. The supervisor cluster consists of 3 supervisor control plane VMs, and the ESXi hosts that act as worker nodes too. Now you can run traditional VMs, and containers side by side. You can run the containers as native vSphere pods directly running on the ESXi hosts, or you can deploy Tanzu Kubernetes clusters in VM form factor on the vSphere namespace and then run container workload on them.

Following are the steps to enable workload management:

  • Login vCenter - Menu - Workload Management.
  • Click Get started.
  • Select NSX-T and click next.

  • Select the cluster.

  • Select a size and click next.

  • Select the storage policy and click next.

  • Provide management network details and click next.

  • Provide workload network details and click next.

  • Add the content library and click next.

  • Click finish.

  • This process will take few minutes to configure and bring up the supervisor cluster. In my case, it took around 30 minutes to complete.
  • You can see the progress in the vCenter UI.


  • You can now see the supervisor control plane VMs are deployed.


Workload management is now enabled and the vSphere cluster is transformed to a supervisor cluster. Let's have a look at the objects that are automatically created in NSX-T.
  • You can see a T1 Gateway is now provisioned.

  • Multiple segments are now created corresponding to each namespace inside the supervisor control plane.

  • Multiple SNAT rules are also now in place for the newly created T1 Gateway, which helps the control plane Kubernetes objects residing in their corresponding namespaces to reach the external network/ internet. It uses the egress range 192.168.72.0/24 that we provided during the workload management configuration for address translation.

  • You can also see two load balancers attached to the T1 Gateway:
    • Distributed Load balancer: All services of type ClusterIP are implemented as distributed load balancer virtual servers. This is for east-west traffic.
    • Server load balancer: All services of type Loadbalancer are implemented as server load balancer L4 virtual servers. And all ingress is implemented as L7 virtual servers.

  • Under the server load balancer, you can see two virtual servers. One for the KubeAPI (6443) and the other for downloading the CLI tools (443) to access the cluster.

Note that this newly created T1 Gateway (domain-c8:6ea515f0-39da-431b-93bf-0d6a5e4a0f77) is connected to the T0 Gateway for external connectivity through BGP.
 
The next step is to create namespaces, and you can then create Tanzu Kubernetes clusters on it. Usually, the vSphere administrator will create namespaces for developers and provide the access so that they can either deploy TKG clusters, vSphere pods, or VMs on the respective namespace. We will cover all these in the next part. 

Hope it was useful. Cheers!

Monday, March 29, 2021

vSphere with Tanzu using NSX-T - Part6 - Create tag, VM storage policy, and content library

In the previous posts we discussed the following: 

Part1: Prerequisites

Part2: Configure NSX-T

Part3: Edge Cluster

Part4: Tier-0 Gateway and BGP peering

Part5: Tier-1 Gateway and Segments


At this stage, we are almost done with the networking/ NSX-T related prerequisites. Before getting into Workload Management configuration we need to create a tag, assign the tag to the datastore, create a VM storage policy, and content library.

Create and assign a tag

  • Select the datastore. Click Assign.
  • Add Tag.
  • Provide a name, and click on create new category.
  • Provide a category name and click create.
  • Click create.
  • Now a tag is created and you can assign it to the vSAN datastore.
  • Select the tag and click assign.

Create VM storage policy with tag based placement

  • Provide a name and click next.
  • Select tag based placement and click next.
  • Click the drop-down for tag category, select "Tanzu", and then click browse tags, select "Tanzu" and click next.
  • Select the compatible datastore, vSAN in this case, and click next.
  • Click finish.
  • You can now see the newly created VM storage policy.

Create content library

  • Click create.
  • Provide details and next.
  • Provide subscription URL and next.
  • Accept the SSL thumbprint by clicking yes. Select the vSAN datastore as the storage location for library contents, and next.
  • Click finish.
  • You can now see the newly created content library.

All the prerequisites are done now. The next step is to configure workload management which will be covered in the next part. Hope it was useful. Cheers!