Showing posts with label load balancer. Show all posts

Wednesday, June 26, 2024

vSphere with Tanzu using NSX-T - Part33 - Troubleshooting intermittent connection timeouts to apiserver and workloads

In the realm of managing Tanzu Kubernetes clusters (TKCs), we have encountered several challenges that hindered the smooth functioning of our applications. In this blog post, we will discuss three such cases and the workarounds we employed to resolve them.


Case 1: TKC Control Plane Node Connectivity Issues


Symptoms:
  • TKC apiserver connection timeouts when attempting to connect using the kubeconfig.
  • Traffic was not flowing to two of the control plane nodes.
  • NSX-T web UI LB VS stats indicated this issue.


Case 2: TKC Worker Node Connectivity Issues


Symptoms:
  • Workload (example: PostgreSQL cluster) connection timeouts.
  • Traffic was not flowing to two of the worker nodes in the TKC.
  • NSX-T web UI LB VS stats indicated this issue.


Case 3: Load Balancer Connectivity Issues


Symptoms:
  • Connection timeouts when attempting to connect to a PostgreSQL workload through the load balancer VS IP.
  • This issue was observed only when creating new services of type LoadBalancer in the TKC.
  • We noticed datapath mempool usage for the edge nodes was above the threshold value.


Resolution/ work around

  • Find the T1 router that is attached to the TKC which has connectivity issues. 
  • In an Active - Standby HA configuration, you will see that there will be one Edge node that will be Active and another one in Standby status. 
  • First place the Standby Edge node in NSX MM, reboot it, and then exit it from NSX MM. 
  • Now, place the Active Edge node in NSX MM, there will be a slight network disruption during this failover, once it is in NSX MM, reboot it, and then exit NSX MM. 
  • This should resolved the issue.


In conclusion, these cases illustrate the importance of verifying NSX-T components when managing Tanzu Kubernetes clusters. By identifying the root cause of the issues and employing effective workarounds, we were able to restore functionality and maintain the health of our applications. Stay tuned for more insights and best practices in managing Kubernetes clusters.

Hope it was useful. Cheers!

Saturday, May 25, 2024

vSphere with Tanzu using NSX-T - Part30 - Troubleshooting inaccessible TKC with server pool members missing in the LB VS

Encountering issues with connectivity to your TKC apiserver/ control plane can be frustrating. One common problem we've seen is the kubeconfig failing to connect, often due to missing server pool members in the load balancer's virtual server (LB VS).

The Issue

The LB VS, which operates on port 6443, should have the control plane VMs listed as its member servers. When these members are missing, connectivity problems arise, disrupting your access to the TKC apiserver.

Troubleshooting steps

  1. Access the TKC: Use the kubeconfig to access the TKC.
    ❯ KUBECONFIG=tkc.kubeconfig kubectl get node
    Unable to connect to the server: dial tcp 10.191.88.4:6443: i/o timeout
    
    
  2. Check the Load Balancer: In NSX-T, verify the status of the corresponding load balancer (LB). It may display a green status indicating success.
  3. Inspect Virtual Servers: Check the virtual servers in the LB, particularly on port 6443. They might show as down.
  4. Examine Server Pool Members: Look into the server pool members of the virtual server. You may find it empty.
  5. SSH to Control Plane Nodes: Attempt to SSH into the TKC control plane nodes.
  6. Run Diagnostic Commands: Execute diagnostic commands inside the control plane nodes to verify their status. The issue could be that the control plane VMs are in a hung state, and the container runtime is not running.
    vmware-system-user@tkc-infra-r68zc-jmq4j [ ~ ]$ sudo su
    root [ /home/vmware-system-user ]# crictl ps
    FATA[0002] failed to connect: failed to connect, make sure you are running as root and the runtime has been started: context deadline exceeded
    root [ /home/vmware-system-user ]#
    root [ /home/vmware-system-user ]# systemctl is-active containerd
    Failed to retrieve unit state: Failed to activate service 'org.freedesktop.systemd1': timed out (service_start_timeout=25000ms)
    root [ /home/vmware-system-user ]#
    root [ /home/vmware-system-user ]# systemctl status containerd
    WARNING: terminal is not fully functional
    -  (press RETURN)Failed to get properties: Failed to activate service 'org.freedesktop.systemd1'>
    lines 1-1/1 (END)lines 1-1/1 (END)
    
  7. Check VM Console: From vCenter, check the console of the control plane VMs. You might see specific errors indicating issues.
    EXT4-fs (sda3): Delayed block allocation failed for inode 266704 at logical offset 10515 with max blocks 2 with error 5
    EXT4-fs (sda3): This should not happen!! Data will be lost
    EXT4-fs error (device sda3) in ext4_writepages:2905: IO failure
    EXT4-fs error (device sda3) in ext4_reserve_inode_write:5947: Journal has aborted
    EXT4-fs error (device sda3) xxxxxx-xxx-xxxx: unable to read itable block
    EXT4-fs error (device sda3) in ext4_journal_check_start:61: Detected aborted journal
    systemd[1]: Caught <BUS>, dumped core as pid 24777.
    systemd[1]: Freezing execution.
    
  8. Restart Control Plane VMs: Restart the control plane VMs. Note that sometimes your admin credentials or administrator@vsphere.local credentials may not allow you to restart the TKC VMs. In such cases, decode the username and password from the relevant secret and use these credentials to connect to vCenter and restart the hung TKC VMs.
    ❯ kubectx wdc-01-vc17
    Switched to context "wdc-01-vc17".
    
    ❯ kg secret -A | grep wcp
    kube-system                                 wcp-authproxy-client-secret                                               kubernetes.io/tls                                  3      291d
    kube-system                                 wcp-authproxy-root-ca-secret                                              kubernetes.io/tls                                  3      291d
    kube-system                                 wcp-cluster-credentials                                                   Opaque                                             2      291d
    vmware-system-nsop                          wcp-nsop-sa-vc-auth                                                       Opaque                                             2      291d
    vmware-system-nsx                           wcp-cluster-credentials                                                   Opaque                                             2      291d
    vmware-system-vmop                          wcp-vmop-sa-vc-auth                                                       Opaque                                             2      291d
    
    ❯ kg secrets -n vmware-system-vmop wcp-vmop-sa-vc-auth
    NAME                  TYPE     DATA   AGE
    wcp-vmop-sa-vc-auth   Opaque   2      291d
    ❯ kg secrets -n vmware-system-vmop wcp-vmop-sa-vc-auth -oyaml
    apiVersion: v1
    data:
      password: aWAmbHUwPCpKe1Uxxxxxxxxxxxx=
      username: d2NwLXZtb3AtdXNlci1kb21haW4tYzEwMDYtMxxxxxxxxxxxxxxxxxxxxxxxxQHZzcGhlcmUubG9jYWw=
    kind: Secret
    metadata:
      creationTimestamp: "2022-10-24T08:32:26Z"
      name: wcp-vmop-sa-vc-auth
      namespace: vmware-system-vmop
      resourceVersion: "336557268"
      uid: dcbdac1b-18bb-438c-ba11-76ed4d6bef63
    type: Opaque
    
    
    ***Decrypt the username and password from the secret and use it to connect to the vCenter.
    ***Following is an example using PowerCLI:
    
    PS /Users/vineetha> get-vm gc-control-plane-f266h
    
    Name                 PowerState Num CPUs MemoryGB
    ----                 ---------- -------- --------
    gc-control-plane-f2… PoweredOn  2        4.000
    
    PS /Users/vineetha> get-vm gc-control-plane-f266h | Restart-VMGuest
    Restart-VMGuest: 08/04/2023 22:20:20	Restart-VMGuest		Operation "Restart VM guest" failed for VM "gc-control-plane-f266h" for the following reason: A general system error occurred: Invalid fault
    PS /Users/vineetha>
    PS /Users/vineetha> get-vm gc-control-plane-f266h | Restart-VM
    
    Confirm
    Are you sure you want to perform this action?
    Performing the operation "Restart-VM" on target "VM 'gc-control-plane-f266h'".
    [Y] Yes  [A] Yes to All  [N] No  [L] No to All  [S] Suspend  [?] Help (default is "Y"): Y
    
    Name                 PowerState Num CPUs MemoryGB
    ----                 ---------- -------- --------
    gc-control-plane-f2… PoweredOn  2        4.000
    
    PS /Users/vineetha>
    
  9. Verify System Pods and Connectivity: Once the control plane VMs are restarted, the system pods inside them will start, and the apiserver will become accessible using the kubeconfig. You should also see the previously missing server pool members reappear in the corresponding LB virtual server, and the virtual server on port 6443 will be up and show a success status.

Following these steps should help you resolve the connectivity issues with your TKC apiserver/control plane effectively.Ensuring that your load balancer's virtual server is correctly configured with the appropriate member servers is crucial for maintaining seamless access. This runbook aims to guide you through the process, helping you get your TKC apiserver back online swiftly.

Note: If required for critical production issues related to TKC accessibility I strongly recommend to raise a product support request.

Hope it was useful. Cheers!

Friday, January 6, 2023

vSphere with Tanzu using NSX-T - Part22 - Working with NGINX Ingress Controller

In this article we will go though the steps to deploy a nginx ingress controller on a Tanzu Kubernetes cluster (TKC) and create a simple ingress resource to test its basic functionality.

❯ gcc kg no
NAME STATUS ROLES AGE VERSION
tkc-control-plane-5m9hd Ready control-plane,master 36d v1.23.8+vmware.3
tkc-workers-6d8wc-5669d8bc79-76f2t Ready <none> 36d v1.23.8+vmware.3
tkc-workers-6d8wc-5669d8bc79-mtqh7 Ready <none> 36d v1.23.8+vmware.3
tkc-workers-6d8wc-5669d8bc79-xh2gz Ready <none> 36d v1.23.8+vmware.3

❯ gcc k apply -f https://raw.githubusercontent.com/kubernetes/ingress-nginx/controller-v1.7.0/deploy/static/provider/cloud/deploy.yaml --namespace=ingress-nginx
namespace/ingress-nginx created
serviceaccount/ingress-nginx created
serviceaccount/ingress-nginx-admission created
role.rbac.authorization.k8s.io/ingress-nginx created
role.rbac.authorization.k8s.io/ingress-nginx-admission created
clusterrole.rbac.authorization.k8s.io/ingress-nginx created
clusterrole.rbac.authorization.k8s.io/ingress-nginx-admission created
rolebinding.rbac.authorization.k8s.io/ingress-nginx created
rolebinding.rbac.authorization.k8s.io/ingress-nginx-admission created
clusterrolebinding.rbac.authorization.k8s.io/ingress-nginx created
clusterrolebinding.rbac.authorization.k8s.io/ingress-nginx-admission created
configmap/ingress-nginx-controller created
service/ingress-nginx-controller created
service/ingress-nginx-controller-admission created
deployment.apps/ingress-nginx-controller created
job.batch/ingress-nginx-admission-create created
job.batch/ingress-nginx-admission-patch created
ingressclass.networking.k8s.io/nginx created
validatingwebhookconfiguration.admissionregistration.k8s.io/ingress-nginx-admission created
 
❯ gcc kg ns
NAME STATUS AGE
default Active 57d
external-dns Active 57d
ingress-nginx Active 17s
kube-node-lease Active 57d
kube-public Active 57d
kube-system Active 57d
vmware-system-auth Active 57d
vmware-system-cloud-provider Active 57d
vmware-system-csi Active 57d

❯ gcc kg deployment,po,svc,ep -n ingress-nginx
NAME READY UP-TO-DATE AVAILABLE AGE
deployment.apps/ingress-nginx-controller 1/1 1 1 21h

NAME READY STATUS RESTARTS AGE
pod/ingress-nginx-admission-create-h4sbz 0/1 Completed 0 21h
pod/ingress-nginx-admission-patch-bw2fr 0/1 Completed 0 21h
pod/ingress-nginx-controller-5795977b8-nfrb8 1/1 Running 0 21h

NAME TYPE CLUSTER-IP EXTERNAL-IP PORT(S) AGE
service/ingress-nginx-controller LoadBalancer 10.96.114.127 10.186.124.41 80:30061/TCP,443:31417/TCP 21h
service/ingress-nginx-controller-admission ClusterIP 10.98.183.189 <none> 443/TCP 21h

NAME ENDPOINTS AGE
endpoints/ingress-nginx-controller 192.168.7.8:443,192.168.7.8:80 21h
endpoints/ingress-nginx-controller-admission 192.168.7.8:8443 21h

Now the nginx ingress controller is deployed. You can also see the service/ingress-nginx-controller has already got an external IP from NSX-T.

Note: gcc is an alias which points to my TKC kubeconfig file.

❯ alias gcc
gcc='KUBECONFIG=gckubeconfig'

Lets create a sample deployment and expose it as a service under namespace ingress-nginx.

❯ gcc kubectl create deployment web --image=gcr.io/google-samples/hello-app:1.0 -n ingress-nginx
deployment.apps/web created
❯ gcc kubectl expose deployment web --type=NodePort --port=8080 -n ingress-nginx
service/web exposed

❯ gcc k get deployments.apps web -n ingress-nginx
NAME READY UP-TO-DATE AVAILABLE AGE
web 1/1 1 1 28s
❯ gcc k get svc web -n ingress-nginx
NAME TYPE CLUSTER-IP EXTERNAL-IP PORT(S) AGE
web NodePort 10.105.243.33 <none> 8080:30750/TCP 28s
❯ gcc k get ep web -n ingress-nginx
NAME ENDPOINTS AGE
web 192.168.1.9:8080 39s

Create a pod on the TKC and try to access the svc web from inside the pod. I've already deployed a nginx pod.

❯ gcc k get po nginx
NAME READY STATUS RESTARTS AGE
nginx 1/1 Running 0 96m

❯ gcc k exec -it nginx -- curl 10.105.243.33:8080
Hello, world!
Version: 1.0.0
Hostname: web-746c8679d4-ptmgh

Lets create a second deployment under namespace ingress-nginx.

❯ gcc kubectl create deployment web2 --image=gcr.io/google-samples/hello-app:2.0 -n ingress-nginx
deployment.apps/web2 created

❯ gcc kubectl expose deployment web2 --port=8080 --type=NodePort -n ingress-nginx
service/web2 exposed


❯ gcc k get deployment web2 -n ingress-nginx
NAME READY UP-TO-DATE AVAILABLE AGE
web2 1/1 1 1 56s
❯ gcc k get svc web2 -n ingress-nginx
NAME TYPE CLUSTER-IP EXTERNAL-IP PORT(S) AGE
web2 NodePort 10.99.79.19 <none> 8080:31695/TCP 65s
❯ gcc k get ep web2 -n ingress-nginx
NAME ENDPOINTS AGE
web2 192.168.2.13:8080 73s

Verify svc web2.

❯ gcc k exec -it nginx -- curl 10.99.79.19:8080
Hello, world!
Version: 2.0.0
Hostname: web2-5858b4c7c5-tmn8x

Service web and web2 are accessible within the TKC. We've already verified it from the nginx pod that runs within the same TKC.

Now, we will create an ingress resource under namespace ingress-nginx.

❯ cat ing-01.yaml
apiVersion: networking.k8s.io/v1
kind: Ingress
metadata:
name: hello-world-ing
annotations:
kubernetes.io/ingress.class: "nginx"
spec:
rules:
- host: hello-world.info
http:
paths:
- path: /
pathType: Prefix
backend:
service:
name: web
port:
number: 8080
- path: /v2
pathType: Prefix
backend:
service:
name: web2
port:
number: 8080
❯ gcc k create -f ing-01.yaml -n ingress-nginx
ingress.networking.k8s.io/hello-world-ing created

❯ gcc k get ing -n ingress-nginx
NAME CLASS HOSTS ADDRESS PORTS AGE
hello-world-ing <none> hello-world.info 80 55s
❯ gcc k get ing -n ingress-nginx
NAME CLASS HOSTS ADDRESS PORTS AGE
hello-world-ing <none> hello-world.info 10.186.124.41 80 56s

I've created a entry in /etc/hosts file in my laptop so that hello-world.info resolves to 10.186.124.41 which is the external IP of service/ingress-nginx-controller.

❯ cat /etc/hosts
##
# Host Database
#
# localhost is used to configure the loopback interface
# when the system is booting. Do not change this entry.
##
127.0.0.1 localhost
255.255.255.255 broadcasthost
::1 localhost
# Added by Docker Desktop
# To allow the same kube context to work on the host and the container:
127.0.0.1 kubernetes.docker.internal
10.186.124.41 hello-world.info
# End of section

Now from my laptop when I curl to hello-world.info, the request will be served by web svc, and when I curl to hello-world.info/v2, it will be served by web2 svc.


❯ curl hello-world.info
Hello, world!
Version: 1.0.0
Hostname: web-746c8679d4-ptmgh

❯ curl hello-world.info/v2
Hello, world!
Version: 2.0.0
Hostname: web2-5858b4c7c5-tmn8x

Hope it was useful. Cheers! 

References:

https://kubernetes.io/docs/tasks/access-application-cluster/ingress-minikube/
https://kubernetes.github.io/ingress-nginx/user-guide/basic-usage/

Friday, November 5, 2021

vSphere with Tanzu using NSX-T - Part12 - Deploy application on TKC and access it

In the previous posts we discussed the following:

This article walks you though the steps to deploy an application on Tanzu Kubernetes Cluster (TKC) and how to access it. I will try to explain how this all works under the hood.

Here I have a TKC cluster as shown below: 

% KUBECONFIG=gc.kubeconfig kg nodes                    
NAME                               STATUS   ROLES                  AGE   VERSION
gc-control-plane-pwngg             Ready    control-plane,master   49d   v1.20.9+vmware.1
gc-workers-wrknn-f675446b6-cz766   Ready    <none>                 49d   v1.20.9+vmware.1
gc-workers-wrknn-f675446b6-f6zqs   Ready    <none>                 49d   v1.20.9+vmware.1
gc-workers-wrknn-f675446b6-rsf6n   Ready    <none>                 49d   v1.20.9+vmware.1

% KUBECONFIG=gc.kubeconfig kg nodes -o wide
NAME                               STATUS   ROLES                  AGE   VERSION            INTERNAL-IP     EXTERNAL-IP   OS-IMAGE                 KERNEL-VERSION       CONTAINER-RUNTIME
gc-control-plane-pwngg             Ready    control-plane,master   49d   v1.20.9+vmware.1   172.29.21.194   <none>        VMware Photon OS/Linux   4.19.191-4.ph3-esx   containerd://1.4.6
gc-workers-wrknn-f675446b6-cz766   Ready    <none>                 49d   v1.20.9+vmware.1   172.29.21.195   <none>        VMware Photon OS/Linux   4.19.191-4.ph3-esx   containerd://1.4.6
gc-workers-wrknn-f675446b6-f6zqs   Ready    <none>                 49d   v1.20.9+vmware.1   172.29.21.196   <none>        VMware Photon OS/Linux   4.19.191-4.ph3-esx   containerd://1.4.6
gc-workers-wrknn-f675446b6-rsf6n   Ready    <none>                 49d   v1.20.9+vmware.1   172.29.21.197   <none>        VMware Photon OS/Linux   4.19.191-4.ph3-esx   containerd://1.4.6

01 Create a namespace

% KUBECONFIG=gc.kubeconfig k create ns webserver
namespace/webserver created

% KUBECONFIG=gc.kubeconfig kg ns                
NAME                           STATUS   AGE
default                        Active   48d
kube-node-lease                Active   48d
kube-public                    Active   48d
kube-system                    Active   48d
vmware-system-auth             Active   48d
vmware-system-cloud-provider   Active   48d
vmware-system-csi              Active   48d
webserver                      Active   10s

02 Deploy nginx application

Following is the nginx-deployment.yaml spec to deploy nginx application:

apiVersion: apps/v1
kind: Deployment
metadata:
  name: my-nginx
spec:
  selector:
    matchLabels:
      run: my-nginx
  replicas: 2
  template:
    metadata:
      labels:
        run: my-nginx
    spec:
      containers:
      - name: my-nginx
        image: nginx
        ports:
        - containerPort: 80

You can apply the yaml file as below:

% KUBECONFIG=gc.kubeconfig k apply -f nginx-deployment.yaml -n webserver
deployment.apps/my-nginx created

% KUBECONFIG=gc.kubeconfig kg deploy -n webserver                     
NAME       READY   UP-TO-DATE   AVAILABLE   AGE
my-nginx   0/2     0            0           3m3s

% KUBECONFIG=gc.kubeconfig kg events -n webserver
LAST SEEN   TYPE      REASON              OBJECT                           MESSAGE
26s         Warning   FailedCreate        replicaset/my-nginx-74d7c6cb98   Error creating: pods "my-nginx-74d7c6cb98-" is forbidden: PodSecurityPolicy: unable to admit pod: []
3m10s       Normal    ScalingReplicaSet   deployment/my-nginx              Scaled up replica set my-nginx-74d7c6cb98 to 2

You can see that the pods failed to get created due to PodSecurityPolicy. Following is the psp.yaml spec to create ClusterRole and ClusterRoleBinding.

apiVersion: rbac.authorization.k8s.io/v1
kind: ClusterRole
metadata:
  name: psp:privileged
rules:
- apiGroups: ['policy']
  resources: ['podsecuritypolicies']
  verbs:     ['use']
  resourceNames:
  - vmware-system-privileged
---
apiVersion: rbac.authorization.k8s.io/v1
kind: ClusterRoleBinding
metadata:
  name: all:psp:privileged
roleRef:
  kind: ClusterRole
  name: psp:privileged
  apiGroup: rbac.authorization.k8s.io
subjects:
- kind: Group
  name: system:serviceaccounts
  apiGroup: rbac.authorization.k8s.io

Apply the yaml file as shown below:

% KUBECONFIG=gc.kubeconfig k apply -f psp.yaml
clusterrole.rbac.authorization.k8s.io/psp:privileged created
clusterrolebinding.rbac.authorization.k8s.io/all:psp:privileged created

Now, in few minutes you can see the deployment will get successful and two nginx pods will get deployed in the webserver namespace.

% KUBECONFIG=gc.kubeconfig kg deploy -n webserver
NAME       READY   UP-TO-DATE   AVAILABLE   AGE
my-nginx   2/2     2            2           80m

% KUBECONFIG=gc.kubeconfig kg pods -n webserver -o wide
NAME                        READY   STATUS    RESTARTS   AGE   IP                NODE                               NOMINATED NODE   READINESS GATES
my-nginx-74d7c6cb98-lzghr   1/1     Running   0          67m   192.168.213.132   gc-workers-wrknn-f675446b6-rsf6n   <none>           <none>
my-nginx-74d7c6cb98-s59dt   1/1     Running   0          67m   192.168.67.196    gc-workers-wrknn-f675446b6-f6zqs   <none>           <none>
 

03 Access the application

You can access the application in many ways depending on the usecase.

---Port-forward---

% KUBECONFIG=gc.kubeconfig kubectl port-forward deployment/my-nginx -n webserver 8080:80
Forwarding from 127.0.0.1:8080 -> 80
Forwarding from [::1]:8080 -> 80
Handling connection for 8080

The deployment is port-forwarded now. If you open another terminal and do curl localhost:8080, you can see the nginx webpage.

% curl localhost:8080
<!DOCTYPE html>
<html>
<head>
<title>Welcome to nginx!</title>
<style>
html { color-scheme: light dark; }
body { width: 35em; margin: 0 auto;
font-family: Tahoma, Verdana, Arial, sans-serif; }
</style>
</head>
<body>
<h1>Welcome to nginx!</h1>
<p>If you see this page, the nginx web server is successfully installed and
working. Further configuration is required.</p>

<p>For online documentation and support please refer to
<a href="http://nginx.org/">nginx.org</a>.<br/>
Commercial support is available at
<a href="http://nginx.com/">nginx.com</a>.</p>

<p><em>Thank you for using nginx.</em></p>
</body>
</html>

You can also open a web browser with http://localhost:8080/ and you will get the same nginx webpage. Well port-forwarding is fine in a local dev test scenario, but you might not want to do it in a production setup. You will need to create a service that connects the application and to access it. 

Services

There are 3 types of services in Kubernetes.

  1. NodePort: Similar to port forwarding where a port on the worker node will be forwarded to the target port of the pod where the application is running.
  2. ClusterIP: This is useful if you want to access the application from within the cluster.
  3. LoadBalancer: This is used to provide access to external users. In my case, NSX-T will be providing this access.

---Service NodePort---

Following is the yaml spec file for service of type nodeport:

% cat nginx-service-np.yaml
apiVersion: v1
kind: Service
metadata:
  name: my-nginx
  labels:
    run: my-nginx
spec:
  type: NodePort
  ports:
  - targetPort: 80
    port: 80
    protocol: TCP
  selector:
    run: my-ngin
x

Apply the above yaml file.

% KUBECONFIG=gc.kubeconfig k apply -f nginx-service-np.yaml -n webserver
service/my-nginx created 

% KUBECONFIG=gc.kubeconfig kg svc -n webserver               
NAME       TYPE       CLUSTER-IP       EXTERNAL-IP   PORT(S)        AGE
my-nginx   NodePort   10.111.182.155   <none>        80:30741/TCP   4s

% KUBECONFIG=gc.kubeconfig kg ep -n webserver               
NAME       ENDPOINTS                              AGE
my-nginx   192.168.213.132:80,192.168.67.196:80   32m

As you can see, a service (my-nginx) of type NodePort is created. And, now the application should be accessible on port 30741 of any worker node. To verify it, first we need connectivity to the worker node IP. For connecting to worker nodes, we need to have a jumpbox pod deployed on the supervisor namespace. Once we have a jumpbox pod deployed on the sv namespace, we can ssh to TKC nodes from the jumpbox pod. You can follow my previous post to see how to create a jumpbox pod. Here is the link to VMware documentation for how to SSH to TKC nodes.

% KUBECONFIG=sv.kubeconfig k exec -it jumpbox -- sh
sh-4.4#     
sh-4.4# curl 172.29.21.197:30741
<!DOCTYPE html>
<html>
<head>
<title>Welcome to nginx!</title>
<style>
html { color-scheme: light dark; }
body { width: 35em; margin: 0 auto;
font-family: Tahoma, Verdana, Arial, sans-serif; }
</style>
</head>
<body>
<h1>Welcome to nginx!</h1>
<p>If you see this page, the nginx web server is successfully installed and
working. Further configuration is required.</p>

<p>For online documentation and support please refer to
<a href="http://nginx.org/">nginx.org</a>.<br/>
Commercial support is available at
<a href="http://nginx.com/">nginx.com</a>.</p>

<p><em>Thank you for using nginx.</em></p>
</body>
</html>
sh-4.4#

---Service ClusterIP---

Service of type ClusterIP will be accessible within the TKC. So, I will need to deploy a jumpbox pod/ test pod within the TKC and connect from there. First let me edit the svc my-nginx from NodePort to type ClusterIP.

% KUBECONFIG=gc.kubeconfig k edit svc my-nginx -n webserver
service/my-nginx edited

% KUBECONFIG=gc.kubeconfig kg svc -n webserver             
NAME       TYPE        CLUSTER-IP       EXTERNAL-IP   PORT(S)   AGE
my-nginx   ClusterIP   10.111.182.155   <none>        80/TCP    39m

I have already deploy a pod inside the TKC. As you can see, dnsutils is the pod that is deployed in the default namespace. We will connect to this pod and from there we can curl to the Cluster-IP of my-nginx service.

% KUBECONFIG=gc.kubeconfig kg pods                  
NAME       READY   STATUS    RESTARTS   AGE
dnsutils   1/1     Running   1          105m

% KUBECONFIG=gc.kubeconfig k exec -it dnsutils -- sh
#
# curl 10.111.182.155:80
<!DOCTYPE html>
<html>
<head>
<title>Welcome to nginx!</title>
<style>
html { color-scheme: light dark; }
body { width: 35em; margin: 0 auto;
font-family: Tahoma, Verdana, Arial, sans-serif; }
</style>
</head>
<body>
<h1>Welcome to nginx!</h1>
<p>If you see this page, the nginx web server is successfully installed and
working. Further configuration is required.</p>

<p>For online documentation and support please refer to
<a href="http://nginx.org/">nginx.org</a>.<br/>
Commercial support is available at
<a href="http://nginx.com/">nginx.com</a>.</p>

<p><em>Thank you for using nginx.</em></p>
</body>
</html>
#

Note: This service of type ClusterIP can be accessed only within the TKC, and not externally!

---Service LoadBalancer---

This is the way to expose your service to external users. In this case NSX-T will provide the external IP which will then internally forwarded to nginx pods through the my-nginx service.

I have edited the service my-nginx from type ClusterIP to LoadBalancer.

% KUBECONFIG=gc.kubeconfig k edit svc my-nginx -n webserver
service/my-nginx edited

% KUBECONFIG=gc.kubeconfig kg svc -n webserver             
NAME       TYPE           CLUSTER-IP       EXTERNAL-IP   PORT(S)        AGE
my-nginx   LoadBalancer   10.111.182.155   <pending>     80:32398/TCP   56m

% KUBECONFIG=gc.kubeconfig kg svc -n webserver
NAME       TYPE           CLUSTER-IP       EXTERNAL-IP      PORT(S)        AGE
my-nginx   LoadBalancer   10.111.182.155   10.186.148.170   80:32398/TCP   56m

You can see that now the service has got an external ip. And, the end points of the service are as shown below, which is basically the nginx pod IPs.

% KUBECONFIG=gc.kubeconfig kg ep -n webserver
NAME       ENDPOINTS                              AGE
my-nginx   192.168.213.132:80,192.168.67.196:80   58m

% curl 10.186.148.170
<!DOCTYPE html>
<html>
<head>
<title>Welcome to nginx!</title>
<style>
html { color-scheme: light dark; }
body { width: 35em; margin: 0 auto;
font-family: Tahoma, Verdana, Arial, sans-serif; }
</style>
</head>
<body>
<h1>Welcome to nginx!</h1>
<p>If you see this page, the nginx web server is successfully installed and
working. Further configuration is required.</p>

<p>For online documentation and support please refer to
<a href="http://nginx.org/">nginx.org</a>.<br/>
Commercial support is available at
<a href="http://nginx.com/">nginx.com</a>.</p>

<p><em>Thank you for using nginx.</em></p>
</body>
</html>

I could also use the external IP 10.186.148.170 in a web browser to access the nginx webpage.

Now lets have a look at what is in the supervisor namespace. This TKC is created under a supervisor namespace "vineetha-test04-deploy".

% kubectl get svc -n vineetha-test04-deploy
NAME                       TYPE           CLUSTER-IP      EXTERNAL-IP      PORT(S)          AGE
gc-ba320a1e3e04259514411   LoadBalancer   172.28.5.217    10.186.148.170   80:31143/TCP     40h
gc-control-plane-service   LoadBalancer   172.28.9.37     10.186.149.120   6443:31639/TCP   51d

% kubectl get ep -n vineetha-test04-deploy  
NAME                       ENDPOINTS                                                     AGE
gc-ba320a1e3e04259514411   172.29.21.195:32398,172.29.21.196:32398,172.29.21.197:32398   40h
gc-control-plane-service   172.29.21.194:6443                                            51d

So what you are seeing is, for a service of type loadbalancer created inside the TKC, a service of type loadbalancer (gc-ba320a1e3e04259514411) will be automatically created under the supervisor namespace, and the its endpoints are the IP address of TKC worker nodes.


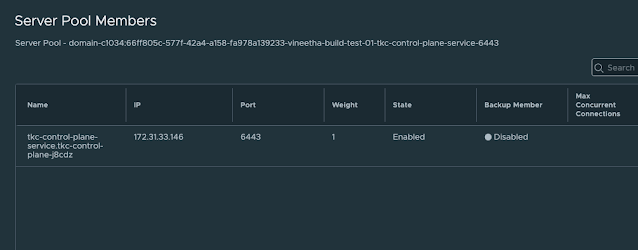
On the NSX-T side you can see the LB for my supervisor namespace, virtual servers in it, and server pool members in the virtual server.

I hope it was useful. Cheers! 

Thursday, July 9, 2015

Server load balancing using KEMP Load Master

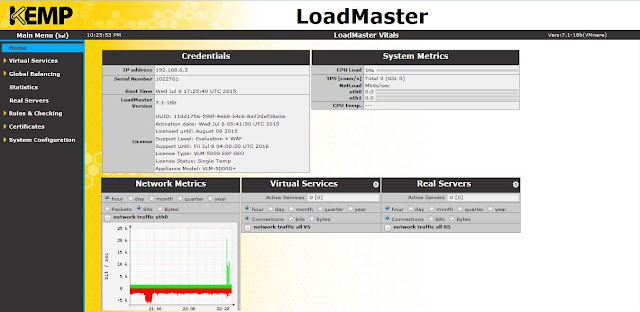
This article explains the basic configuration steps for load balancing multiple web servers using KEMP load balancer. In my setup, I've two web servers (INVLABSWEB01 and INVLABSWEB02) which are load balanced using a KEMP Load Master. For the purpose of testing I've used a virtual load master appliance (VLM-5000). After the installation is complete, you have to activate the license. Once you are done with that, you can get to the home page of the load master using a web browser as shown below.

Home page

Now you have to add a virtual service. Click add new, provide a virtual address, give it a name, select a protocol and click add this virtual service.

Add new virtual service

Select a service type. Check the box to activate the service.


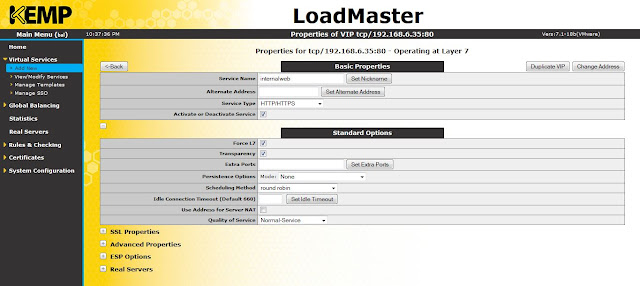
Expand standard options. Select the options as shown below. If you don't select Force L7 option, then the virtual service will be forced to Layer 4. Transparency can be enabled or disabled depending on the use case.

If persistence mode is enabled, the same client will subsequently connect to the same real server depending the mode selected. And there is a timeout value, that can be set which determines for how long this particular connection is remembered.

Scheduling method determines the method by which the load master selects a real server for a particular service. There are several methods like round robin, weighted round robin, least connection, resource based (adaptive) etc. Here I have selected round robin.

Basic properties and standard options

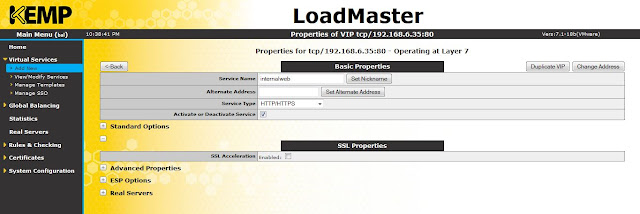
If you want to enable SSL acceleration, that can be done here.

SSL acceleration

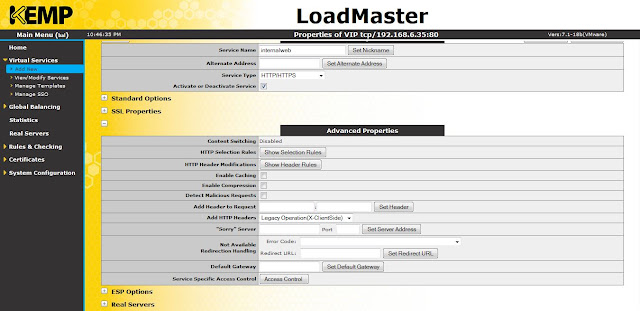
Advanced options like enabling caching, compression, access control etc can be done here.

Advanced properties

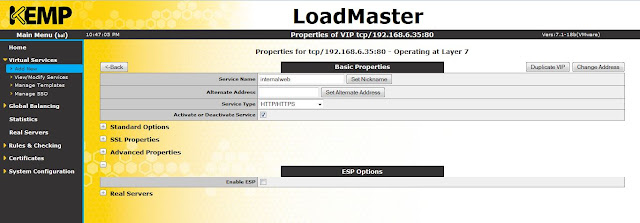
Edge Security Pack (ESP) feature can be enabled in this option.

ESP feature

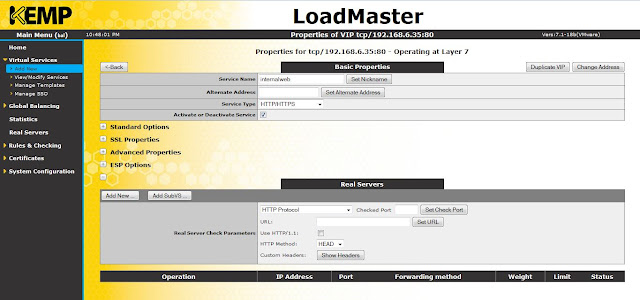
Click add new to add real servers to the virtual service (VS).

Real servers

Provide real server address, port number and click add this real server.

Add real server

Similarly, I've added two web servers (192.168.6.30 and 192.168.6.31) here.

Real servers

Click on view/ modify services to view the VS that you have just created.

Virtual services

Click on real servers to view the real servers (INVLABSWEB01 and INVLABSWEB01).

Real servers

Now, both of my web servers are load balanced. If you want to disable any of the servers from the load balancer, click disable button for the respective server.

Reference :
Kemp Technologies