Showing posts with label deployment. Show all posts

Saturday, April 20, 2024

Hugging Face - Part5 - Deploy your LLM app on Kubernetes

In our previous blog post, we explored the process of containerizing the Large Language Model (LLM) from Hugging Face using FastAPI and Docker. The next step is deploying this containerized application on a Kubernetes cluster. Additionally, I'll share my observations and insights gathered during this exercise. 


You can access the deployment yaml spec and detailed instructions in my GitHub repo: 

https://github.com/vineethac/huggingface/tree/main/6-deploy-on-k8s

Requirements

  • I am using a Tanzu Kubernetes Cluster (TKC).
  • Each node is of size best-effort-2xlarge which has 8 vCPU and 64Gi of memory.

❯ KUBECONFIG=gckubeconfig k get node
NAME                                             STATUS   ROLES                  AGE    VERSION
tkc01-control-plane-49jx4                        Ready    control-plane,master   97d    v1.23.8+vmware.3
tkc01-control-plane-m8wmt                        Ready    control-plane,master   105d   v1.23.8+vmware.3
tkc01-control-plane-z6gxx                        Ready    control-plane,master   97d    v1.23.8+vmware.3
tkc01-worker-nodepool-a1-pqq7j-dc6957d97-8gjn8   Ready    <none>                 21d    v1.23.8+vmware.3
tkc01-worker-nodepool-a1-pqq7j-dc6957d97-c9nfq   Ready    <none>                 21d    v1.23.8+vmware.3
tkc01-worker-nodepool-a1-pqq7j-dc6957d97-cngff   Ready    <none>                 21d    v1.23.8+vmware.3
❯

  • I've attached 256Gi storage volumes to the worker nodes that is mounted at /var/lib/containerd. The worker nodes on which these llm pods are running should have enough storage space. Otherwise you may notice these pods getting stuck/ restarting/ unknownstatus. If the worker nodes run out of the storage disk space, you will see pods getting evicted with warnings The node was low on resource: ephemeral-storage. TKC spec is available in the above mentioned Git repo.

Deployment

  • This works on a CPU powered Kubernetes cluster. Additional configurations might be required if you want to run this on a GPU powered cluster.
  • We have already instrumented the Readiness and Liveness functionality in the LLM app itself. 
  • The readiness probe invokes the /healthz endpoint exposed by the FastAPI app. This will make sure the FastAPI itself is healthy/ responding to the API calls.
  • The liveness probe invokes liveness.py script within the app. The script invokes the /ask endpoint which interacts with the LLM and returns the response. This will make sure the LLM is responding to the user queries. For some reason if the llm is not responding/ hangs, the liveness probe will fail and eventually it will restart the container.
  • You can apply the deployment yaml spec as follows:
❯ KUBECONFIG=gckubeconfig k apply -f fastapi-llm-app-deploy-cpu.yaml

Validation


❯ KUBECONFIG=gckubeconfig k get deploy fastapi-llm-app
NAME              READY   UP-TO-DATE   AVAILABLE   AGE
fastapi-llm-app   2/2     2            2           21d
❯
❯ KUBECONFIG=gckubeconfig k get pods | grep fastapi-llm-app
fastapi-llm-app-758c7c58f7-79gmq                               1/1     Running   1 (71m ago)    13d
fastapi-llm-app-758c7c58f7-gqdc6                               1/1     Running   1 (99m ago)    13d
❯
❯ KUBECONFIG=gckubeconfig k get svc fastapi-llm-app
NAME              TYPE           CLUSTER-IP      EXTERNAL-IP     PORT(S)          AGE
fastapi-llm-app   LoadBalancer   10.110.228.33   10.216.24.104   5000:30590/TCP   5h24m
❯

Now you can just do a curl against the EXTERNAL-IP of the above mentioned fastapi-llm-app service.

❯ curl http://10.216.24.104:5000/ask -X POST -H "Content-Type: application/json" -d '{"text":"list comprehension examples in python"}'

In our next blog post, we'll try enhancing our FastAPI application with robust instrumentation. Specifically, we'll explore the process of integrating FastAPI metrics into our application, allowing us to gain valuable insights into its performance and usage metrics. Furthermore, we'll take a look at incorporating traces using OpenTelemetry, a powerful tool for distributed tracing and observability in modern applications. By leveraging OpenTelemetry, we'll be able to gain comprehensive visibility into the behavior of our application across distributed systems, enabling us to identify performance bottlenecks and optimize resource utilization.

Stay tuned for an insightful exploration of FastAPI metrics instrumentation and OpenTelemetry integration in our upcoming blog post!

Hope it was useful. Cheers!

Monday, January 15, 2024

Ollama - Part1 - Deploy Ollama on Kubernetes

Docker published GenAI stack around Oct 2023 which consists of large language models (LLMs) from Ollama, vector and graph databases from Neo4j, and the LangChain framework. These utilities can help developers with the resources they need to kick-start creating new applications using generative AI. Ollama can be used to deploy and run LLMs locally. In this exercise we will deploy Ollama to a Kubernetes cluster and prompt it.

In my case I am using a Tanzu Kubernetes Cluster (TKC) running on vSphere with Tanzu 7u3 platform powered by Dell PowerEdge R640 servers. The TKC nodes are using best-effort-2xlarge vmclass with 8 CPU and 64Gi Memory.  Note that I am running it on a regular Kubernetes cluster without GPU. If you have GPU, additional configuration steps might be required.


Hope it was useful. Cheers!

Friday, January 6, 2023

vSphere with Tanzu using NSX-T - Part22 - Working with NGINX Ingress Controller

In this article we will go though the steps to deploy a nginx ingress controller on a Tanzu Kubernetes cluster (TKC) and create a simple ingress resource to test its basic functionality.

❯ gcc kg no
NAME STATUS ROLES AGE VERSION
tkc-control-plane-5m9hd Ready control-plane,master 36d v1.23.8+vmware.3
tkc-workers-6d8wc-5669d8bc79-76f2t Ready <none> 36d v1.23.8+vmware.3
tkc-workers-6d8wc-5669d8bc79-mtqh7 Ready <none> 36d v1.23.8+vmware.3
tkc-workers-6d8wc-5669d8bc79-xh2gz Ready <none> 36d v1.23.8+vmware.3

❯ gcc k apply -f https://raw.githubusercontent.com/kubernetes/ingress-nginx/controller-v1.7.0/deploy/static/provider/cloud/deploy.yaml --namespace=ingress-nginx
namespace/ingress-nginx created
serviceaccount/ingress-nginx created
serviceaccount/ingress-nginx-admission created
role.rbac.authorization.k8s.io/ingress-nginx created
role.rbac.authorization.k8s.io/ingress-nginx-admission created
clusterrole.rbac.authorization.k8s.io/ingress-nginx created
clusterrole.rbac.authorization.k8s.io/ingress-nginx-admission created
rolebinding.rbac.authorization.k8s.io/ingress-nginx created
rolebinding.rbac.authorization.k8s.io/ingress-nginx-admission created
clusterrolebinding.rbac.authorization.k8s.io/ingress-nginx created
clusterrolebinding.rbac.authorization.k8s.io/ingress-nginx-admission created
configmap/ingress-nginx-controller created
service/ingress-nginx-controller created
service/ingress-nginx-controller-admission created
deployment.apps/ingress-nginx-controller created
job.batch/ingress-nginx-admission-create created
job.batch/ingress-nginx-admission-patch created
ingressclass.networking.k8s.io/nginx created
validatingwebhookconfiguration.admissionregistration.k8s.io/ingress-nginx-admission created
 
❯ gcc kg ns
NAME STATUS AGE
default Active 57d
external-dns Active 57d
ingress-nginx Active 17s
kube-node-lease Active 57d
kube-public Active 57d
kube-system Active 57d
vmware-system-auth Active 57d
vmware-system-cloud-provider Active 57d
vmware-system-csi Active 57d

❯ gcc kg deployment,po,svc,ep -n ingress-nginx
NAME READY UP-TO-DATE AVAILABLE AGE
deployment.apps/ingress-nginx-controller 1/1 1 1 21h

NAME READY STATUS RESTARTS AGE
pod/ingress-nginx-admission-create-h4sbz 0/1 Completed 0 21h
pod/ingress-nginx-admission-patch-bw2fr 0/1 Completed 0 21h
pod/ingress-nginx-controller-5795977b8-nfrb8 1/1 Running 0 21h

NAME TYPE CLUSTER-IP EXTERNAL-IP PORT(S) AGE
service/ingress-nginx-controller LoadBalancer 10.96.114.127 10.186.124.41 80:30061/TCP,443:31417/TCP 21h
service/ingress-nginx-controller-admission ClusterIP 10.98.183.189 <none> 443/TCP 21h

NAME ENDPOINTS AGE
endpoints/ingress-nginx-controller 192.168.7.8:443,192.168.7.8:80 21h
endpoints/ingress-nginx-controller-admission 192.168.7.8:8443 21h

Now the nginx ingress controller is deployed. You can also see the service/ingress-nginx-controller has already got an external IP from NSX-T.

Note: gcc is an alias which points to my TKC kubeconfig file.

❯ alias gcc
gcc='KUBECONFIG=gckubeconfig'

Lets create a sample deployment and expose it as a service under namespace ingress-nginx.

❯ gcc kubectl create deployment web --image=gcr.io/google-samples/hello-app:1.0 -n ingress-nginx
deployment.apps/web created
❯ gcc kubectl expose deployment web --type=NodePort --port=8080 -n ingress-nginx
service/web exposed

❯ gcc k get deployments.apps web -n ingress-nginx
NAME READY UP-TO-DATE AVAILABLE AGE
web 1/1 1 1 28s
❯ gcc k get svc web -n ingress-nginx
NAME TYPE CLUSTER-IP EXTERNAL-IP PORT(S) AGE
web NodePort 10.105.243.33 <none> 8080:30750/TCP 28s
❯ gcc k get ep web -n ingress-nginx
NAME ENDPOINTS AGE
web 192.168.1.9:8080 39s

Create a pod on the TKC and try to access the svc web from inside the pod. I've already deployed a nginx pod.

❯ gcc k get po nginx
NAME READY STATUS RESTARTS AGE
nginx 1/1 Running 0 96m

❯ gcc k exec -it nginx -- curl 10.105.243.33:8080
Hello, world!
Version: 1.0.0
Hostname: web-746c8679d4-ptmgh

Lets create a second deployment under namespace ingress-nginx.

❯ gcc kubectl create deployment web2 --image=gcr.io/google-samples/hello-app:2.0 -n ingress-nginx
deployment.apps/web2 created

❯ gcc kubectl expose deployment web2 --port=8080 --type=NodePort -n ingress-nginx
service/web2 exposed


❯ gcc k get deployment web2 -n ingress-nginx
NAME READY UP-TO-DATE AVAILABLE AGE
web2 1/1 1 1 56s
❯ gcc k get svc web2 -n ingress-nginx
NAME TYPE CLUSTER-IP EXTERNAL-IP PORT(S) AGE
web2 NodePort 10.99.79.19 <none> 8080:31695/TCP 65s
❯ gcc k get ep web2 -n ingress-nginx
NAME ENDPOINTS AGE
web2 192.168.2.13:8080 73s

Verify svc web2.

❯ gcc k exec -it nginx -- curl 10.99.79.19:8080
Hello, world!
Version: 2.0.0
Hostname: web2-5858b4c7c5-tmn8x

Service web and web2 are accessible within the TKC. We've already verified it from the nginx pod that runs within the same TKC.

Now, we will create an ingress resource under namespace ingress-nginx.

❯ cat ing-01.yaml
apiVersion: networking.k8s.io/v1
kind: Ingress
metadata:
name: hello-world-ing
annotations:
kubernetes.io/ingress.class: "nginx"
spec:
rules:
- host: hello-world.info
http:
paths:
- path: /
pathType: Prefix
backend:
service:
name: web
port:
number: 8080
- path: /v2
pathType: Prefix
backend:
service:
name: web2
port:
number: 8080
❯ gcc k create -f ing-01.yaml -n ingress-nginx
ingress.networking.k8s.io/hello-world-ing created

❯ gcc k get ing -n ingress-nginx
NAME CLASS HOSTS ADDRESS PORTS AGE
hello-world-ing <none> hello-world.info 80 55s
❯ gcc k get ing -n ingress-nginx
NAME CLASS HOSTS ADDRESS PORTS AGE
hello-world-ing <none> hello-world.info 10.186.124.41 80 56s

I've created a entry in /etc/hosts file in my laptop so that hello-world.info resolves to 10.186.124.41 which is the external IP of service/ingress-nginx-controller.

❯ cat /etc/hosts
##
# Host Database
#
# localhost is used to configure the loopback interface
# when the system is booting. Do not change this entry.
##
127.0.0.1 localhost
255.255.255.255 broadcasthost
::1 localhost
# Added by Docker Desktop
# To allow the same kube context to work on the host and the container:
127.0.0.1 kubernetes.docker.internal
10.186.124.41 hello-world.info
# End of section

Now from my laptop when I curl to hello-world.info, the request will be served by web svc, and when I curl to hello-world.info/v2, it will be served by web2 svc.


❯ curl hello-world.info
Hello, world!
Version: 1.0.0
Hostname: web-746c8679d4-ptmgh

❯ curl hello-world.info/v2
Hello, world!
Version: 2.0.0
Hostname: web2-5858b4c7c5-tmn8x

Hope it was useful. Cheers! 

References:

https://kubernetes.io/docs/tasks/access-application-cluster/ingress-minikube/
https://kubernetes.github.io/ingress-nginx/user-guide/basic-usage/

Tuesday, January 7, 2020

vRealize Automation 8 - Part2 - Initial configuration using quickstart

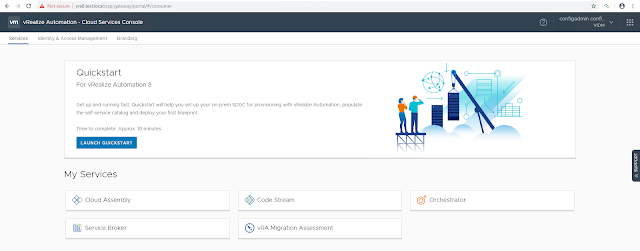
In this article, I will briefly explain how to set up your on-prem SDDC infrastructure for provisioning with vRA 8.0 using quickstart wizard. Follow my previous blog post vRA 8.0 - Part1 for the complete installation procedure. After a successful deployment, you can access the vRA Cloud Services Console.

Click Launch Quickstart.


Provide vCenter server details and click Validate.


Click Accept.


Select the datacenter to allow provisioning and click Create and go to next step.


Select the NSX version if you have it configured in your environment. In my case, I don't have NSX. So select None and click Create and go to next step.


Provide the basic configuration details like Datacenter, Template, Datastore, and Network. Quickstart will use this info to create your first blueprint and releases it to the catalog. This can be used for your first deployment. Here I've selected a centos7 template. 

Click Next step.


Select governance policies. I am using the defaults. Click Next step.


Review summary and click Run quickstart.

Note that here I did not select to "Automatically deploy my template when quickstart completed". In this case, a blueprint will be created and releases it to the catalog. You can request the catalog item to deploy it.


Once all the steps are completed, click Close.


At this point, a blueprint will be created under the quickstart project. And it can be seen under Cloud Assembly > Blueprints.

This blueprint is available as a catalog item. It can be seen under Service Broker > Catalog Items.

Hope it was useful. Cheers!

Related posts