This blog series captures practical learnings from working with GPUs in real‑world environments, with a focus on operations, reliability, and scale. Each post deep‑dives into specific aspects of GPU systems based on hands‑on experience, incidents, and operational challenges. Together, these articles aim to share actionable insights, highlight common pitfalls, and help teams build more robust and predictable GPU operations.
A blog on the evolving infrastructure stack - virtualization, Kubernetes, and GPUs.
Saturday, March 7, 2026
Saturday, April 26, 2025
Azure AI Foundry - Part4 - Deploy and use a generative AI model
Azure AI Foundry supports deploying large language models (LLMs). In this article, we will see how to deploy a model and use it.
Azure AI Foundry Portal
- Select your project - My assets - Models + endpoints - Deploy model
- Click Deploy base model
- Select the model you want to deploy (here I am selecting gpt-4.1) and click Confirm
- You can see the deployment details like capacity (token per minute), resource location etc.
- Click on Create resource and deploy
- Now it will start creating the resource and this step may take a minute or so.
- Once it is done, it will take you to the following page where you can see the mode details on the model you just deployed.
- Click on Open in playground to test the model.
- Once the chat playground is open, you will see your deployment, and under that you will see a section where you can give the model instructions and context. An example is given in the following screenshot. Once the model instructions and context are provided make sure to click Apply changes button.
- Now you can click on Generate prompt, provide the query and click on Send.
- You can also set values for limiting the maximum output token for the model response, temperature, frequency penalty etc. under the Parameters section.
- A sample response is provided in the following screenshot.
- To see the sample code, you can click on View code.
- You can also see code samples and authentication using API key as shown below.
- Metrics (total requests, token count, etc.) related to your LLM model deployment can be found on the following page.
Python
Azure AI Foundry Blog Series
Azure AI Foundry is a comprehensive suite of tools and services designed to accelerate the development and deployment of AI solutions on the Azure platform. Throughout this blog series, we will cover various aspects of Azure AI Foundry.
Part1 - Create project
Part2 - Language translation using AI Services
Part3 - Abstractive text summarization
Part4 - Deploy and use a generative AI model
Tuesday, April 22, 2025
Azure AI Foundry - Part3 - Abstractive text summarization
In this article, I will show you how to use Azure Cognitive Services for text summarization.
Azure AI Foundry portal
- AI Services - Language + Translator
- Summarize Information - Summarize text
- Select a connected AI service resource or create a new one.
- Playgrounds - Summarize Information - Summarize text
Python
Hope this was useful. Cheers!
Tuesday, April 15, 2025
Azure AI Foundry - Part2 - Language translation using AI Services
In this article, I will show you how to use an Azure AI Service available within the Azure AI Foundry project. We'll use the language translator as an example.
Azure AI Foundry portal
- Select AI Services.
- Click on Language + Translator.
- Select Translation.
- Select Text Translation.
- Click on Try with your own.
- Here I am translating language from English to Malayalam. Take a look at the Connected Azure AI Services, you can see it is already connected to one. Incase if it is not connected to an Azure AI Services resource, you can click on Create a new AI Services resource, select a region, provide an AI Services name if you like to and click Create and connect.
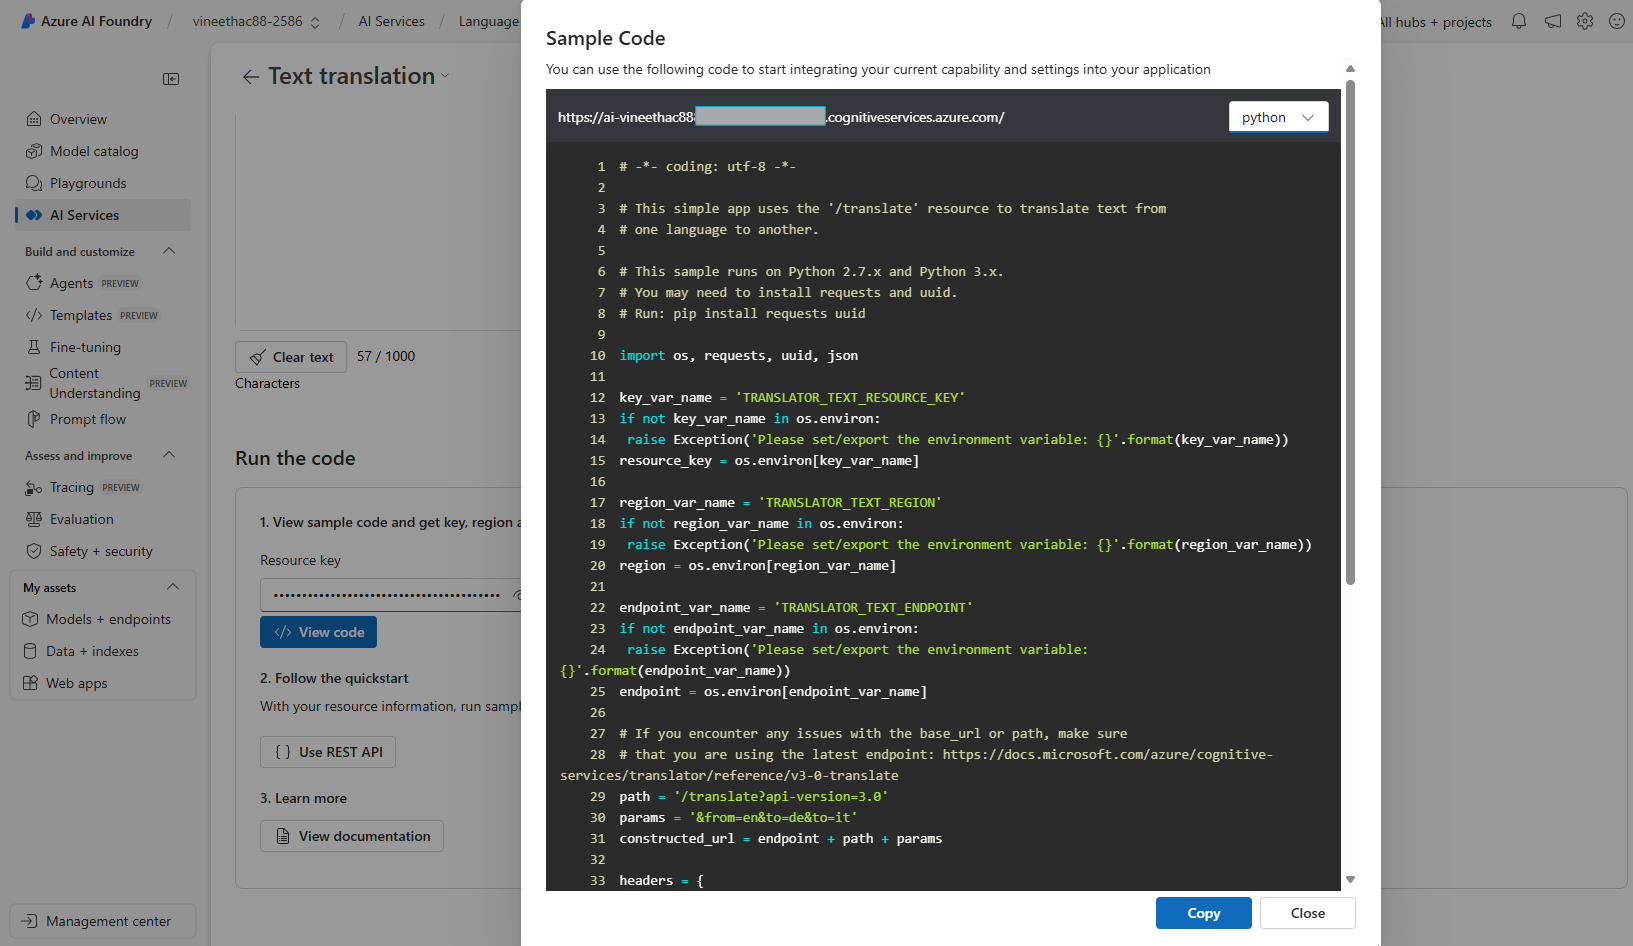
- You can also view the sample code by clicking on View code.
- Here is the sample code in Python and when you scroll down you can find the Resource key and Region details.
Python
import os, requests, uuid, json
resource_key = 'resource_key_here'
region = 'region_here'
endpoint = 'https://api.cognitive.microsofttranslator.com/'
# If you encounter any issues with the base_url or path, make sure
# that you are using the latest endpoint: https://docs.microsoft.com/azure/cognitive-services/translator/reference/v3-0-translate
path = '/translate?api-version=3.0'
params = '&to=ml'
constructed_url = endpoint + path + params
headers = {
'Ocp-Apim-Subscription-Key': resource_key,
'Ocp-Apim-Subscription-Region': region,
'Content-type': 'application/json',
'X-ClientTraceId': str(uuid.uuid4())
}
# You can pass more than one object in body.
body = [{
'text' : 'where are you right now?'
}]
request = requests.post(constructed_url, headers=headers, json=body)
response = request.json()
print(json.dumps(response, sort_keys=True, indent=4, separators=(',', ': ')))
Sample output:
What you see is a unicode string and once it is converted you will see the corresponding Malayalam text.
Curl
curl -X POST "https://api.cognitive.microsofttranslator.com/translate?api-version=3.0&to=ml" \
> -H "Ocp-Apim-Subscription-Key: your_key_here" \
> -H "Ocp-Apim-Subscription-Region: your_region_here" \
> -H "Content-Type: application/json" \
> -d "[{'Text':'where are you now?'}]" -v
Sample output:
Hope this was useful. Cheers!
References
Monday, April 14, 2025
Azure AI Foundry - Part1 - Create project
Create project using the portal
- Sign in to the Azure AI Foundry portal https://ai.azure.com.
- Click Create project.
- The project will have an auto generated name or you can provide one.
- You can also notice that it creates a new Hub, and Storage account, Key Vault and AI Services under a new resource group.
- Click Create.
- The project is getting created now. This may take a minute or two.
- Once it's done, it will take you to this overview page.
- On the Azure AI Foundry portal, you can use the Management center to configure/ get more details about your project, connected resources, models, endpoints etc.
- Under the Hub or Project properties, if you select the Resource Group, it will open a new browser tab and navigate to the Azure portal where you can see all the Azure resources that have been created to support your hub and project.
Create project using Azure CLI
Note: Remove any existing installation of the ml and azure-cli-ml extensions and install new.
- az extension remove -n azure-cli-ml
- az extension remove -n ml
- az extension add -n ml
- az extension update -n ml
- az login
- az account set --subscription "subscription_id"
- az group create --name "resource_group_name" --location "location_name"
- az ml workspace create --kind hub --resource-group "resource_group_name" --name "hub_name"
- $hub_id = "you will get this id from the output of previous step"
- az ml workspace create --kind project --hub-id $hub_id --resource-group "resource_group_name" --name "project_name"
References
Thursday, March 28, 2024
Generative AI and LLMs Blog Series
In this blog series we will explore the fascinating world of Generative AI and Large Language Models (LLMs). We delve into the latest advancements in AI technology, focusing particularly on LLMs, which have revolutionized various fields, including natural language processing and text generation.
Throughout this series, we will discuss LLM serving platforms such as Ollama and Hugging Face, providing insights into their capabilities, features, and applications. I will also guide you through the process of getting started with LLMs, from setting up your development/ test environment to deploying these powerful models on Kubernetes clusters. Additionally, we'll demonstrate how to effectively prompt and interact with LLMs using frameworks like LangChain, empowering you to harness the full potential of these cutting-edge technologies.
Stay tuned for insightful articles, and hands-on guides that will equip you with the knowledge and skills to unlock the transformative capabilities of LLMs. Let's explore the future of AI together!
![]() |
| Image credits: designer.microsoft.com/image-creator |
Ollama
Part1 - Deploy Ollama on Kubernetes
Part2 - Prompt LLMs using Ollama, LangChain, and Python
Part3 - Web UI for Ollama to interact with LLMs
Part4 - Vision assistant using LLaVA
Hugging Face
Part1 - Getting started with Hugging Face
Part2 - Code generation with Code Llama Instruct
Part3 - Inference with Code Llama using LangChain
Part4 - Containerize your LLM app using Python, FastAPI, and Docker
Part5 - Deploy your LLM app on Kubernetes
Part6 - LLM app observability <coming soon>
Monday, January 15, 2024
Ollama - Part1 - Deploy Ollama on Kubernetes
Docker published GenAI stack around Oct 2023 which consists of large language models (LLMs) from Ollama, vector and graph databases from Neo4j, and the LangChain framework. These utilities can help developers with the resources they need to kick-start creating new applications using generative AI. Ollama can be used to deploy and run LLMs locally. In this exercise we will deploy Ollama to a Kubernetes cluster and prompt it.
In my case I am using a Tanzu Kubernetes Cluster (TKC) running on vSphere with Tanzu 7u3 platform powered by Dell PowerEdge R640 servers. The TKC nodes are using best-effort-2xlarge vmclass with 8 CPU and 64Gi Memory. Note that I am running it on a regular Kubernetes cluster without GPU. If you have GPU, additional configuration steps might be required.
Full project in my GitHub
https://github.com/vineethac/Ollama/tree/main/ollama_on_kubernetes


.jpeg)
