Showing posts with label Microsoft. Show all posts

Saturday, April 26, 2025

Azure AI Foundry - Part4 - Deploy and use a generative AI model

Azure AI Foundry supports deploying large language models (LLMs). In this article, we will see how to deploy a model and use it.

Azure AI Foundry Portal

  • Select your project - My assets - Models + endpoints - Deploy model
  • Click Deploy base model
  • Select the model you want to deploy (here I am selecting gpt-4.1) and click Confirm

  • You can see the deployment details like capacity (token per minute), resource location etc. 
  • Click on Create resource and deploy

  • Now it will start creating the resource and this step may take a minute or so.
  • Once it is done, it will take you to the following page where you can see the mode details on the model you just deployed.

  • Click on Open in playground to test the model.
  • Once the chat playground is open, you will see your deployment, and under that you will see a section where you can give the model instructions and context. An example is given in the following screenshot. Once the model instructions and context are provided make sure to click Apply changes button. 
  • Now you can click on Generate prompt, provide the query and click on Send.
  • You can also set values for limiting the maximum output token for the model response, temperature, frequency penalty etc. under the Parameters section.

  • A sample response is provided in the following screenshot.

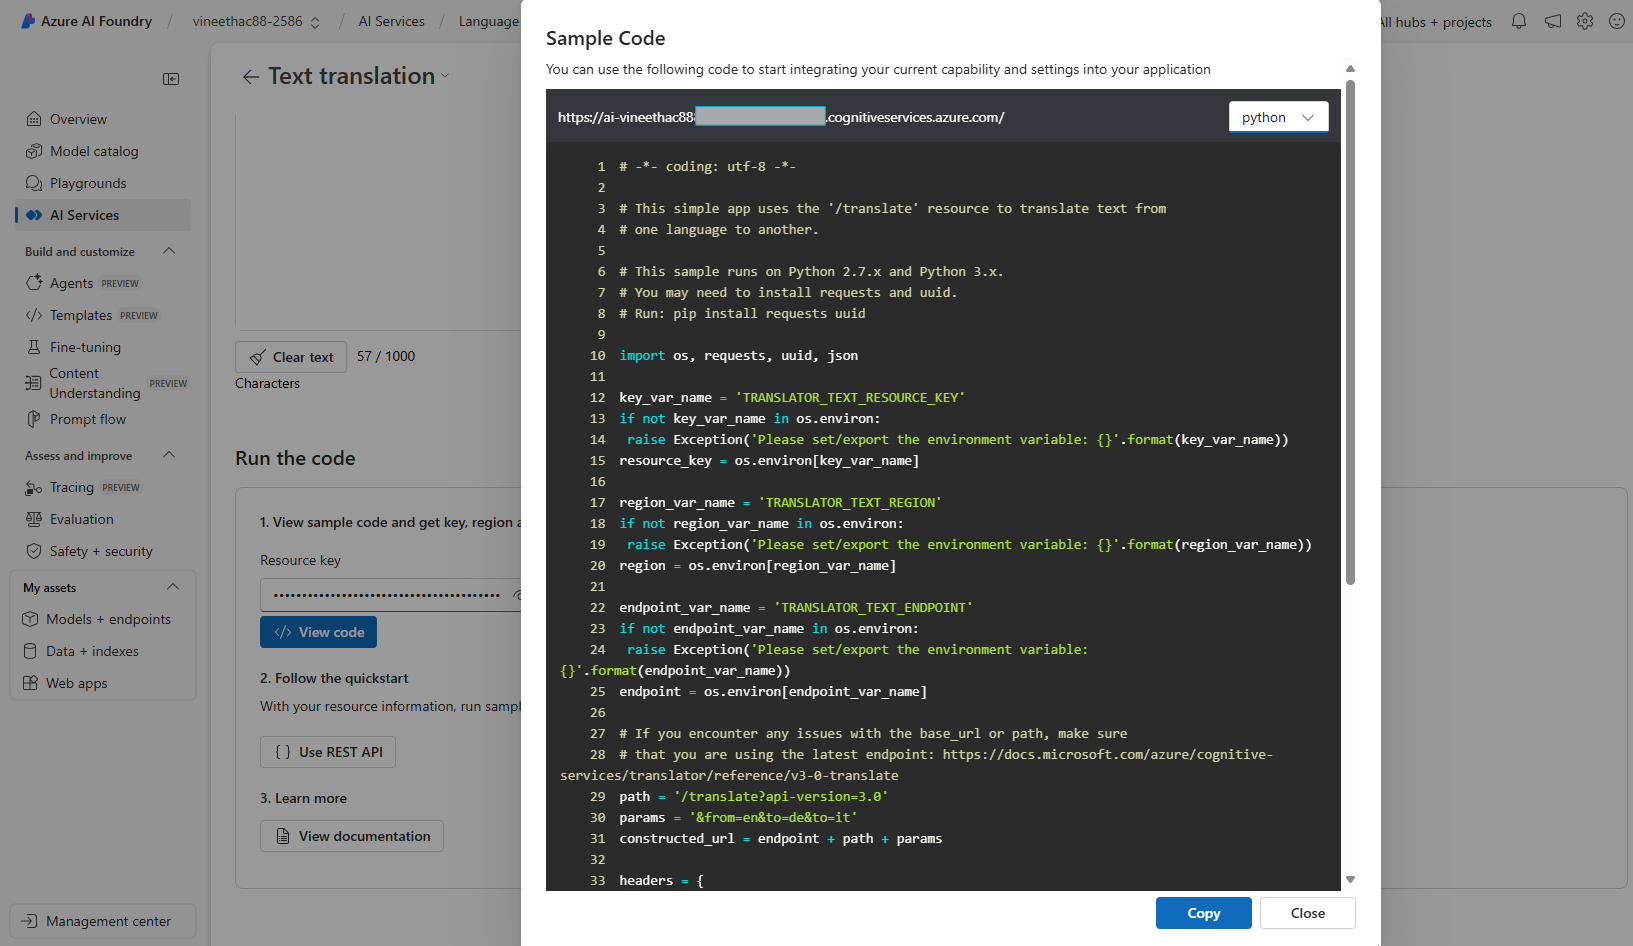
  • To see the sample code, you can click on View code.
  • You can also see code samples and authentication using API key as shown below.

  • Metrics (total requests, token count, etc.) related to your LLM model deployment can be found on the following page.


Python


Sample code to interact with the model can be found in my GitHub repo.

Hope it was useful. Cheers!

Azure AI Foundry Blog Series

Azure AI Foundry is a comprehensive suite of tools and services designed to accelerate the development and deployment of AI solutions on the Azure platform. Throughout this blog series, we will cover various aspects of Azure AI Foundry.


Part1 - Create project
Part2 - Language translation using AI Services
Part3 - Abstractive text summarization
Part4 - Deploy and use a generative AI model


Tuesday, April 22, 2025

Azure AI Foundry - Part3 - Abstractive text summarization

In this article, I will show you how to use Azure Cognitive Services for text summarization. 

Azure AI Foundry portal

  • AI Services - Language + Translator


  • Summarize Information - Summarize text


  • Select a connected AI service resource or create a new one.


  • Playgrounds - Summarize Information - Summarize text


Python


Sample code to summarize a PDF can be found in my GitHub repo. Following is an example of a resume summary: 


Hope this was useful. Cheers!

Tuesday, April 15, 2025

Azure AI Foundry - Part2 - Language translation using AI Services

In this article, I will show you how to use an Azure AI Service available within the Azure AI Foundry project. We'll use the language translator as an example.

Azure AI Foundry portal

  • Select AI Services. 
    • Click on Language + Translator.


  • Select Translation.

  • Select Text Translation.

  • Click on Try with your own.

  • Here I am translating language from English to Malayalam. Take a look at the Connected Azure AI Services, you can see it is already connected to one. Incase if it is not connected to an Azure AI Services resource, you can click on Create a new AI Services resource, select a region, provide an AI Services name if you like to and click Create and connect

  • You can also view the sample code by clicking on View code.

  • Here is the sample code in Python and when you scroll down you can find the Resource key and Region details.

Python

import os, requests, uuid, json

resource_key = 'resource_key_here'
region = 'region_here'
endpoint = 'https://api.cognitive.microsofttranslator.com/'

# If you encounter any issues with the base_url or path, make sure
# that you are using the latest endpoint: https://docs.microsoft.com/azure/cognitive-services/translator/reference/v3-0-translate
path = '/translate?api-version=3.0'
params = '&to=ml'
constructed_url = endpoint + path + params

headers = {
    'Ocp-Apim-Subscription-Key': resource_key,
    'Ocp-Apim-Subscription-Region': region,
    'Content-type': 'application/json',
    'X-ClientTraceId': str(uuid.uuid4())
}

# You can pass more than one object in body.
body = [{
    'text' : 'where are you right now?'
}]
request = requests.post(constructed_url, headers=headers, json=body)
response = request.json()

print(json.dumps(response, sort_keys=True, indent=4, separators=(',', ': ')))


Sample output:

What you see is a unicode string and once it is converted you will see the corresponding Malayalam text. 

Curl

curl -X POST "https://api.cognitive.microsofttranslator.com/translate?api-version=3.0&to=ml" \
> -H "Ocp-Apim-Subscription-Key: your_key_here" \
> -H "Ocp-Apim-Subscription-Region: your_region_here" \
> -H "Content-Type: application/json" \
> -d "[{'Text':'where are you now?'}]" -v


Sample output:

Hope this was useful. Cheers!

References

Monday, April 14, 2025

Azure AI Foundry - Part1 - Create project

Azure AI Foundry is a unified platform that helps you design, customize, build, test, deploy, and manage generative AI applications. In this article, I will show you how to create a project and a hub, which are the first steps to building your AI solution. Let's get started!

Create project using the portal


  • Click Create project.
    • The project will have an auto generated name or you can provide one. 
    • You can also notice that it creates a new Hub, and Storage account, Key Vault and AI Services under a new resource group.
    • Click Create.
  • The project is getting created now. This may take a minute or two.


  • Once it's done, it will take you to this overview page.


  • On the Azure AI Foundry portal, you can use the Management center to configure/ get more details about your project, connected resources, models, endpoints etc.


  • Under the Hub or Project properties, if you select the Resource Group, it will open a new browser tab and navigate to the Azure portal where you can see all the Azure resources that have been created to support your hub and project.


Create project using Azure CLI


Note: Remove any existing installation of the ml and azure-cli-ml extensions and install new.
  • az extension remove -n azure-cli-ml
  • az extension remove -n ml
  • az extension add -n ml
  • az extension update -n ml

  • az login
  • az account set --subscription "subscription_id"
  • az group create --name "resource_group_name" --location "location_name"

  • az ml workspace create --kind hub --resource-group "resource_group_name" --name "hub_name"


  • $hub_id = "you will get this id from the output of previous step"
  • az ml workspace create --kind project --hub-id $hub_id --resource-group "resource_group_name" --name "project_name"

Tuesday, March 20, 2018

Working with ScaleIO REST API using PowerShell - Part 3

As you all know disk drives are the most important and basic building blocks of a storage system. In order to ensure data availability, the disk drives in your storage system should always stay healthy. Unhealthy drives not only cause risk to your data but also contribute to degraded performance. In this article, I will show how to query and get disk health-related information in a ScaleIO cluster using REST API and PowerShell. 

Please refer my previous posts for API authentication, token generation and 'Invoke-RestMethod'.


#Query all devices in the ScaleIO cluster
$all_devices = (Invoke-RestMethod -Uri "https://192.168.11.15:443/api/types/Device/instances " -Method Get -Headers $ScaleIOAuthHeaders)  

#Select necessary properties and sort
$all_devices = (Invoke-RestMethod -Uri "https://192.168.11.15:443/api/types/Device/instances " -Method Get -Headers $ScaleIOAuthHeaders) | select sdsId, storagePoolId, name, deviceCurrentPathName, errorState, deviceState, ssdEndOfLifeState, temperatureState, aggregatedState  | sort sdsId | ft -AutoSize


#Sample output

Hope this was helpful. Please refer to ScaleIO 2.5 API reference guide for more details. Cheers!

Sunday, March 11, 2018

PowerShell quick start guide

This post is for all those who would like to kickstart and learn PowerShell from the very basic level. When I started learning PowerShell I wrote few articles so that it will be helpful for folks who are looking forward to 'how to start and learn it' and I can also refer to it whenever I need. Here in this post, I am just putting all of them together in proper order so that anyone can easily make use of it.

PowerShell 101 blog series

Friday, March 9, 2018

Infrastructure testing using Pester - Part 2

In my previous post I explained briefly about the basics of using Pester to test and validate your infrastructure. This article is about how to create/ output custom messages on Pester test failures. Let's have a look at the below example.

#example_test.ps1
Describe "Verify drive D" {
    Context "Check file system type and AUS" {
        It "Test 1: Should be NTFS" {
            $drive_stat = fsutil fsinfo statistics D:
            ($drive_stat[0]) -match 'File System Type :\s+NTFS' | Should Be $true
        }
        It "Test 2: Should have 4K AUS" {
            $AUS_stat = fsutil fsinfo refsinfo D:
            ($AUS_stat[8]) -match 'Bytes Per Cluster :\s+4096' | Should Be $true
        }
    }
}

Describe "Verify Hyper-V vSwitch" {
    Context "Check for Corp vSwitch, its type and connected NIC" {
       
        $check = Get-VMSwitch | where name -eq Corp

        It "Test 3: Corp vSwitch should be present" {
            ($check.Name) | Should -BeExactly "Corp"
        }
        It "Test 4: Corp vSwitch type should be Internal" {
            ($check.SwitchType) | Should -BeExactly "Internal"  
        }
    }
}


I get the following output, when I run it against one of my test machine.


The above screenshot shows, Test 1 and Test 4 is failed. Eventhough you get the error message, some users/ admins prefer to have a custom message when a test fails. So that it will be very easy to troubleshoot for the one who is validating the infrastructure. To save custom messages for each test, I am using a hash table, and if a test is found to be failed, it will pick the respective custom message from the hash table and displays it and the end of the test. Here I created a new ps1 file as below.

#invoke_test.ps1
$test = Invoke-Pester .\example_test.ps1 -PassThru

$failmsg_table = @{
    "Test 1: Should be NTFS"                        = "Test 1: Failed because the filesystem of drive D is not NTFS"
    "Test 2: Should have 4K AUS"                    = "Test 2: Failed because the AUS of drive D is not 4K"
    "Test 3: Corp vSwitch should be present"        = "Test 3: Failed becuase Corp vSwitch is not present"
    "Test 4: Corp vSwitch type should be Internal"  = "Test 4: Failed because Corp vSwitch type is not Internal"
}

for ($i=0; $i -le $test.TotalCount; $i++){
    if ($test.TestResult[$i].Result -eq "Failed") {
        write-output $failmsg_table[$($test.TestResult[$i].Name)]
    }
}


When I execute "invoke_test.ps1", it invokes "example_test.ps1" and the output is saved to variable "test". The hash table has the list of tests and the corresponding custom message. If any of the "TestResult" is Failed, the corresponding custom message will be displayed. Sample output screenshot is given below.


 Hope this was useful. Cheers!

Wednesday, March 7, 2018

Working with ScaleIO REST API using PowerShell - Part 2

In my previous post, I explained how to connect and authenticate with ScaleIO REST API, and use Invoke-RestMethod. In this article, I will explain how to query selected statistics/ properties with POST method. 

First, you have to define the set of properties that you would like to query, and then pass it to "invoke-restmethod". You can get the list of available properties of the respective object from the ScaleIO REST API Reference Guide. 

Example 1: Query and collect MDM cluster information
Here I am collecting the below-mentioned properties of "MDMCluster" object. 

#selected properties to query

$param1 = @'
{
    "properties":["name", "clusterMode", "master", "clusterState", "virtualIps"]
}
'@

#invoke-restmethod with respective uri

$MDM_cluster_stats = (Invoke-RestMethod -Uri "https://192.168.11.15:443/api/instances/System/queryMdmCluster " -Body $param1 -ContentType "application/json" -Headers $ScaleIOAuthHeaders -Method Post)

#organize output in a hash table

$mdm_props = @{

    'Cluster name'      = ($MDM_cluster_stats).name
    'Mode'              = ($MDM_cluster_stats).clusterMode
    'Cluster state'     = ($MDM_cluster_stats).clusterState
    'Master MDM IP'     = ($MDM_cluster_stats.master).managementIPs[0]
    'Cluster VIP01'     = ($MDM_cluster_stats).virtualIps[0]
    'Cluster VIP02'     = ($MDM_cluster_stats).virtualIps[1]
}

Write-Output $mdm_props

#sample output screenshot given below


Example 2: Query and collect overall ScaleIO system capacity details
Here I am collecting some properties of "System Statistics" object. 

#selected properties to query

$param2 = @'
{
    "properties":["maxCapacityInKb", "capacityInUseInKb", "spareCapacityInKb", "failedCapacityInKb", "degradedFailedCapacityInKb"]
}
'@

#invoke-restmethod with respective uri

$system_overall_stats = (Invoke-RestMethod -uri "https://192.168.11.15:443/api/types/System/instances/action/querySelectedStatistics " -Body $param2 -ContentType "application/json" -Headers $ScaleIOAuthHeaders -Method Post)

#organize output in a hash table


$system_capacity_props = @{

    "System max capacity (TB)"                = (($system_overall_stats.maxCapacityInKb)/1024/1024/1024)
    "System capacity in use (TB)"             = (($system_overall_stats.capacityInUseInKb)/1024/1024/1024)
    "System spare capacity (TB)"              = (($system_overall_stats.spareCapacityInKb)/1024/1024/1024)
    "System failed capacity (TB)"             = (($system_overall_stats.failedCapacityInKb)/1024/1024/1024)
    "System degraded failed capacity (TB)"    = (($system_overall_stats.degradedFailedCapacityInKb)/1024/1024/1024)
}

Write-Output $system_capacity_props

#sample output screenshot given below


Hope this was useful. Please refer Dell EMC ScaleIO Ready Node Version 2.5 API Reference Guide for more details.