Showing posts with label Automation. Show all posts

Friday, October 23, 2020

VMware PowerCLI 101 - part8 - Working with vSAN

This article explains how to work with vSAN resources using PowerCLI. 

Note I am using the following versions:
PowerShell: 5.1.14393.3866
VMware PowerCLI: 12.1.0.17009493


Connect to vCenter:
Connect-VIServer <IP of vCenter server>

List all vSAN get cmdlets:
Get-Command Get-Vsan*


vSAN runtime info:
$c = Get-Cluster Cluster01
Get-VsanRuntimeInfo -Cluster $c


vSAN space usage:
Get-VsanSpaceUsage


vSAN cluster configuration:
Get-VsanClusterConfiguration


vSAN disk details:
Get-VsanDisk


View all properties of a disk:
(Get-VsanDisk)[31] | select *


View disk vendor, model, firmware revision, physical location, operational state:
(Get-VsanDisk)[31].ExtensionData


 vSAN disk group details:
Get-VsanDiskGroup


Get all properties of a disk group:

Tuesday, January 7, 2020

vRealize Automation 8 - Part2 - Initial configuration using quickstart

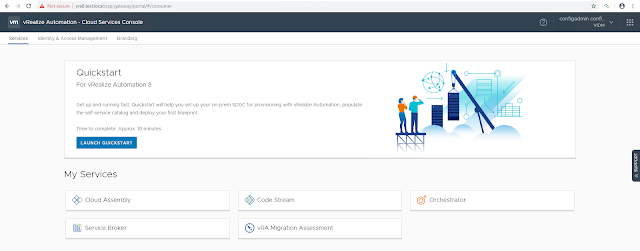
In this article, I will briefly explain how to set up your on-prem SDDC infrastructure for provisioning with vRA 8.0 using quickstart wizard. Follow my previous blog post vRA 8.0 - Part1 for the complete installation procedure. After a successful deployment, you can access the vRA Cloud Services Console.

Click Launch Quickstart.


Provide vCenter server details and click Validate.


Click Accept.


Select the datacenter to allow provisioning and click Create and go to next step.


Select the NSX version if you have it configured in your environment. In my case, I don't have NSX. So select None and click Create and go to next step.


Provide the basic configuration details like Datacenter, Template, Datastore, and Network. Quickstart will use this info to create your first blueprint and releases it to the catalog. This can be used for your first deployment. Here I've selected a centos7 template. 

Click Next step.


Select governance policies. I am using the defaults. Click Next step.


Review summary and click Run quickstart.

Note that here I did not select to "Automatically deploy my template when quickstart completed". In this case, a blueprint will be created and releases it to the catalog. You can request the catalog item to deploy it.


Once all the steps are completed, click Close.


At this point, a blueprint will be created under the quickstart project. And it can be seen under Cloud Assembly > Blueprints.

This blueprint is available as a catalog item. It can be seen under Service Broker > Catalog Items.

Hope it was useful. Cheers!

Related posts

Monday, December 16, 2019

vRealize Automation 8 - Part1 - Installation

Background


  • vRealize Automation (vRA) has two consumption models now:
    • vRA on-prem
    • vRA cloud (SAAS offering)
  • From vRA 8.0 onwards the same code being used in vRA cloud is taken and packaged together for on-prem use.
  • vRA 8.0 is focused on greenfield environments (new vRA deployments).
  • If you want to upgrade from vRA 7.x VMware recommends waiting until vRA 8.x as it will have a migration tool that helps the upgrade process. 

Before starting the installation process, I strongly recommend you to go through the below documentation links.


Installation


Download the installer ISO file and mount it. If you are running it from a Windows machine, browse to win32 folder and run installer.exe file. During the installation process first LCM VM will be deployed and it is responsible for deploying IDM and vRA VMs.

Note: Make sure DNS entries for LCM, IDM, and vRA are present and resolvable.

Click install.


Click next.


Accept EULA.


Provide vCenter details.


Accept.


Select a datacenter location.


Select a compute cluster.


Select a datastore.


Provide network configuration details.


Set password.


Provide LCM config details.


Provide IDM config details.


Provide vRA config details.


Review summary.


Click submit to start the installation process.


Once the installation is successful you will get the following URLs to navigate to vRSLCM and vRA UI.


Login to LCM.


Login to vRA.


Provide creds.


There you go! vRA 8.0 is successfully deployed.


Hope it was useful. Cheers!

References


Tuesday, December 3, 2019

Working with iDRAC9 Redfish API using PowerShell - Part 3

In this article, I will explain how to access the iDRAC Redfish API using session-based authentication.


[CmdletBinding()]
param(
    [Parameter(Mandatory)]
    [String]$idrac_ip
)

#To fix the connection issues to iDRAC REST API
add-type @"
    using System.Net;
    using System.Security.Cryptography.X509Certificates;
    public class TrustAllCertsPolicy : ICertificatePolicy {
    public bool CheckValidationResult(
        ServicePoint srvPoint, X509Certificate certificate,
        WebRequest request, int certificateProblem) {
        return true;
        }
    }
"@

[System.Net.ServicePointManager]::CertificatePolicy = New-Object TrustAllCertsPolicy
[System.Net.ServicePointManager]::SecurityProtocol = [System.Net.SecurityProtocolType]::Tls12 -bor [System.Net.SecurityProtocolType]::Tls11

#Get iDRAC creds
$Credentials = Get-Credential -Message "Enter iDRAC Creds"

$creds_json = '{"UserName": "$($Credentials.UserName)", "Password": "$($Credentials.GetNetworkCredential().Password)"}'
$creds_json = $ExecutionContext.InvokeCommand.ExpandString($creds_json)

#Using Invoke-WebRequest
try {
    $result1 = Invoke-WebRequest -Uri "https://$($idrac_ip)/redfish/v1/Sessions " -Method POST -ContentType 'application/json' -Headers @{"Accept"="application/json"} -Body $creds_json -Verbose
}
catch {
    Write-Error -Message "Failed to invoke the API! Incorrect creds!"
    $PSCmdlet.ThrowTerminatingError($PSItem)
}

$auth_head = @{
"X-Auth-Token" = $result1.Headers.'X-Auth-Token'
"accept" = "application/json" }

#URI to get basic system info
$u1 = "https://$($idrac_ip)/redfish/v1/Systems/System.Embedded.1"

#Using Invoke-RestMethod
try {
    $output = Invoke-RestMethod -Uri $u1 -Method Get -Headers $auth_head -ContentType 'application/json' -Verbose
}
catch {
    Write-Error -Message "Failed to invoke the API! Incorrect creds!"
    $PSCmdlet.ThrowTerminatingError($PSItem)
}

Write-Output "`nBasic System Info:" $output


Hope it was useful. Cheers!

Related posts

Working with iDRAC9 Redfish API using PowerShell - Part 1

Working with iDRAC9 Redfish API using PowerShell - Part 2


References

iDRAC9 Redfish API guide

Wednesday, August 7, 2019

VMware PowerCLI 101 - Part4 - Snapshots

In this post, I will briefly explain how to make use of PowerCLI when working with virtual machine snapshots.

Take a snapshot of VM:
New-Snapshot -VM "New Virtual Machine" -Name snap1 -Description try1

Revert to a snapshot:
$snap = Get-Snapshot -VM "New Virtual Machine" -Name "snap1"
Set-VM -VM "New Virtual Machine" -Snapshot $snap -WhatIf
Set-VM -VM "New Virtual Machine" -Snapshot $snap 


Delete specific snapshot of a VM:
$snap = Get-Snapshot -VM "New Virtual Machine" -Name "snap1"
Remove-Snapshot -Snapshot $snap -WhatIf
Remove-Snapshot -Snapshot $snap 

Delete all snapshots of a VM:
Get-VM "New Virtual Machine" | Get-Snapshot | Remove-Snapshot -WhatIf
Get-VM "New Virtual Machine" | Get-Snapshot | Remove-Snapshot 

List all VMs with snapshots:
Get-VM | Get-Snapshot | Select-Object VM, Name, Description, SizeGB

List VMs with snapshots older than a week:
Get-VM | Get-Snapshot | Where {$PSItem.Created -lt (Get-Date).AddDays(-7)} | Select-Object VM, Name, Description, Created, SizeGB | Format-Table

Find the parent-child relationship of VM snapshots:
$vm = Get-VM "New Virtual Machine"
get-vm $vm | Get-Snapshot | Select VM,Name,Description,Parent,Children,SizeGB,IsCurrent,Created,Id | sort Created |  Format-Table


Hope it was useful. Cheers!

Related posts:

Friday, June 7, 2019

VMware PowerCLI 101 - Part3 - Basic VM operations

Previous posts of this blog series talked about how to install PowerCLI, connecting to ESXi host and basics of working with the vCenter server. In this article, we will go through basic VM operations.

Get basic VM details:
Get-VM -Name <name of the virtual machine>

To view all properties of a VM object:
Get-VM -Name <name of the virtual machine> | Get-Member

To start a VM:
Get-VM -Name <name of the virtual machine> | Start-VM

To restart a VM:
Get-VM -Name <name of the virtual machine> | Restart-VMGuest

To shut down a VM:
Get-VM -Name <name of the virtual machine> | Shutdown-VMGuest

To delete a VM permanently:
Get-VM -Name <name of the virtual machine> | Remove-VM -DeletePermanently

Let's have a look into the "ExtensionData" property of a virtual machine.

Status related details of a VM:
(Get-VM -Name <name of the virtual machine>).ExtensionData | select GuestHeartbeatStatus,OverallStatus,ConfigStatus


CPU, Memory config details of a VM:
(Get-VM -Name <name of the virtual machine>).ExtensionData.Config.Hardware


CPU, Memory hot add/ remove features:


Layout details of a VM:
(Get-VM -Name <name of the virtual machine>).ExtensionData.LayoutEx.File | sort Key | ft


VM tools status and other guest details:
(Get-VM -Name <name of the virtual machine>).ExtensionData.Guest


Network related info of a VM:
(Get-VM -Name <name of the virtual machine>).ExtensionData.Guest.Net


Hope this was useful. Cheers!