Showing posts with label Application image. Show all posts

Saturday, January 23, 2021

Benchmarking Kubernetes infrastructure using K-Bench

K-Bench is a framework to benchmark the control and data plane aspects of a Kubernetes cluster. More details are available at https://github.com/vmware-tanzu/k-bench. In my case, I am going to conduct this benchmarking study on a Tanzu Kubernetes cluster which is provisioned using Tanzu Kubernetes Grid service on a vSphere 7 U1 cluster.

Step 1: Clone the K-Bench repo

git clone https://github.com/vmware-tanzu/k-bench.git


Step 2: Install

./install.sh


Once the installation is done it will say, "Completed k-bench installation.".

Step 3: Run the benchmark

./run.sh


If you don't specify any test, then it is going to conduct the default set of tests. All sets of tests are defined under the config directory. If you browse to the config directory and list, there are separate folders specific to each test. You can see folders starting with cp and dp, and it refers to control plane and data plane related tests.


If no specific test is mentioned, then it is going to run all that is defined in the default directory. You can also see details of the test and results in the logs. The directories starting with "results" will have log files corresponding to each test run.


Following is a sample log that shows a summary of pod creation throughput, pod creation average latency, pod startup total latency, list/ update/ delete pod latency, etc.


Now, if you want to run a specific test case, you can do it as follows:
Usage: ./run.sh -r <run-tag> [-t <comma-separated-tests> -o <output-dir>]
DP network internode test

For example, you can run a data plane test to check the network performance between two nodes as shown below.

./run.sh -r "kbench-run-on-tkg-cluster-02"  -t "dp_network_internode" -o "./"


As soon as you run the above command, two pods will be created inside "kbench-pod-namespace" on two worker nodes as you see below.


It will then start "iperf3" process inside those two pods to create a network load following a client-server model as per the actions defined in the config.json file.


Sample logs are given below. It shows details like the amount of data transferred, transfer rate, network latency, etc.


Once the test run is complete, the pods and other resources created will be automatically deleted. Similarly, you can select the other set of tests that are pre-defined in the framework. I believe you have the flexibility to define custom test cases too as per your requirements. I hope it was useful. Cheers!

Related posts


Storage performance benchmarking of Tanzu Kubernetes clusters
Monitoring Tanzu Kubernetes cluster using Prometheus and Grafana


References


Wednesday, October 23, 2019

Docker 101 - Part4 - Creating images using dockerfile

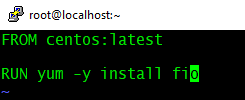
In this article, I will briefly explain how to create your own image using Dockerfile. For example, I will be creating an FIO image. FIO is a storage stress test tool and this image can be used for container storage IO benchmarking/ testing.

  • Login to the CentOS docker host.
  • Create a file named "Dockerfile".
  • # vi Dockerfile
  • Add the below two lines and save it.

  • # docker build ./

  • Once the build is complete, it returns the IMAGE ID as shown below.
  • You can use the "docker tag" command to mention a repository and tag to the image. 

  • At this stage, as shown in the above screenshot, the FIO image is created with repository "vineethac/fio_image" and tagged as "latest".
  • You can run this image as given below.

  • # docker run -dit --name FIO_test01 --mount source=disk_data,target=/vol vineethac/fio_image fio --name=RandomReadTest1 --readwrite=randread --rwmixwrite=0 --bs=4k --invalidate=1 --direct=1 --filename=/vol/newfile --size=10g --time_based --runtime=300 --ioengine=libaio --numjobs=2 --iodepth=1 --norandommap --randrepeat=0 --exitall


  • The above command will start a container with FIO application running inside it. FIO will use "/vol/newfile" for IO tests. "/vol" is using "disk_data" directory which is inside "/var/lib/docker/volumes". Once the test is complete, the container will exit.

Hope it was useful. Cheers!

Related posts


Docker 101 - Part3 - Persisting data using volumes

Docker 101 - Part2 - Basic operations

Docker 101 - Part1 - Installation


Friday, October 18, 2019

Docker 101 - Part2 - Basic operations

In this article, I will walk you through basic Docker commands and how to work with it for creating, managing, and monitoring Docker containers.

Docker version and info


#docker version


#docker info


Default directory for Docker


#cd /var/lib/docker


Pull images


#docker pull centos:latest 


List images


#docker images


Create bridge network


#docker network create -d bridge --subnet 10.0.0.0/24 ps-bridge

List all bridge networks


#brctl show

Inspect a network 


#docker network ls
#docker network inspect <name>


Run a container


#docker run -dt --name centos_test --network ps-bridge centos sleep 900


SSH into a container


#docker exec -it <name> sh


List running containers


#docker ps


List all containers


#docker ps -a

List container stats


#docker stats


Stop a container


#docker stop <Container ID>


Remove a container


#docker rm <Container ID>

Remove an image


#docker rmi <REPOSITORY:TAG>


Hope it was useful. Cheers!

Related posts


References