Saturday, October 24, 2015

Creating VHD/ VHDX templates

Templates can save you lot of time, instead of building a server from scratch. Following are the steps to create a VHD/ VHDX template that can be used on Hyper-V servers.

1.Create a virtual machine (say Windows Server 2008 R2 with 80 GB hard drive)
2.Make sure you create fixed disk
3.Install OS
4.Install Windows updates
5.Install Hyper-V integration services
6.Install any applications as per your requirement

Once you are done with all the above steps, now its time to sysprep your machine. This is shown below :

sysprep

Make sure you check Generalize and shutdown options. Once the system completes sysprep operation, it will automatically shutdown. You can now take a copy of this VHD disk, rename it as you wish and save it to a location where you keep your templates. Also, make sure to make this file as read-only, so that you can avoid booting it up accidentally.

Note : You can create VHD templates for OS earlier than Windows Server 2012 and VHDX templates for Windows Server 2012 and later.

Friday, October 2, 2015

Monday, September 28, 2015

Ports on FC Switched Fabric (FC-SW)

The diagram given below gives a brief idea about the different types of ports on a Fiber Channel Switched Fabric.

Ports on FC Switched Fabric


Friday, August 28, 2015

RAID controller

As RAID controller is responsible for the operations on RAID array drives, it is very important to have an enterprise class controller for enhanced performance, increased reliability and fault tolerance. Considering the business requirement and budget, you can choose a RAID controller. Here I will be explaining about DELL Power Edge RAID Controller (PERC). When choosing a controller, there are few critical hardware features that affect performance to keep in mind :
  • Read policy
  • Write policy
  • Controller cache memory
  • CacheCade
  • Cut-through I/ O
  • FastPath

PERC Series

PERC H810 - high performance RAID controller that can be connected to JBOD

PERC H710P - ideal for implementing hybrid server platforms based on SAS HDDs with high performance and enterprise class reliability

PERC H310 - entry-level RAID controller (no cache)

Reference :
Dell
Microsoft

Saturday, August 8, 2015

How to calculate total IOPS supported by a disk array

IOPS stands for input/ output operations per second. 

Consider a RAID array with 4 disks in RAID 5. Each disk is 4TB 15K SAS drive. We can use the below formula for calculating maximum IOPS supported by the RAID array.

Raw IOPS = Disk Speed IOPS * Number of disks

Functional IOPS = (Raw IOPS * Write % / RAID Penalty) + (RAW IOPS * Read %)

No: of disks = 4 (4TB 15K SAS)
IOPS of a single 15K SAS disk = 175 - 210
RAID penalty = 4 (for RAID 5)
Read - Write ratio = 2:1 (say we have 66 % reads and 33 % writes)

From the above details :

Raw IOPS = 175 * 4 = 700
Functional IOPS = (700 * 0.33 / 4) + (700 * 0.66) = 519.75

Therefore, the maximum IOPS supported by this RAID array  = 520

The above calculation is entirely based on assumption that the read - write ration is 2:1. In real time scenarios it may vary depending on the type of workload. That means workload characterization is also important while calculating maximum IOPS value supported by your RAID array. It also depends on the type of RAID, as penalty will be different for different type of RAID. Disk type (SSD, SAS, SATA etc), disk RPM and number of disks also affects the total IOPS value.

From this we can conclude that, if your current IOPS usage is closer to the maximum IOPS supported, then you have to be very cautious as it may lead to I/O contentions due to heavy workloads causing high latency and performance degradation to your storage server.

Thursday, July 9, 2015

Server load balancing using KEMP Load Master

This article explains the basic configuration steps for load balancing multiple web servers using KEMP load balancer. In my setup, I've two web servers (INVLABSWEB01 and INVLABSWEB02) which are load balanced using a KEMP Load Master. For the purpose of testing I've used a virtual load master appliance (VLM-5000). After the installation is complete, you have to activate the license. Once you are done with that, you can get to the home page of the load master using a web browser as shown below.
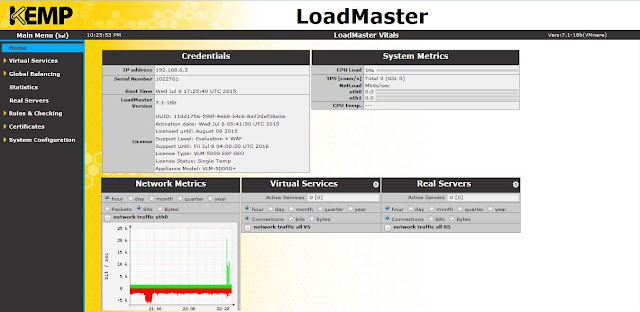
Home page

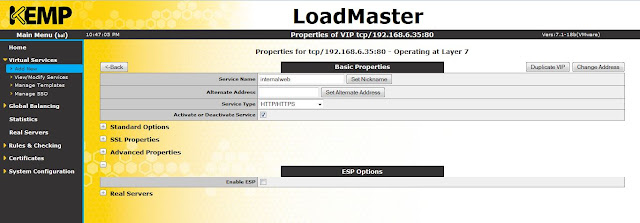
Now you have to add a virtual service. Click add new, provide a virtual address, give it a name, select a protocol and click add this virtual service.

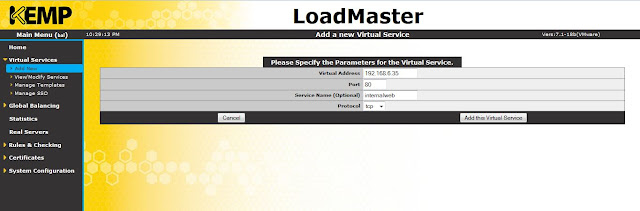
Add new virtual service

Select a service type. Check the box to activate the service.


Expand standard options. Select the options as shown below. If you don't select Force L7 option, then the virtual service will be forced to Layer 4. Transparency can be enabled or disabled depending on the use case.

If persistence mode is enabled, the same client will subsequently connect to the same real server depending the mode selected. And there is a timeout value, that can be set which determines for how long this particular connection is remembered.

Scheduling method determines the method by which the load master selects a real server for a particular service. There are several methods like round robin, weighted round robin, least connection, resource based (adaptive) etc. Here I have selected round robin.

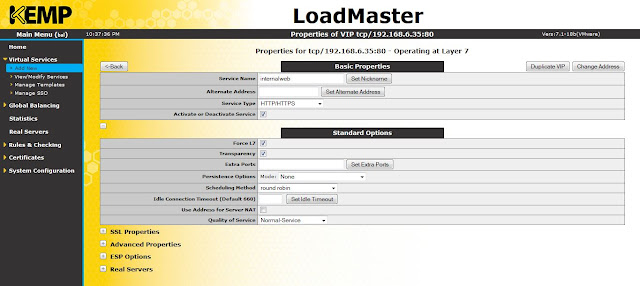
Basic properties and standard options

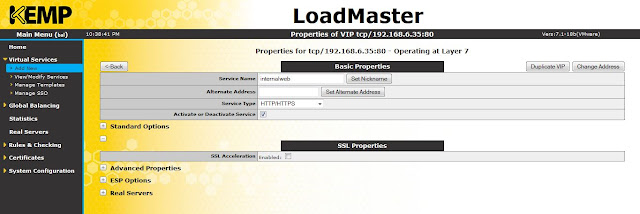
If you want to enable SSL acceleration, that can be done here.

SSL acceleration

Advanced options like enabling caching, compression, access control etc can be done here.
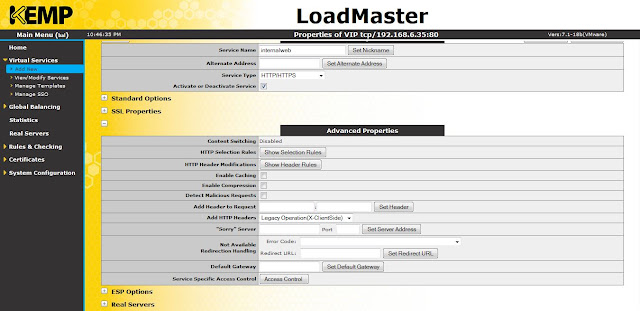
Advanced properties

Edge Security Pack (ESP) feature can be enabled in this option.

ESP feature

Click add new to add real servers to the virtual service (VS).
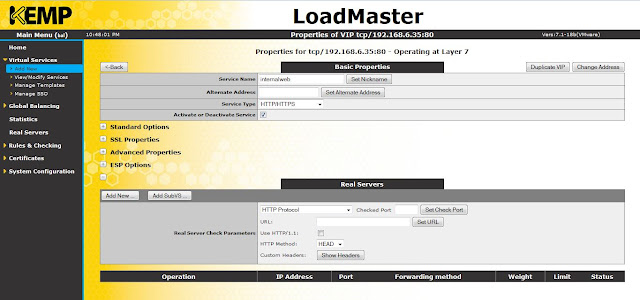
Real servers

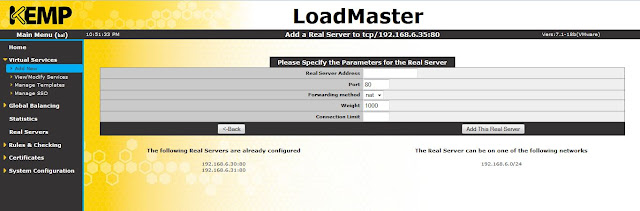
Provide real server address, port number and click add this real server.

Add real server

Similarly, I've added two web servers (192.168.6.30 and 192.168.6.31) here.

Real servers

Click on view/ modify services to view the VS that you have just created.
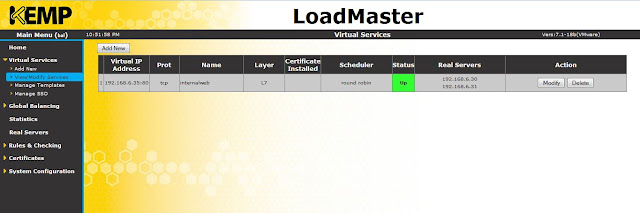
Virtual services

Click on real servers to view the real servers (INVLABSWEB01 and INVLABSWEB01).
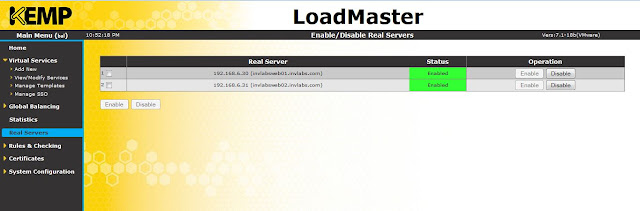
Real servers

Now, both of my web servers are load balanced. If you want to disable any of the servers from the load balancer, click disable button for the respective server.

Reference :
Kemp Technologies

Wednesday, July 8, 2015

Multi-Master Model and FSMO Roles

Consider an enterprise with multiple Domain Controllers (DC). A multi-master enabled database like Windows Active Directory (AD), allows to update changes to any DC in the enterprise. But, in this case there are chances/ possibilities of conflicts which may lead to problems. As AD role is not bound to a single DC, it is referred as a Flexible Single Master Operation (FSMO) role. Currently in Windows there are 5 FSMO roles. These roles prevent conflict operations and are vital for handling the smooth operation of AD as a multi-master system. Out of the 5 FSMO roles, there are 2 forest wide roles per forest and 3 domain wide roles in each domain.

Forest wide roles

-Schema master : controls all updates and modifications to the schema (eg : changes to attributes of an object).

-Domain naming master : responsible while adding or removing a domain  in a forest.


Domain wide roles

-RID master : allocates Relative IDs (RID) to DCs within a domain. When an object is created it will have an SID, which contains a domain SID (same for all SIDs created in the domain) and RID which is unique to the domain.

-PDC emulator : responsible for time sync, password changes etc.

-Infrastructure master : responsible for updating references from objects in its domain to objects in other domains. Infrastructure master role should not be on the same DC that is hosting the Global Catalogue (GC), unless there is only one DC in a domain. If they are on the same server, infrastructure master will not function, it will never find data that is out of date and so will never replicate changes to other DCs in a domain. If all DCs in the domain hosts a GC, then it doesn't matter which DC has the infrastructure master role as all DCs will be up to date due to the GC.


If you want to transfer FSMO roles from one DC to another, you can follow the below steps.

To check current FSMO status
Steps before role transfer
Use ntdsutil to transfer the roles. You have to connect to the server to which you want to transfer the role. Above screenshot explains this whole process.

Transfer roles
Click Yes to transfer the role and then transfer all roles one by one.

FSMO status after role transfer
Now all roles are moved from INVLABSDC02 to INVLABSDC01.