Saturday, June 22, 2024

vSphere with Tanzu using NSX-T - Part31 - Troubleshooting inaccessible TKC with expired control plane certs

In the course of managing multiple Tanzu Kubernetes Clusters (TKC), I encountered an unexpected issue: the control plane certificates had expired, preventing us from accessing the cluster using the kubeconfig file. To make matters worse, we were unable to SSH into the TKC control plane Virtual Machines (VMs) due to the vmware-system-user password expiring in accordance with STIG Hardening.

The recommended workaround for updating the vmware-system-user password expiry involves applying a specific daemonset on Guest Clusters. However, this approach requires access to the TKC using its admin kubeconfig file, which was unavailable due to the expired certificates.

Warning: In case of critical production issues that affect the accessibility of your Tanzu Kubernetes Cluster (TKC), it is strongly advised to submit a product support request to our team for assistance. This will ensure that you receive expert guidance and a timely resolution to help minimize the impact on your environment.

To resolve this issue, I followed an alternative workaround: I reset the root password of the TKC control plane VMs through the vCenter VM console, as outlined in this knowledge base article. Once the root password was reset, I was able to log directly into the TKC control plane VM using the VM console.


After gaining access to the TKC control plane VM, I proceeded to renew the control plane certificates using kubeadm, as detailed in this blog post. It's essential to apply this process to all control plane nodes in your cluster to ensure proper functionality.

root [ /etc/kubernetes ]# kubeadm certs check-expiration

root [ /etc/kubernetes ]# kubeadm certs renew all
[renew] Reading configuration from the cluster...
[renew] FYI: You can look at this config file with 'kubectl -n kube-system get cm kubeadm-config -o yaml'
[renew] Error reading configuration from the Cluster. Falling back to default configuration

certificate embedded in the kubeconfig file for the admin to use and for kubeadm itself renewed
certificate for serving the Kubernetes API renewed
certificate the apiserver uses to access etcd renewed
certificate for the API server to connect to kubelet renewed
certificate embedded in the kubeconfig file for the controller manager to use renewed
certificate for liveness probes to healthcheck etcd renewed
certificate for etcd nodes to communicate with each other renewed
certificate for serving etcd renewed
certificate for the front proxy client renewed
certificate embedded in the kubeconfig file for the scheduler manager to use renewed

Done renewing certificates. You must restart the kube-apiserver, kube-controller-manager, kube-scheduler and etcd, so that they can use the new certificates.

Although this workaround required some additional steps, it ultimately allowed us to regain access to our Tanzu Kubernetes Cluster and maintain its security and functionality.

Hope it was useful. Cheers!

Saturday, May 25, 2024

vSphere with Tanzu using NSX-T - Part30 - Troubleshooting inaccessible TKC with server pool members missing in the LB VS

Encountering issues with connectivity to your TKC apiserver/ control plane can be frustrating. One common problem we've seen is the kubeconfig failing to connect, often due to missing server pool members in the load balancer's virtual server (LB VS).

The Issue

The LB VS, which operates on port 6443, should have the control plane VMs listed as its member servers. When these members are missing, connectivity problems arise, disrupting your access to the TKC apiserver.

Troubleshooting steps

  1. Access the TKC: Use the kubeconfig to access the TKC.
    ❯ KUBECONFIG=tkc.kubeconfig kubectl get node
    Unable to connect to the server: dial tcp 10.191.88.4:6443: i/o timeout
    
    
  2. Check the Load Balancer: In NSX-T, verify the status of the corresponding load balancer (LB). It may display a green status indicating success.
  3. Inspect Virtual Servers: Check the virtual servers in the LB, particularly on port 6443. They might show as down.
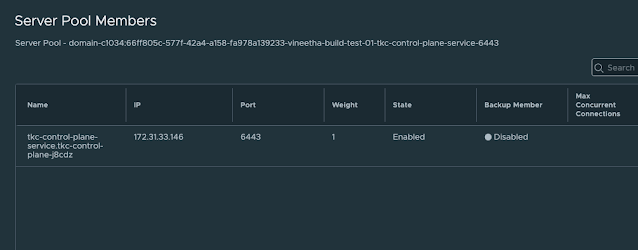
  4. Examine Server Pool Members: Look into the server pool members of the virtual server. You may find it empty.
  5. SSH to Control Plane Nodes: Attempt to SSH into the TKC control plane nodes.
  6. Run Diagnostic Commands: Execute diagnostic commands inside the control plane nodes to verify their status. The issue could be that the control plane VMs are in a hung state, and the container runtime is not running.
    vmware-system-user@tkc-infra-r68zc-jmq4j [ ~ ]$ sudo su
    root [ /home/vmware-system-user ]# crictl ps
    FATA[0002] failed to connect: failed to connect, make sure you are running as root and the runtime has been started: context deadline exceeded
    root [ /home/vmware-system-user ]#
    root [ /home/vmware-system-user ]# systemctl is-active containerd
    Failed to retrieve unit state: Failed to activate service 'org.freedesktop.systemd1': timed out (service_start_timeout=25000ms)
    root [ /home/vmware-system-user ]#
    root [ /home/vmware-system-user ]# systemctl status containerd
    WARNING: terminal is not fully functional
    -  (press RETURN)Failed to get properties: Failed to activate service 'org.freedesktop.systemd1'>
    lines 1-1/1 (END)lines 1-1/1 (END)
    
  7. Check VM Console: From vCenter, check the console of the control plane VMs. You might see specific errors indicating issues.
    EXT4-fs (sda3): Delayed block allocation failed for inode 266704 at logical offset 10515 with max blocks 2 with error 5
    EXT4-fs (sda3): This should not happen!! Data will be lost
    EXT4-fs error (device sda3) in ext4_writepages:2905: IO failure
    EXT4-fs error (device sda3) in ext4_reserve_inode_write:5947: Journal has aborted
    EXT4-fs error (device sda3) xxxxxx-xxx-xxxx: unable to read itable block
    EXT4-fs error (device sda3) in ext4_journal_check_start:61: Detected aborted journal
    systemd[1]: Caught <BUS>, dumped core as pid 24777.
    systemd[1]: Freezing execution.
    
  8. Restart Control Plane VMs: Restart the control plane VMs. Note that sometimes your admin credentials or administrator@vsphere.local credentials may not allow you to restart the TKC VMs. In such cases, decode the username and password from the relevant secret and use these credentials to connect to vCenter and restart the hung TKC VMs.
    ❯ kubectx wdc-01-vc17
    Switched to context "wdc-01-vc17".
    
    ❯ kg secret -A | grep wcp
    kube-system                                 wcp-authproxy-client-secret                                               kubernetes.io/tls                                  3      291d
    kube-system                                 wcp-authproxy-root-ca-secret                                              kubernetes.io/tls                                  3      291d
    kube-system                                 wcp-cluster-credentials                                                   Opaque                                             2      291d
    vmware-system-nsop                          wcp-nsop-sa-vc-auth                                                       Opaque                                             2      291d
    vmware-system-nsx                           wcp-cluster-credentials                                                   Opaque                                             2      291d
    vmware-system-vmop                          wcp-vmop-sa-vc-auth                                                       Opaque                                             2      291d
    
    ❯ kg secrets -n vmware-system-vmop wcp-vmop-sa-vc-auth
    NAME                  TYPE     DATA   AGE
    wcp-vmop-sa-vc-auth   Opaque   2      291d
    ❯ kg secrets -n vmware-system-vmop wcp-vmop-sa-vc-auth -oyaml
    apiVersion: v1
    data:
      password: aWAmbHUwPCpKe1Uxxxxxxxxxxxx=
      username: d2NwLXZtb3AtdXNlci1kb21haW4tYzEwMDYtMxxxxxxxxxxxxxxxxxxxxxxxxQHZzcGhlcmUubG9jYWw=
    kind: Secret
    metadata:
      creationTimestamp: "2022-10-24T08:32:26Z"
      name: wcp-vmop-sa-vc-auth
      namespace: vmware-system-vmop
      resourceVersion: "336557268"
      uid: dcbdac1b-18bb-438c-ba11-76ed4d6bef63
    type: Opaque
    
    
    ***Decrypt the username and password from the secret and use it to connect to the vCenter.
    ***Following is an example using PowerCLI:
    
    PS /Users/vineetha> get-vm gc-control-plane-f266h
    
    Name                 PowerState Num CPUs MemoryGB
    ----                 ---------- -------- --------
    gc-control-plane-f2… PoweredOn  2        4.000
    
    PS /Users/vineetha> get-vm gc-control-plane-f266h | Restart-VMGuest
    Restart-VMGuest: 08/04/2023 22:20:20	Restart-VMGuest		Operation "Restart VM guest" failed for VM "gc-control-plane-f266h" for the following reason: A general system error occurred: Invalid fault
    PS /Users/vineetha>
    PS /Users/vineetha> get-vm gc-control-plane-f266h | Restart-VM
    
    Confirm
    Are you sure you want to perform this action?
    Performing the operation "Restart-VM" on target "VM 'gc-control-plane-f266h'".
    [Y] Yes  [A] Yes to All  [N] No  [L] No to All  [S] Suspend  [?] Help (default is "Y"): Y
    
    Name                 PowerState Num CPUs MemoryGB
    ----                 ---------- -------- --------
    gc-control-plane-f2… PoweredOn  2        4.000
    
    PS /Users/vineetha>
    
  9. Verify System Pods and Connectivity: Once the control plane VMs are restarted, the system pods inside them will start, and the apiserver will become accessible using the kubeconfig. You should also see the previously missing server pool members reappear in the corresponding LB virtual server, and the virtual server on port 6443 will be up and show a success status.

Following these steps should help you resolve the connectivity issues with your TKC apiserver/control plane effectively.Ensuring that your load balancer's virtual server is correctly configured with the appropriate member servers is crucial for maintaining seamless access. This runbook aims to guide you through the process, helping you get your TKC apiserver back online swiftly.

Note: If required for critical production issues related to TKC accessibility I strongly recommend to raise a product support request.

Hope it was useful. Cheers!

Monday, April 22, 2024

Hugging Face - Part6 - Repo model xyz is gated and you must be authenticated to access it

Today, while working locally on my machine with mistralai/Mistral-7B-Instruct-v0.2 from Hugging Face, I encountered the following issue:


Cannot access gated repo for url https://huggingface.co/mistralai/Mistral-7B-Instruct-v0.2/resolve/main/config.json.
Repo model mistralai/Mistral-7B-Instruct-v0.2 is gated. You must be authenticated to access it.

OSError: You are trying to access a gated repo.
Make sure to have access to it at https://huggingface.co/mistralai/Mistral-7B-Instruct-v0.2.
403 Client Error. (Request ID: Root=1-66266e88-14951c696b21d7515a1dd516;df373d0d-261c-41ec-9142-bca579e082fc)

Cannot access gated repo for url https://huggingface.co/mistralai/Mistral-7B-Instruct-v0.2/resolve/main/config.json.
Access to model mistralai/Mistral-7B-Instruct-v0.2 is restricted and you are not in the authorized list. Visit https://huggingface.co/mistralai/Mistral-7B-Instruct-v0.2 to ask for access.

Upon conducting a Google search, I observed that certain Hugging Face repositories are restricted, requiring an access token for downloading models locally from these gated repositories.


Following are the discussion threads:

https://huggingface.co/google/gemma-7b/discussions/31

https://huggingface.co/mistralai/Mistral-7B-Instruct-v0.2/discussions/93

Therefore, if you intend to utilize this code for downloading and engaging with a Mistral model on your local system, you'll require a Hugging Face access token and must implement minor adjustments as outlined below:

import os

MODEL_ID = "mistralai/Mistral-7B-Instruct-v0.2"

access_token = os.environ["HFREADACCESS"]

tokenizer = AutoTokenizer.from_pretrained(MODEL_ID, token=access_token)

model = AutoModelForCausalLM.from_pretrained(MODEL_ID, token=access_token)


Note: You can pass the access token to the script as an environment variable. If this is running on Kubernetes as a pod, then you can consider creating a secret with the access token, inject the secret to the container as env using secretKeyRef.  

Next, you'll need to log in to Hugging Face, navigate to the model card you wish to download, and select "Agree and access repository". Once completed, executing the Python script should enable you to download the model locally and interact with it seamlessly. 

Hope it was useful. Cheers!

Saturday, April 20, 2024

Hugging Face - Part5 - Deploy your LLM app on Kubernetes

In our previous blog post, we explored the process of containerizing the Large Language Model (LLM) from Hugging Face using FastAPI and Docker. The next step is deploying this containerized application on a Kubernetes cluster. Additionally, I'll share my observations and insights gathered during this exercise. 


You can access the deployment yaml spec and detailed instructions in my GitHub repo: 

https://github.com/vineethac/huggingface/tree/main/6-deploy-on-k8s

Requirements

  • I am using a Tanzu Kubernetes Cluster (TKC).
  • Each node is of size best-effort-2xlarge which has 8 vCPU and 64Gi of memory.

❯ KUBECONFIG=gckubeconfig k get node
NAME                                             STATUS   ROLES                  AGE    VERSION
tkc01-control-plane-49jx4                        Ready    control-plane,master   97d    v1.23.8+vmware.3
tkc01-control-plane-m8wmt                        Ready    control-plane,master   105d   v1.23.8+vmware.3
tkc01-control-plane-z6gxx                        Ready    control-plane,master   97d    v1.23.8+vmware.3
tkc01-worker-nodepool-a1-pqq7j-dc6957d97-8gjn8   Ready    <none>                 21d    v1.23.8+vmware.3
tkc01-worker-nodepool-a1-pqq7j-dc6957d97-c9nfq   Ready    <none>                 21d    v1.23.8+vmware.3
tkc01-worker-nodepool-a1-pqq7j-dc6957d97-cngff   Ready    <none>                 21d    v1.23.8+vmware.3
❯

  • I've attached 256Gi storage volumes to the worker nodes that is mounted at /var/lib/containerd. The worker nodes on which these llm pods are running should have enough storage space. Otherwise you may notice these pods getting stuck/ restarting/ unknownstatus. If the worker nodes run out of the storage disk space, you will see pods getting evicted with warnings The node was low on resource: ephemeral-storage. TKC spec is available in the above mentioned Git repo.

Deployment

  • This works on a CPU powered Kubernetes cluster. Additional configurations might be required if you want to run this on a GPU powered cluster.
  • We have already instrumented the Readiness and Liveness functionality in the LLM app itself. 
  • The readiness probe invokes the /healthz endpoint exposed by the FastAPI app. This will make sure the FastAPI itself is healthy/ responding to the API calls.
  • The liveness probe invokes liveness.py script within the app. The script invokes the /ask endpoint which interacts with the LLM and returns the response. This will make sure the LLM is responding to the user queries. For some reason if the llm is not responding/ hangs, the liveness probe will fail and eventually it will restart the container.
  • You can apply the deployment yaml spec as follows:
❯ KUBECONFIG=gckubeconfig k apply -f fastapi-llm-app-deploy-cpu.yaml

Validation


❯ KUBECONFIG=gckubeconfig k get deploy fastapi-llm-app
NAME              READY   UP-TO-DATE   AVAILABLE   AGE
fastapi-llm-app   2/2     2            2           21d
❯
❯ KUBECONFIG=gckubeconfig k get pods | grep fastapi-llm-app
fastapi-llm-app-758c7c58f7-79gmq                               1/1     Running   1 (71m ago)    13d
fastapi-llm-app-758c7c58f7-gqdc6                               1/1     Running   1 (99m ago)    13d
❯
❯ KUBECONFIG=gckubeconfig k get svc fastapi-llm-app
NAME              TYPE           CLUSTER-IP      EXTERNAL-IP     PORT(S)          AGE
fastapi-llm-app   LoadBalancer   10.110.228.33   10.216.24.104   5000:30590/TCP   5h24m
❯

Now you can just do a curl against the EXTERNAL-IP of the above mentioned fastapi-llm-app service.

❯ curl http://10.216.24.104:5000/ask -X POST -H "Content-Type: application/json" -d '{"text":"list comprehension examples in python"}'

In our next blog post, we'll try enhancing our FastAPI application with robust instrumentation. Specifically, we'll explore the process of integrating FastAPI metrics into our application, allowing us to gain valuable insights into its performance and usage metrics. Furthermore, we'll take a look at incorporating traces using OpenTelemetry, a powerful tool for distributed tracing and observability in modern applications. By leveraging OpenTelemetry, we'll be able to gain comprehensive visibility into the behavior of our application across distributed systems, enabling us to identify performance bottlenecks and optimize resource utilization.

Stay tuned for an insightful exploration of FastAPI metrics instrumentation and OpenTelemetry integration in our upcoming blog post!

Hope it was useful. Cheers!

Saturday, March 30, 2024

Hugging Face - Part4 - Containerize your LLM app using Python, FastAPI, and Docker

In this exercise, our objective is to integrate an API endpoint for the Large Language Model (LLM) provided by Hugging Face using FastAPI. Additionally, we aim to encapsulate this whole application within a Docker container for portability and ease of deployment.

To achieve this, our project consists of several key components:

  • Large Language Model: Our application logic resides in model.py, where the model_pipeline function serves as the core engine behind our LLM interaction using LangChain. We've chosen the Mistral Instruct model from Hugging Face for this exercise.

  • API Endpoint Integration: We'll be incorporating an API endpoint using FastAPI to seamlessly interact with the LLM downloaded from Hugging Face. The main.py file implements the FastAPI framework, defining routes and endpoints. Specifically, the /ask endpoint invokes the model_pipeline function to interact with the Mistral Instruct model and generate a response.

  • Containerization: Utilizing the Dockerfile, we containerize our FastAPI LLM application. This ensures that our application, along with its dependencies, can be easily packaged and deployed across various environments.


You can access the Dockerfile, Python code, and other observations on my GitHub repository:

https://github.com/vineethac/huggingface/tree/main/5-containerize-llm-app

Deploy on Kubernetes as a pod

Deploying directly as a pod is not a preferred way. This is just for quick testing purpose! In the next blog post we will see how to deploy this as a Kubernetes deployment resource.

❯ KUBECONFIG=gckubeconfig k run hf-11 --image=vineethac/fastapi-llm-app:latest --image-pull-policy=Always
pod/hf-11 created
❯ KUBECONFIG=gckubeconfig kg po hf-11
NAME    READY   STATUS              RESTARTS   AGE
hf-11   0/1     ContainerCreating   0          2m23s
❯
❯ KUBECONFIG=gckubeconfig kg po hf-11
NAME    READY   STATUS    RESTARTS   AGE
hf-11   1/1     Running   0          26m
❯
❯ KUBECONFIG=gckubeconfig k logs hf-11 -f
Downloading shards: 100%|██████████| 3/3 [02:29<00:00, 49.67s/it]
Loading checkpoint shards: 100%|██████████| 3/3 [00:03<00:00,  1.05s/it]
INFO:     Will watch for changes in these directories: ['/fastapi-llm-app']
INFO:     Uvicorn running on http://0.0.0.0:5000 (Press CTRL+C to quit)
INFO:     Started reloader process [7] using WatchFiles
Loading checkpoint shards: 100%|██████████| 3/3 [00:11<00:00,  3.88s/it]
INFO:     Started server process [25]
INFO:     Waiting for application startup.
INFO:     Application startup complete.
2024-03-28 08:19:12 hf-11 watchfiles.main[7] INFO 3 changes detected
2024-03-28 08:19:48 hf-11 root[25] INFO User prompt: select head or tail randomly. strictly respond only in one word. no explanations needed.
2024-03-28 08:19:48 hf-11 root[25] INFO Model: mistralai/Mistral-7B-Instruct-v0.2
Setting `pad_token_id` to `eos_token_id`:2 for open-end generation.
2024-03-28 08:19:54 hf-11 root[25] INFO LLM response:  Head.
2024-03-28 08:19:54 hf-11 root[25] INFO FastAPI response:  Head.
INFO:     127.0.0.1:53904 - "POST /ask HTTP/1.1" 200 OK
INFO:     127.0.0.1:55264 - "GET / HTTP/1.1" 200 OK
INFO:     127.0.0.1:43342 - "GET /healthz HTTP/1.1" 200 OK

For a quick validation, I did exec into the pod and curl against the exposed APIs.

❯ KUBECONFIG=gckubeconfig k exec -it hf-11 -- bash
root@hf-11:/fastapi-llm-app#
root@hf-11:/fastapi-llm-app# curl -d '{"text":"select head or tail randomly. strictly respond only in one word. no explanations needed."}' -H "Content-Type: application/json" -X POST http://localhost:5000/ask
{"response":" Head."}root@hf-11:/fastapi-llm-app#
root@hf-11:/fastapi-llm-app# curl localhost:5000
"Welcome to FastAPI for your local LLM!"root@hf-11:/fastapi-llm-app#
root@hf-11:/fastapi-llm-app#
root@hf-11:/fastapi-llm-app# curl localhost:5000/healthz
{"Status":"OK"}root@hf-11:/fastapi-llm-app#
root@hf-11:/fastapi-llm-app#


You can also use kubectl expose command to create a service for this pod and then port forward to it and then curl to it. 

Hope it was useful. Cheers!

Thursday, March 28, 2024

Generative AI and LLMs Blog Series

In this blog series we will explore the fascinating world of Generative AI and Large Language Models (LLMs). We delve into the latest advancements in AI technology, focusing particularly on LLMs, which have revolutionized various fields, including natural language processing and text generation.

Throughout this series, we will discuss LLM serving platforms such as Ollama and Hugging Face, providing insights into their capabilities, features, and applications. I will also guide you through the process of getting started with LLMs, from setting up your development/ test environment to deploying these powerful models on Kubernetes clusters. Additionally, we'll demonstrate how to effectively prompt and interact with LLMs using frameworks like LangChain, empowering you to harness the full potential of these cutting-edge technologies.

Stay tuned for insightful articles, and hands-on guides that will equip you with the knowledge and skills to unlock the transformative capabilities of LLMs. Let's explore the future of AI together!

Image credits: designer.microsoft.com/image-creator


Ollama

Part1 - Deploy Ollama on Kubernetes

Part2 - Prompt LLMs using Ollama, LangChain, and Python

Part3 - Web UI for Ollama to interact with LLMs

Part4 - Vision assistant using LLaVA


Hugging Face

Part1 - Getting started with Hugging Face

Part2 - Code generation with Code Llama Instruct

Part3 - Inference with Code Llama using LangChain

Part4 - Containerize your LLM app using Python, FastAPI, and Docker

Part5 - Deploy your LLM app on Kubernetes 

Part6 - LLM app observability <coming soon>


Friday, February 23, 2024

Hugging Face - Part3 - Inference with Code Llama using LangChain

In the field of understanding and working with human language (NLP), Hugging Face is a key platform that provides many pre-trained models for different tasks. With Transformers, LangChain, and Python developers can easily use Hugging Face's models on their own computers for quick processing. Using LangChain offers a streamlined and user-friendly approach to tapping into the capabilities of pre-trained language models. In this blog post we focus on how to inference with Code Llama - Instruct model from Hugging Face locally using LangChain. 


You can access the Python script in my GitHub repository:
https://github.com/vineethac/huggingface/tree/main/4-codellama_with_langchain


To initiate inference with Code Llama, developers can start by specifying the desired model using its identifier, such as MODEL_ID = "codellama/CodeLlama-7b-Instruct-hf". Transformers simplifies the process by providing a unified interface with the familiar Python programming language, allowing users to effortlessly initialize the model and tokenizer.

Once the model and tokenizer are set up, developers can leverage LangChain's HuggingFacePipeline class to create a text generation pipeline. This pipeline, defined with parameters like max_new_tokens and repetition_penalty, becomes a powerful tool for local inferencing. By combining this pipeline with LangChain's PromptTemplate, developers can easily construct prompts and invoke the entire chain to generate responses. This streamlined process facilitates local inferencing with Code Llama, empowering developers to leverage Hugging Face's models for a wide range of natural language processing tasks in their Python applications. 


Example

root@hf-3:/codellama# python3 codellama_langchain.py
tokenizer_config.json: 100%|█████████████████████████████████████████████████████████| 749/749 [00:00<00:00, 3.57MB/s]
tokenizer.model: 100%|█████████████████████████████████████████████████████████████| 500k/500k [00:00<00:00, 4.48MB/s]
tokenizer.json: 100%|████████████████████████████████████████████████████████████| 1.84M/1.84M [00:00<00:00, 6.13MB/s]
special_tokens_map.json: 100%|███████████████████████████████████████████████████████| 411/411 [00:00<00:00, 1.86MB/s]
config.json: 100%|███████████████████████████████████████████████████████████████████| 646/646 [00:00<00:00, 3.40MB/s]
model.safetensors.index.json: 100%|██████████████████████████████████████████████| 25.1k/25.1k [00:00<00:00, 68.2MB/s]
model-00001-of-00002.safetensors: 100%|██████████████████████████████████████████| 9.98G/9.98G [01:50<00:00, 90.0MB/s]
model-00002-of-00002.safetensors: 100%|██████████████████████████████████████████| 3.50G/3.50G [00:39<00:00, 89.5MB/s]
Downloading shards: 100%|███████████████████████████████████████████████████████████████| 2/2 [02:30<00:00, 75.16s/it]
Loading checkpoint shards: 100%|████████████████████████████████████████████████████████| 2/2 [00:05<00:00, 2.86s/it]
generation_config.json: 100%|█████████████████████████████████████████████████████████| 116/116 [00:00<00:00, 110kB/s]

Ask codellama: given two unsorted integer lists. merge the two lists, sort the merged list, and find median using python. consider the length of the merged list while finding the median value.
Setting `pad_token_id` to `eos_token_id`:2 for open-end generation.
Here is a possible solution to the problem:

def merge_and_find_median(list1, list2):
# Merge the two lists
merged_list = list1 + list2

# Sort the merged list
merged_list.sort()

# Find the median value
if len(merged_list) % 2 == 0:
# Even number of elements in the merged list
median = (merged_list[len(merged_list) // 2 - 1] + merged_list[len(merged_list) // 2]) / 2
else:
# Odd number of elements in the merged list
median = merged_list[len(merged_list) // 2]

return median

Explanation:

* First, we merge the two lists by concatenating them.
* Then, we sort the merged list using the `sort()` method.
* Next, we check whether the length of the merged list is even or odd. If it's even, we take the average of the middle two elements of the list. If it's odd, we simply take the middle element as the median.
* Finally, we return the median value.

Note that this solution assumes that both input lists are sorted in ascending order. If they are not sorted, you may need to add additional code to sort them before merging and finding the median.</s>

Ask codellama: /bye
root@hf-3:/codellama#


Hope it was useful. Cheers!