Tuesday, December 3, 2019

Working with iDRAC9 Redfish API using PowerShell - Part 3

In this article, I will explain how to access the iDRAC Redfish API using session-based authentication.


[CmdletBinding()]
param(
    [Parameter(Mandatory)]
    [String]$idrac_ip
)

#To fix the connection issues to iDRAC REST API
add-type @"
    using System.Net;
    using System.Security.Cryptography.X509Certificates;
    public class TrustAllCertsPolicy : ICertificatePolicy {
    public bool CheckValidationResult(
        ServicePoint srvPoint, X509Certificate certificate,
        WebRequest request, int certificateProblem) {
        return true;
        }
    }
"@

[System.Net.ServicePointManager]::CertificatePolicy = New-Object TrustAllCertsPolicy
[System.Net.ServicePointManager]::SecurityProtocol = [System.Net.SecurityProtocolType]::Tls12 -bor [System.Net.SecurityProtocolType]::Tls11

#Get iDRAC creds
$Credentials = Get-Credential -Message "Enter iDRAC Creds"

$creds_json = '{"UserName": "$($Credentials.UserName)", "Password": "$($Credentials.GetNetworkCredential().Password)"}'
$creds_json = $ExecutionContext.InvokeCommand.ExpandString($creds_json)

#Using Invoke-WebRequest
try {
    $result1 = Invoke-WebRequest -Uri "https://$($idrac_ip)/redfish/v1/Sessions " -Method POST -ContentType 'application/json' -Headers @{"Accept"="application/json"} -Body $creds_json -Verbose
}
catch {
    Write-Error -Message "Failed to invoke the API! Incorrect creds!"
    $PSCmdlet.ThrowTerminatingError($PSItem)
}

$auth_head = @{
"X-Auth-Token" = $result1.Headers.'X-Auth-Token'
"accept" = "application/json" }

#URI to get basic system info
$u1 = "https://$($idrac_ip)/redfish/v1/Systems/System.Embedded.1"

#Using Invoke-RestMethod
try {
    $output = Invoke-RestMethod -Uri $u1 -Method Get -Headers $auth_head -ContentType 'application/json' -Verbose
}
catch {
    Write-Error -Message "Failed to invoke the API! Incorrect creds!"
    $PSCmdlet.ThrowTerminatingError($PSItem)
}

Write-Output "`nBasic System Info:" $output


Hope it was useful. Cheers!

Related posts

Working with iDRAC9 Redfish API using PowerShell - Part 1

Working with iDRAC9 Redfish API using PowerShell - Part 2


References

iDRAC9 Redfish API guide

Friday, November 1, 2019

vRealize Operations Manager 7.5 - Part9 - Dashboard sharing

The ability to share dashboards using URLs without login requirements is a very useful feature starting from vROps 7.0.

  • Select the dashboard that you want to share and click on the share icon as marked in the screenshot below.


  • Click on "COPY LINK" and provide it to whoever necessary. You can also set link expiry to 1 Day, 1 Week, 1 Month, 3 Months, or Never Expire as per your requirement.

  • To unshare a link, enter the link that you want to unshare as shown below and click "UNSHARE".

Hope it was useful. Cheers!


Related posts


Wednesday, October 23, 2019

Docker 101 - Part4 - Creating images using dockerfile

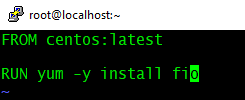
In this article, I will briefly explain how to create your own image using Dockerfile. For example, I will be creating an FIO image. FIO is a storage stress test tool and this image can be used for container storage IO benchmarking/ testing.

  • Login to the CentOS docker host.
  • Create a file named "Dockerfile".
  • # vi Dockerfile
  • Add the below two lines and save it.

  • # docker build ./

  • Once the build is complete, it returns the IMAGE ID as shown below.
  • You can use the "docker tag" command to mention a repository and tag to the image. 

  • At this stage, as shown in the above screenshot, the FIO image is created with repository "vineethac/fio_image" and tagged as "latest".
  • You can run this image as given below.

  • # docker run -dit --name FIO_test01 --mount source=disk_data,target=/vol vineethac/fio_image fio --name=RandomReadTest1 --readwrite=randread --rwmixwrite=0 --bs=4k --invalidate=1 --direct=1 --filename=/vol/newfile --size=10g --time_based --runtime=300 --ioengine=libaio --numjobs=2 --iodepth=1 --norandommap --randrepeat=0 --exitall


  • The above command will start a container with FIO application running inside it. FIO will use "/vol/newfile" for IO tests. "/vol" is using "disk_data" directory which is inside "/var/lib/docker/volumes". Once the test is complete, the container will exit.

Hope it was useful. Cheers!

Related posts


Docker 101 - Part3 - Persisting data using volumes

Docker 101 - Part2 - Basic operations

Docker 101 - Part1 - Installation


Docker 101 - Part3 - Persisting data using volumes

In this article, I will explain how to use Docker volumes for persisting data generated by and used by containers with --mount flag. Volumes use the Docker area and it can be found under /var/lib/docker/volumes/ directory of the Docker host.

Example:

docker run -dit --name centos_volume_test --mount source=data_volume01,target=/datavol01 centos sleep 1800

The above command will run a CentOS container and mounts a volume at /datavol01 inside the container. It uses source /var/lib/docker/volumes/data_volume01. The below screenshot shows the necessary steps to verify it.


Hope it was useful. Cheers!

Related posts


Docker 101 - Part2 - Basic operations

Docker 101 - Part1 - Installation


References


Friday, October 18, 2019

Docker 101 - Part2 - Basic operations

In this article, I will walk you through basic Docker commands and how to work with it for creating, managing, and monitoring Docker containers.

Docker version and info


#docker version


#docker info


Default directory for Docker


#cd /var/lib/docker


Pull images


#docker pull centos:latest 


List images


#docker images


Create bridge network


#docker network create -d bridge --subnet 10.0.0.0/24 ps-bridge

List all bridge networks


#brctl show

Inspect a network 


#docker network ls
#docker network inspect <name>


Run a container


#docker run -dt --name centos_test --network ps-bridge centos sleep 900


SSH into a container


#docker exec -it <name> sh


List running containers


#docker ps


List all containers


#docker ps -a

List container stats


#docker stats


Stop a container


#docker stop <Container ID>


Remove a container


#docker rm <Container ID>

Remove an image


#docker rmi <REPOSITORY:TAG>


Hope it was useful. Cheers!

Related posts


References


Docker 101 - Part1 - Installation

Enter cloud native! In this article, I will briefly explain how to build a virtual Docker host. Here I am installing Docker on a CentOS 7.4 virtual machine running on ESXi 6.5 which is part of a VMware vSAN cluster.

Prerequisites:
  • Deploy a basic CentOS 7.4 VM
  • Assign IP address and ensure the VM has internet connectivity
  • You should have root creds

Installation:
  • SSH to the CentOS VM as root
  • yum check-update
  • yum install -y yum-utils device-mapper-persistent-data lvm2
  • yum-config-manager --add-repo https://download.docker.com/linux/centos/docker-ce.repo
  • yum install docker-ce
  • systemctl start docker
  • systemctl enable docker
  • systemctl status docker

Verify version:
  • docker version

Run your first container:
  • docker run hello-world

Hope it was useful. Cheers! In the next part, I will explain basic Docker commands and operations.

Related posts


References